Manuals for other products and services
This is the multi-page printable view of this section. Click here to print...
For suitable output, we recommend to use Google Chrome (15+) or Microsoft Edge (79+).
Miscellaneous
Miscellaneous items
- 1: TWELITE PAL/CUE/ARIA Script
- 1.1: How to Use
- 1.2: Source Files
- 1.2.1: PAL_Script.py
- 1.2.2: Main_user.py
- 1.2.3: MNLib
- 1.2.3.1: apppal.py
- 1.2.3.2: appbase.py
- 1.2.3.3: mwSerial.py
- 1.2.3.4: parseFmt.py parseFmt_*.py
- 2: TWE Programmer
1 - TWELITE PAL/CUE/ARIA Script
Python script for processing data from devices such as TWELITE SENSE PAL
Please consider using the new library MWings for Python.
It supports TWELITE devices other than the PAL series and can output data in JSON or pandas DataFrame formats.
The TWELITE PAL Script is a sample script to interpret and log data from TWELITE SENSE PAL (Sensor PAL), TWELITE CUE (acceleration and magnetic sensors), and TWELITE ARIA (temperature/humidity and magnetic sensors).
This application is provided for reference purposes.
- This application and document are provided without warranty.
- Specifications may change without notice.
- Subject to the MONOWIRELESS Software License Agreement (MW-SLA-1J/E).
1.1 - How to Use
How to use the TWELITE PAL Script
Instructions for using TWELITE PAL with MONOSTICK.
Preparing Your PC
Extract the downloaded archive to an easy-to-find folder (for example, C:).
Download and install Anaconda suitable for your PC environment from the following webpage.
https://www.anaconda.com/download/
If you do not want to install Anaconda, refer to “If Not Installing Anaconda”.Open Anaconda Prompt and run the following command to install pyserial. (On Windows, open Anaconda Prompt from the Start menu → Anaconda3.)
pip install pyserial
If Not Installing Anaconda
The installation steps below are an example for Windows OS. Please refer to the documentation of each library and install the necessary software and libraries.
Download and install the latest version of Python from the following page.
https://www.python.org/downloads/
At that time, make sure to check the box surrounded by the frame in the figure below
or add Python’s installation directory to your PATH.
Open Command Prompt and enter the following command to install pyserial.
pip install pyserial
Preparing TWELITE PAL
- Connect SENSE PAL to BLUE PAL/RED PAL.
- Insert a coin cell battery (CR2032) into the battery holder of BLUE PAL/RED PAL.
Preparing MONOSTICK
- Rewrite the MONOSTICK application (App_PAL-Parent-xxx-MONOSTICK.bin).
- Reset MONOSTICK or reconnect it to the USB port.
Running the Script
If the COM port of MONOSTICK is COM6, run the following command in Anaconda Prompt to output data as shown below. (It cannot be started if Teraterm is connected.)
cd C:\PAL_Script
python PAL_Script.py -t COM6
*** MONOWIRELESS App_PAL_Viewer 1.1.0 ***
  *** Open COM6 ***
ArriveTime : 2021/03/05 09:43:28.880
LogicalID : 1
EndDeviceSID : 10B6465
RouterSID : No Relay
LQI : 180 (-35.50 [dBm])
…
To exit the script, press Ctrl+C in Anaconda Prompt.
Script Arguments
You can use the following arguments when running the script.
Argument: -h
Function: Display a list of command line arguments
Example: python PAL_Script.py -h
Argument: -t
Function: Specify the port name used by MONOSTICK
Setting: MONOSTICK port name
Default: COM3 on Windows, /dev/ttyUSB0 on Linux, etc.
Example: python PAL_Script.py -t COM6
Argument: -b
Function: Specify the baud rate of the port used by MONOSTICK
Setting: MONOSTICK baud rate
Default: 115200
Example: python PAL_Script.py -t COM6 -b 115200
Argument: -l
Function: Output log in CSV format
Example: python PAL_Script.py -t COM6 -l
Note: A CSV file will be generated in the same directory.
The file name will be AppPAL_SerialNumber_PAL_YYYYMMDD.csv
The CSV file columns are explained in the table below.
| Header | Description | Unit |
|---|---|---|
| LogicalID | Logical Device ID of the end device | - |
| EndDeviceSID | Serial number of the end device | - |
| LQI | LQI | - |
| Power | Power supply voltage | mV |
| ADC* | Voltage | mV |
| HALLIC | Magnetic sensor state | - |
| Temperature | Temperature | ℃ |
| Humidity | Humidity | % |
| Illuminance | Illuminance | Lux |
AccelerationX | Acceleration | g |
1.2 - Source Files
Source files for the TWELITE PAL Script
Operating Environment
Operation has been confirmed in the following environment.
- Windows 10 Build 1809
- Python 3.6.4
- pyserial 3.4
- Python 3.6.4
1.2.1 - PAL_Script.py
Execution script for TWELITE PAL Script
This script initializes and runs the code that reads data from MONOSTICK and outputs the interpreted data to standard output.
How to Read Data
The example below checks whether data has been received from MONOSTICK and, if so, passes it to the Main() function.
from apppal import AppPAL

...

def mainloop(PAL):
	# Check if the user-defined Main function can be imported.
	try:
		from Main_user import Main
	except:
		mainflag = False
	else:
		mainflag = True

	# Check whether data is available
	if PAL.ReadSensorData():
		if mainflag:
			# If Main was imported, pass the PAL object to Main()
			Main(PAL)
		else:
			# If Main was not imported, display the data on the console.
			PAL.ShowSensorData()

...

if __name__ == '__main__':
...

	try:
		PAL = AppPAL(port=options.target, baud=options.baud, tout=0.05, sformat=options.format, autolog=bEnableLog, err=bEnableErrMsg, stdinput=options.stdinp, Logfilename=options.file)
	except:
		print("Cannot open \"AppPAL\" class...")
		exit(1)

	while True:
		try:
			mainloop(PAL)
		except KeyboardInterrupt:
			break

	del PAL
First, create an AppPAL object. Since serial port settings are configured at instantiation, pass them as arguments.
PPAL = AppPAL(port=options.target, baud=options.baud, tout=0.05, sformat=options.format, autolog=bEnableLog, err=bEnableErrMsg, stdinput=options.stdinp, Logfilename=options.file)
Next, in the mainloop(), call ReadSensorData() to check whether serial data has arrived. If it returns True, pass the interpreted result to Main().
def mainloop(PAL):
	# Check if the user-defined Main function can be imported.
	try:
		from Main_user import Main
	except:
		mainflag = False
	else:
		mainflag = True

	# Check whether data is available
	if PAL.ReadSensorData():
		if mainflag:
			# If Main was imported, pass the PAL object to Main()
			Main(PAL)
		else:
			# If Main was not imported, display the data on the console.
			PAL.ShowSensorData()
For details on the dictionary structure received, refer to this section.
1.2.2 - Main_user.py
This code describes the processing performed after reading data in the TWELITE PAL Script
This code contains the main processing performed after reading data.
Here, it outputs the interpreted data to the console when data is received.
# Write the desired processing inside this function
def Main(PAL=None):
	# Check if the passed variable is an instance of AppPAL
	if isinstance(PAL, AppPAL):
		sns_data = PAL.GetDataDict()

		# Reception time
		print('Receive Time: ', end='')
		if isinstance(sns_data['ArriveTime'], datetime.datetime):
			print(sns_data['ArriveTime'].strftime('%Y/%m/%d %H:%M:%S') + '.%03d'%(sns_data['ArriveTime'].microsecond/1000))
		else:
			print(sns_data['ArriveTime'])

		# Logical Device ID
		print('Logical ID: 0x%02X'%sns_data['LogicalID'])
		# Serial Number
		print('Serial ID: 0x' + sns_data['EndDeviceSID'])
		# Power Voltage
		print('Power: %d mV' % sns_data['Power'])

		# Check the sensor name
		sname  = PAL.GetSensorName()

		# If the sensor name is PAL, output model name such as PAL/ARIA/CUE
		if sname == 'PAL':
			pid = PAL.GetPALName()
			print('Sensor: ' + pid )
		else:
			print('Sensor: ' + sname )

		# Analog sensor mode (App_Tag)
		if sname == 'Analog':
			print('ADC1: %d mV'%sns_data['ADC1'])
			print('ADC2: %d mV'%sns_data['ADC2'])
		else:
			# Hall IC
			if 'HALLIC' in sns_data.keys():
				print('HALLIC: %d'%sns_data['HALLIC'])

			# Temperature
			if 'Temperature' in sns_data.keys():
				print('Temperature: %.02f degC'%sns_data['Temperature'])

			# Humidity
			if 'Humidity' in sns_data.keys():
				print('Humidity: %.02f %%'%sns_data['Humidity'])

			# Illuminance
			if 'Illuminance' in sns_data.keys():
				print('Illuminance: %f lux'%sns_data['Illuminance'])

			# Pressure
			if 'Pressure' in sns_data.keys():
				print('Pressure: %f hPa'%sns_data['Pressure'])

			# Acceleration
			if 'AccelerationX' in sns_data.keys():
				print('X: ', end='')
				print(sns_data['AccelerationX'])
				print('Y: ', end='')
				print(sns_data['AccelerationY'])
				print('Z: ', end='')
				print(sns_data['AccelerationZ'])

			# Gyroscope
			if 'Roll' in sns_data.keys():
				print('Roll: ', end='')
				print(sns_data['Roll'])
				print('Pitch: ', end='')
				print(sns_data['Pitch'])
				print('Yaw: ', end='')
				print(sns_data['Yaw'])

			# Color sensor
			if 'Red' in sns_data.keys():
				print('Red: ', end='')
				print(sns_data['Red'])
				print('Green: ', end='')
				print(sns_data['Green'])
				print('Blue: ', end='')
				print(sns_data['Blue'])
				print('IR: ', end='')
				print(sns_data['IR'])


		print()
1.2.3 - MNLib
Part of the TWELITE PAL Script responsible for reading and interpreting serial data
This folder contains the part of the TWELITE PAL Script responsible for reading and interpreting serial data.
1.2.3.1 - apppal.py
Class that interprets the read byte sequence and stores it in a dictionary object
Class AppPAL
This class inherits from AppBase, interprets the received payload, converts it into usable data, and stores it in a dictionary object.
Parameters for Definition
Parameters with default values are optional.
| Name | Type | Default | Description |
|---|---|---|---|
| port | string | None | Name of the serial port to open e.g., COM3, /dev/ttyUSB0 |
| baud | int | 115200 | Baud rate |
| tout | float | 0.1 | Timeout duration (in seconds) for serial communication |
| sformat | string | Ascii | This value is fixed to Ascii |
| autolog | boolean | False | If True, automatically logs interpreted payload to a CSV file |
| err | boolean | False | If True, outputs error messages |
ReadSensorData()
This method reads the payload and interprets it according to the TWELITE PAL parent format.
Interprets the TWELITE PAL parent format (ASCII format only). Most of the interpretation follows this specification.
Parameters
None
Return Value
If data is successfully read: True
If data could not be read: False
The keys stored in the dictionary object are as follows.
For details on the meaning of EventID and related data, please refer to this document.
| Key | Type | Description |
|---|---|---|
| ArriveTime | datetime | Time the payload was received |
| LogicalID | int | Logical device ID of the end device |
| EndDeviceSID | int | Serial number of the end device |
| RouterSID | int | Serial number of the first repeater to receive the packet (0x80000000 if the parent directly receives the packet) |
| LQI | int | Link quality of received signal |
| SequenceNumber | int | Sequence number incremented with each transmission Starts from 1, rolls over to 0 after 65535 |
| Sensor | int | Sensor type (fixed at 0x80) |
| PALID | int | PAL board ID |
| PALVersion | int | PAL board version |
| HALLIC | int | State of the Hall IC |
| Temperature | float | Temperature (degC) |
| Humidity | float | Humidity (%) |
| Illuminance | int | Illuminance (lux) |
| AccelerationX | list,float | Acceleration on X-axis (g) |
| AccelerationY | list,float | Acceleration on Y-axis (g) |
| AccelerationZ | list,float | Acceleration on Z-axis (g) |
| SamplingFrequency | int | Sampling frequency of acceleration |
| EventID | list,int | Cause of event and event ID |
| WakeupFactor | list,int | Data on wakeup factors, etc. |
OutputCSV()
Outputs the dictionary object to a CSV file.
Parameters
None
Return Value
None
1.2.3.2 - appbase.py
Base class for serial data interpretation
class AppBase
This code provides a base class implementing common functions required for all TWELITE APPS. It includes operations such as opening and closing the serial port, reading serial data, and writing to log files.
The derived class apppal.py interprets the received byte sequence, stores the data in a dictionary object, and returns it to the main function.
GetDataDict()
Interprets the payload and returns a dictionary object containing the data.
Parameters
None
Return Value
| Type | Description |
|---|---|
| Dict | Dictionary object containing the interpreted payload data |
1.2.3.3 - mwSerial.py
Class for managing serial port operations
Class MWSerial
This class manages serial port operations such as reading and writing.
Parameters for Definition
Initial values are set and do not need to be specified.
| Name | Type | Default | Description |
|---|---|---|---|
| port | string | None | Name of the serial port to open e.g., COM3, /dev/ttyUSB0 |
| baud | int | 115200 | Baud rate |
| timeout | float | 0.1 | Timeout duration for serial communication (in seconds) |
| parity | int | serial.PARITY_NONE | Specify parity |
| stop | int | 1 | Stop bit |
| byte | int | 8 | Data bit length |
| rtscts | int | 0 | Set to 1 to enable RTS and CTS |
| dsrdtr | int | 0 | Set to 1 to enable DSR and DTR |
| mode | string | Ascii | This value is fixed to Ascii |
SerialSelect
Searches for serial ports connected to the PC and prompts the user to select one.
If only one port is available, it is automatically selected.
If no ports are found, None is returned.
If a port name is passed as an argument, that port will be used.
Parameters
| Name | Type | Default | Description |
|---|---|---|---|
| portname | string | None | Name of the serial port to open (e.g., COM3, /dev/ttyUSB0) Leave unspecified for automatic selection. |
Return Value
None
1.2.3.4 - parseFmt.py parseFmt_*.py
TWELITE serial format parser
class FmtBase
The base class for format parsers, defining common procedures. Subclasses such as FmtAscii (ASCII format) and FmtBinary (binary format) inherit from this.
Format parsers are designed for serial input. For ASCII format, interpretation is done per line; for binary format, it is done byte by byte. Once the input sequence satisfies the defined header, footer, and checksum, the parsing is considered complete and the content excluding the header and footer (the payload) is stored.
process(c)
Interprets the input string. After interpretation, if is_complete() returns true, the interpretation succeeded and the payload can be obtained via get_payload(). Since subsequent process() calls may invalidate the payload, it should be retrieved immediately after completion.
To interpret another sequence, call process() again.
Parameters
| Parameter | Description |
|---|---|
c | The input sequence to interpret. Supports both single-byte and sequence-level inputs. For single-byte input: int (ASCII code), str, bytes, or list of length 1. For sequence-level input: list, str, or bytes representing a complete sequence. Sequences that are incomplete or contain multiple series cannot be processed. |
Return Value
None
is_comp()
Called after process() to indicate whether format interpretation is complete. If true, the payload can be retrieved using get_payload() or get_payload_in_str().
Because subsequent calls to
process() may initialize or overwrite the internal payload storage, copy the data immediately.Parameters
None
Return Value
| Value | Description |
|---|---|
true | Interpretation succeeded. Payload is available. |
false | Interpretation failed or is incomplete. |
get_payload()
Returns the payload.
Parameters
None
Return Value
Returns the payload portion excluding header and footer as a list of bytes.
reinit()
Explicitly resets the internal state.
Parameters
None
Return Value
None
Other methods
Several internal-use methods are defined. Please refer to the source code for details.
Code Examples
Sequence-level Interpretation
Interprets a str sequence a and stores the payload in pay. For example, pay will contain [ 0x78, 0x80, 0x01, ... , 0x00 ].
import parseFmt_Ascii

fmta=parseFmt_Ascii.FmtAscii()
a = ':7880010F0F0380030002800200DF'
pay = []

fmta.process(a)

if fmta.is_comp():
    pay = fmta.get_payload()
Byte-by-byte Interpretation
For binary sequence b, parsing is performed one byte at a time using the process() method. When the end byte 0x04 is input, parsing completes and the payload is stored in pay.
import parseFmt_Binary

fmtb=parseFmt_Binary.FmtBinary()
b = [0xA5, 0x5A, 0x80, 0x05, 0x78, 0x00, 0x11, 0x22, 0x33, 0x78, 0x04]
pay = []

for x in b:
  fmtb.process(x)

  if fmtb.is_comp():
    pay = fmtb.get_payload()
    break
2 - TWE Programmer
A TWELITE flashing and terminal tool for Windows
TWE Programmer is a utility for flashing firmware to TWELITE series wireless microcontrollers and connecting to the terminal.
Consider using the TWELITE STAGE App, which includes a build function and supports multiple platforms.
Installation
Download TWE-Programmer.exe from our website and copy it to any location.
Operating Environment
Developed and tested under the following environment:
| Version | OS | .NET |
|---|---|---|
| v3.8.1 | Windows 10 Pro 1809 | v4.0.30319 |
Operation has also been reported to succeed on Windows 11.
Dependencies
FTDI Driver
You may need to install the FTDI serial converter IC driver used in TWELITE R and MONOSTICK.
Launch
Launch TWEProgrammer.exe by double-clicking it, like any standard application.
The software searches for MONOSTICK or TWELITE R on startup. You cannot choose which device to open if multiple are connected. If it fails to launch due to too many connected devices on the USB bus, try disconnecting others.
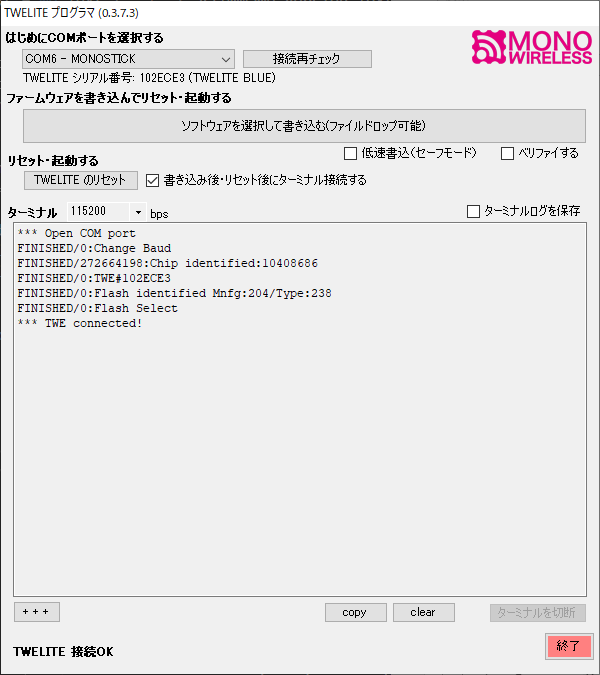
Example screen after startup
Flashing Firmware
Selecting the COM Port
Select the COM port connected to TWELITE R or MONOSTICK with a TWELITE module.
If TWELITE is properly recognized, the serial number printed on its surface will be displayed.
Selecting the Firmware
Press the button to select a file or drag a .bin file to load and begin firmware flashing. If a previously selected file still exists, you can press the “(Re)Write” button to reflash it.
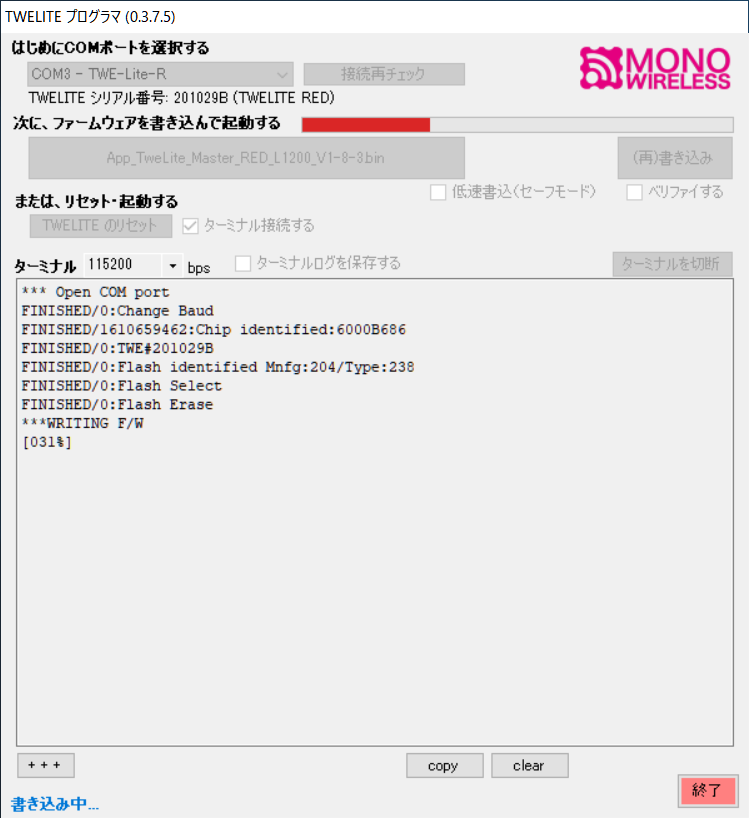
Example screen during flashing
If “Connect to Terminal” is checked, TWELITE will be automatically reset and the terminal screen will be displayed.
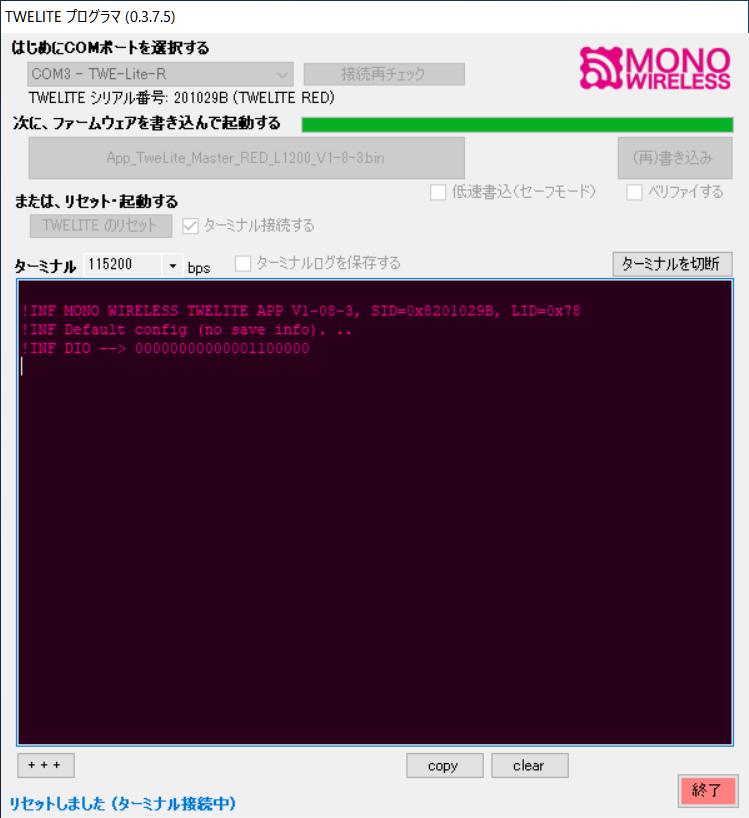
Example screen after flashing
Options
Slow Write (Safe Mode)
Applies safer settings. Usually not needed.
Verify
Verifies the data after flashing.
Connecting to the Terminal
Baud Rate Configuration
The baud rate can be changed from the “Terminal” section. The setting uses 8N1 format.
Connecting the Terminal
To use only the terminal without flashing, check “Connect to Terminal” and press “Reset TWELITE”.
Pressing
Alt+R will reset TWELITE. To connect without resetting, press Alt+N.On startup, the device automatically enters programming mode. You can disable this behavior via settings.
Disconnecting the Terminal
Click “Disconnect Terminal” or press Alt+I.
Shortcuts
| Function | Key Combination | Remarks |
|---|---|---|
| Disconnect Terminal | Alt+I | Or the “Disconnect Terminal” button |
| Connect Terminal (normal) | Alt+N | Connect without reset |
| Connect Terminal (reset) | Alt+R | Connect with reset |
| Hardware Reset | Alt+R | |
Send +++ | Alt+P | Or the + + + button.Used to enter interactive mode |
| Change Terminal Display Color | Alt+G | Only when connected |
| Clear Terminal Display | Alt+L | Or the clear button |
| Copy Display Contents | Alt+C | Or the copy button |
| Paste from Clipboard | Alt+V | |
| Open Firmware File | Ctrl+Alt+O | Disabled while connected to terminal |
| Reflash Firmware | Ctrl+Alt+W | |
| Erase Firmware | Ctrl+Alt+E | Disabled while connected to terminal |
| Change Terminal Rendering Mode | Ctrl+Alt+D | Switch to double-buffer mode. Cursor hidden, may cause rendering issues |
| Exit TWE Programmer | Ctrl+Alt+X |
The following escape sequences are also supported:
| Function | Key Combination |
|---|---|
| Move cursor up one line | ESC[A] |
| Move cursor to beginning of line | ESC[G] |
| Move cursor to home position | ESC[H |
| Clear screen | ESC[2J |
| CR / Move cursor to beginning of line | \r |
Logging
To log terminal input and output, check “Save Terminal Log” before connecting.
Not intended for long-term recording.
A log file named twelog.log will be saved in append mode in the same folder as TWE-Programmer.exe.
Input and output logs may occasionally be out of order due to timing.
To obtain multiple logs simultaneously, install TWE-Programmer.exe in separate folders.
Input/Output Format
The following format is used for saving:
| Character | Description |
|---|---|
Printable ASCII characters (excluding backslash \) | excluding backslash \ |
Backslash \ (0x5C) | converted to \\ |
| Others | represented in hexadecimal |
Input from PC to TWELITE is enclosed in escape sequences to distinguish it from TWELITE’s output.
- Input start:
ESC[7m] - Input end:
ESC[0m]
These escape sequences correspond to inverted display in ANSI terminals. Use a compatible viewer (e.g.,
less -r twelog.log) to improve readability.Settings
Several settings can be configured via command-line options at startup.
| Parameter | Description |
|---|---|
-v | Enable verify |
-c | Disable auto-connect after startup |
-s | Enable slow write (safe mode) |
-D | Enable double buffer Reduces flickering but hides cursor and imposes limitations |
-g [num]--color [num] | Specify text color (0 for none)0: Pink/Wine1: Orange/Black2: Green/Black3: Black/White4: White/Wine5: Wine/Yellow6: White/Blue |
[file] | Specify firmware file to load |
You can create a program shortcut and add command-line options via its properties.
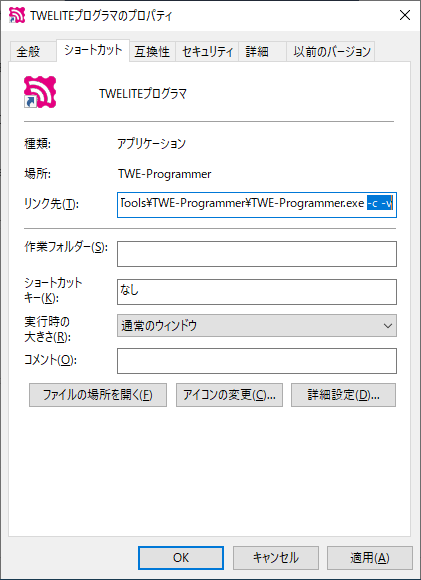
Example of the Properties dialog
Error Output
If an error occurs during flashing, the screen will turn pink as shown below. Check the connection and press “(Re)Write”.
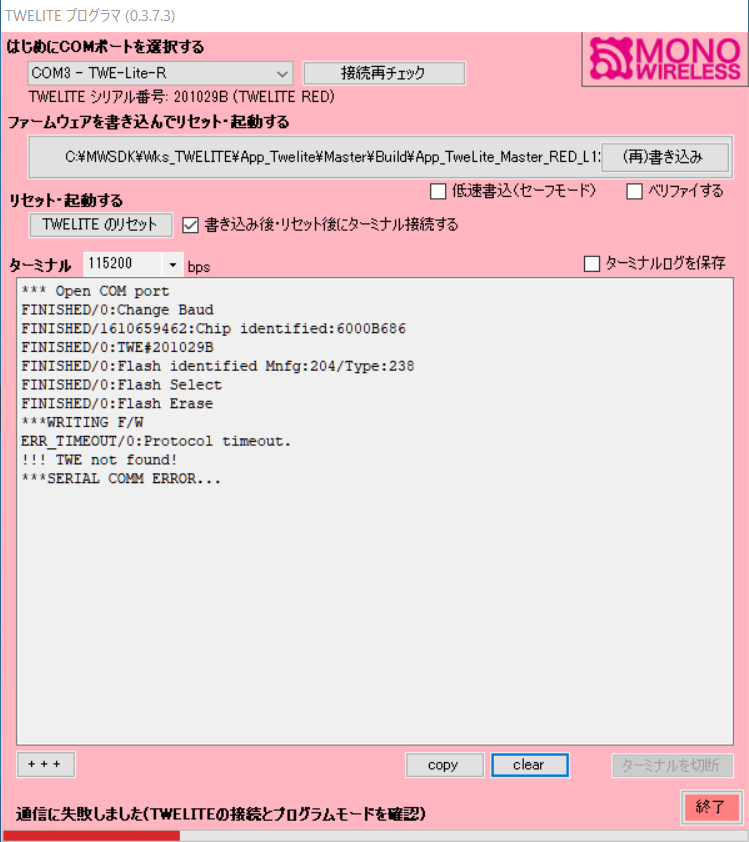
Example of flashing failure
Errors also occur if another software is using the COM port. Close the software using the port, then press “Recheck Connection”.
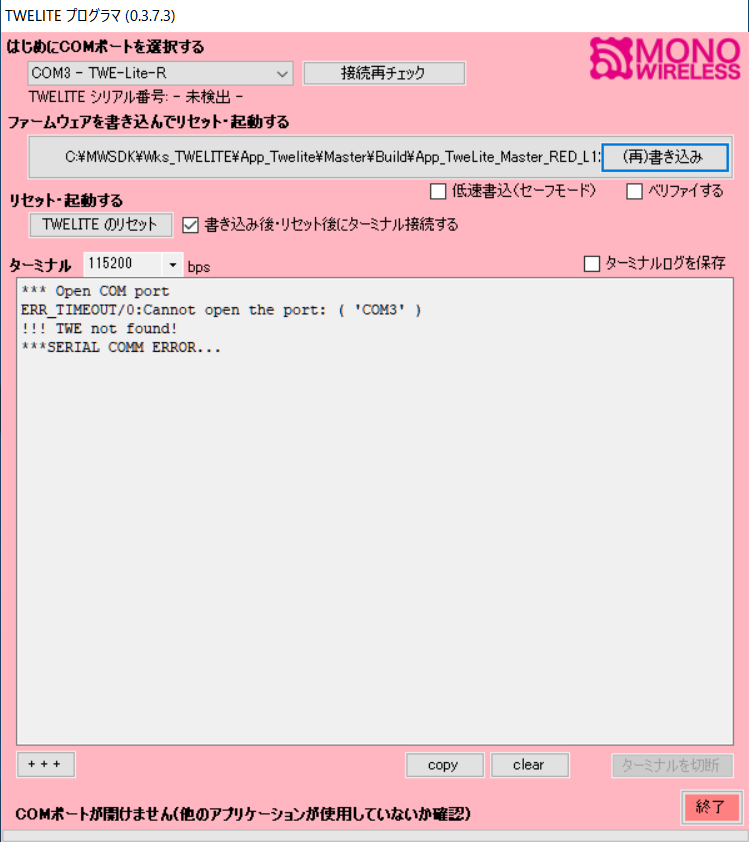
Example of connection failure