This section explains advanced sample sketches that combine TWELITE NET with Wi-Fi functionality.
This is the multi-page printable view of this section. Click here to print...
For suitable output, we recommend to use Google Chrome (15+) or Microsoft Edge (79+).
Sketches Using TWELITE with Wi-Fi
Advanced sample sketches for TWELITE SPOT using Wi-Fi
- 1: Pre-installed Sketch
- 1.1: Pre-installed Sketch
- 1.2: Pre-installed Sketch
- 2: Relay for WebSocket
- 2.1: Relay for WebSocket
- 3: Using the REST API
- 3.1: Using REST API
- 3.2: Using the REST API
- 4: Using Google Sheets
- 4.1: Using Google Sheets
- 5: Graph Display Using ThingSpeak
1 - Pre-installed Sketch
An explanation of the sample sketch spot-server, a local server that displays data from end devices on a web page.
spot-server is pre-installed on TWELITE SPOT at the time of shipment.
This is an explanation of the sample sketch
spot-server, which acts as a wireless LAN access point and displays data from end devices on a web page.1.1 - Pre-installed Sketch
Latest Edition (ESP32 Arduino Core v3.x.x)
This is an overview of the sample sketch
spot-server, which operates as a wireless LAN access point and displays data from child devices on a web page.spot-server comes pre-installed on the TWELITE SPOT at the time of shipment.
This guide uses third-party open-source software.
We cannot provide detailed support regarding third-party software. In addition, we accept no liability for any damages resulting from the use of third-party software.
Obtaining the Source Code
Available from GitHub (monowireless/spot-server).
System Overview
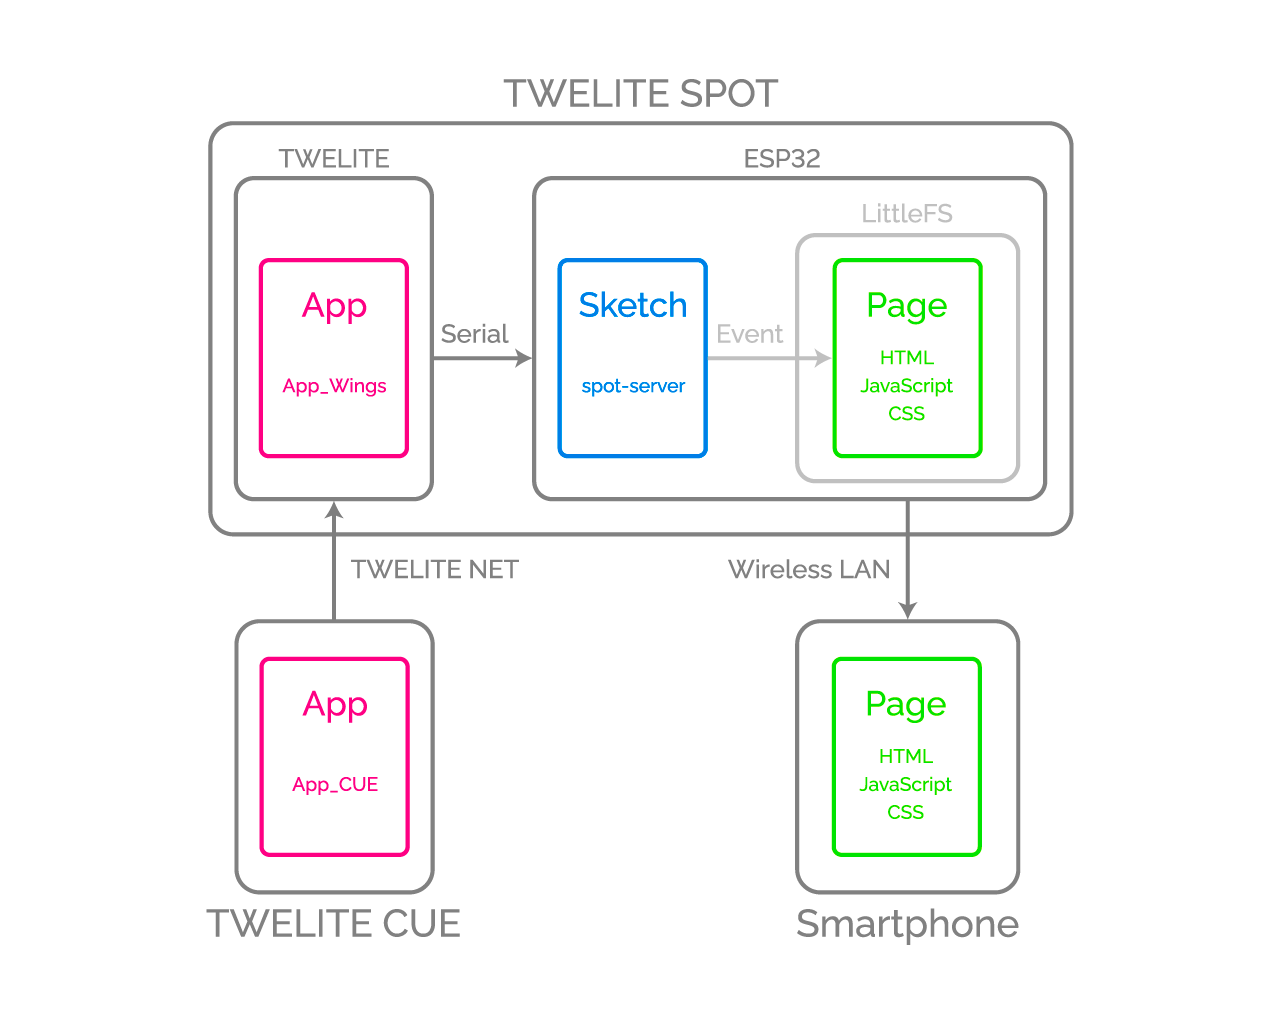
spot-server consists of an Arduino sketch (.ino) for receiving and forwarding data from TWELITE, and a web page (.html / .css / .js) delivered to smartphones.
Diagram
Data transmitted from TWELITE nodes is received by the Arduino sketch, which triggers events on the published web page. The published web page dynamically updates its HTML content in response to these events.
Developing the web page requires knowledge of web technologies such as HTML, CSS, and ECMAScript (JavaScript).
What You Need for Development
-
Wireless LAN Gateway TWELITE SPOT
- USB-C cable for power
- USB AC adapter (capable of supplying 1A or more)
-
Wireless Tag with Accelerometer TWELITE CUE or other child device (If you do not have one, please purchase 👉 List of retailers)
- CR2032 coin battery or equivalent power supply
-
USB Adapter TWELITE R3 (If you do not have one, please purchase 👉 List of retailers)
- USB-C cable for communication
- Grove - OLED Display 1.12 (The sketch works even without this.)
- Grove cable
- 💻 Computer
Setting Up Your Environment
Installing the IDE and Toolchain
Please refer to How to set up the development environment using Arduino IDE 1.x.
Or
Please refer to How to set up the development environment using Arduino IDE 2.x.
Installing Libraries
First, if there is no libraries folder in the Arduino sketchbook location (as specified in the Arduino IDE preferences, e.g., C:\Users\foo\Documents\Arduino), please create it.
Asynchronous TCP Communication Library
1. Download the Zip file from GitHub (me-no-dev/AsyncTCP)2. Extract the Zip file and rename the folder from AsyncTCP-master to AsyncTCP3. Place the AsyncTCP folder into the libraries folder
Open the Library Manager and install Async TCP.
me-no-dev/AsyncTCP has been transferred to ESP32Async/AsyncTCP.
With this change, it appears that it can now be installed from the Library Manager.
Asynchronous Web Server Library
1. Download the Zip file from GitHub (me-no-dev/ESPAsyncWebServer)2. Extract the Zip file and rename the folder from AsyncWebServer-master to AsyncWebServer3. Place the AsyncWebServer folder into the libraries folder
Open the Library Manager and install ESP Async WebServer.
me-no-dev/ESPAsyncWebServer has been transferred to ESP32Async/ESPAsyncWebServer.
With this change, it appears that it can now be installed from the Library Manager.
OLED Display Library
- Download the Zip file from GitHub (Seeed-Studio/OLED_Display_96X96)
- Extract the Zip file and rename the folder from
OLED_Display_96X96-mastertoOLED_Display_96X96 - Place the
OLED_Display_96X96folder into thelibrariesfolder
JSON Library
Open the Library Manager and install Arduino_JSON.
Here, use the official
Arduino_JSON instead of the third-party ArduinoJson.Installing Plugins
To write HTML and other files to the ESP32 flash area, an Arduino plugin is required.
For Arduino IDE 1.x
For Arduino IDE 1.x (Legacy version), use lorol/arduino-esp32fs-plugin: Arduino plugin for uploading files to ESP32 file system (compatible with LittleFS).
For installation instructions, see TWELITE SPOT Manual: How to write files to ESP32 (Arduino IDE 1.x).
For Arduino IDE 2.x
For Arduino IDE 2.x, use earlephilhower/arduino-littlefs-upload: Build and uploads LittleFS filesystems for the Arduino-Pico RP2040, RP2350, ESP8266, and ESP32 cores under Arduino IDE 2.2.1 or higher.
For installation instructions, see TWELITE SPOT Manual: How to write files to ESP32 (Arduino IDE 2.x).
Obtaining Project Files
- Download the Zip file from GitHub (monowireless/spot-server)
- Extract the Zip file and rename the folder from
spot-server-maintospot-server - Place the
spot-serverfolder into the Arduino sketchbook location (as specified in the Arduino IDE preferences, e.g.,C:\Users\foo\Documents\Arduino)
Writing Project Files
Sketch
See How to write sketches to ESP32.
Web Page
See How to write files to ESP32 (Arduino IDE 1.x).
Or
See How to write files to ESP32 (Arduino IDE 2.x).
Sketch
This section explains the Arduino sketch spot-server.ino.
Including Libraries
Official Arduino and ESP32 Libraries
Lines 4-9 include the official Arduino and ESP32 libraries.
#include <Arduino.h>
#include <Arduino_JSON.h>
#include <ESPmDNS.h>
#include <LittleFS.h>
#include <WiFi.h>
#include "esp_wifi.h"
#include <Wire.h>
| Header File | Description | Remarks |
|---|---|---|
Arduino.h | Basic Arduino library | Can sometimes be omitted, but included just in case |
Arduino_JSON.h | Handles JSON strings | Different from ArduinoJson |
ESPmDNS.h | Uses mDNS | Required to use hostnames |
LittleFS.h | Handles LittleFS file system | Needed for page publishing |
WiFi.h | Uses ESP32 WiFi | |
esp_wifi.h | Advanced WiFi settings | Needed for locale settings |
Wire.h | Uses I2C | For OLED display |
Third-Party Libraries
Lines 13-15 include third-party libraries.
#include <AsyncTCP.h>
#include <ESPAsyncWebServer.h>
#include <SeeedGrayOLED.h>
| Header File | Description | Remarks |
|---|---|---|
AsyncTCP.h | Performs asynchronous TCP communication | |
ESPAsyncWebServer.h | Runs asynchronous web server | Depends on AsyncTCP |
SeeedGrayOLED.h | Uses OLED display |
MWings Library
Line 18 includes the MWings library.
#include <MWings.h>
Pin Number Definitions
Lines 21-25 define pin numbers.
const uint8_t TWE_RST = 5;
const uint8_t TWE_PRG = 4;
const uint8_t LED = 18;
const uint8_t ESP_RXD1 = 16;
const uint8_t ESP_TXD1 = 17;
Unlike other simple samples, this sketch strictly specifies the ESP32 UART pins.
| Name | Description |
|---|---|
TWE_RST | Pin number connected to the RST pin of TWELITE |
TWE_PRG | Pin number connected to the PRG pin of TWELITE |
LED | Pin number connected to the ESP32 onboard LED |
ESP_RXD1 | Pin number connected to the TX pin of TWELITE |
ESP_TXD1 | Pin number connected to the RX pin of TWELITE |
For connection details, see the schematic in the TWELITE SPOT datasheet.
TWELITE Configuration Definitions
Lines 28-31 define the settings applied to the TWELITE parent module mounted on TWELITE SPOT.
const uint8_t TWE_CH = 18;
const uint32_t TWE_APPID = 0x67720102;
const uint8_t TWE_RETRY = 2;
const uint8_t TWE_POWER = 3;
| Name | Description |
|---|---|
TWE_CH | TWELITE frequency channel |
TWE_APPID | TWELITE Application ID |
TWE_RETRY | TWELITE retransmission count (on transmit) |
TWE_POWER | TWELITE transmit power |
In this sample, commands are not sent from the TWELITE parent, so the settings on lines 29-30 are not relevant.
Wireless LAN Configuration Definitions
Lines 34-46 define the wireless LAN settings applied to the ESP32 mounted on TWELITE SPOT.
wifi_country_t WIFI_COUNTRY_JP = {
  cc: "JP",         // Contry code
  schan: 1,         // Starting channel
  nchan: 14,        // Number of channels
  max_tx_power: 20, // Maximum power in dBm
  policy: WIFI_COUNTRY_POLICY_MANUAL
};
const char* WIFI_SSID_BASE = "TWELITE SPOT";
const char* WIFI_PASSWORD = "twelitespot";
const uint8_t WIFI_CH = 13;
const IPAddress WIFI_IP = IPAddress(192, 168, 1, 1);
const IPAddress WIFI_MASK = IPAddress(255, 255, 255, 0);
const char* HOSTNAME = "spot";    // spot.local
| Name | Description |
|---|---|
WIFI_COUNTRY_JP | Locale setting (Japan) |
WIFI_SSID_BASE | Common part of SSID string |
WIFI_PASSWORD | Password |
WIFI_CH | ESP32 frequency channel |
WIFI_IP | IP address |
WIFI_MASK | Subnet mask |
HOSTNAME | Host name |
With ESP32 Arduino Core v3.x.x, if you do not set the locale, features such as channel 13 may not be available.
Declaration of Global Objects
Lines 49-50 declare global objects.
AsyncWebServer server(80);
AsyncEventSource events("/events");
| Name | Description |
|---|---|
server | Interface for asynchronous web server opened on port 80 |
events | Interface for server-sent events opened at /events ? |
Declaration of Function Prototypes
Lines 53-57 declare function prototypes.
uint16_t createUidFromMac();
String createJsonFrom(const ParsedAppTwelitePacket& packet);
String createJsonFrom(const ParsedAppAriaPacket& packet);
String createJsonFrom(const ParsedAppCuePacket& packet);
String createJsonFrom(const BarePacket& packet);
| Name | Description |
|---|---|
createUidFromMac() | Creates an identifier for SSID from MAC address |
createJsonFrom()<ParsedAppTwelitePacket&> | Creates a JSON string from App_Twelite packet data |
createJsonFrom()<ParsedAppAriaPacket&> | Creates a JSON string from App_ARIA packet data |
createJsonFrom()<ParsedAppCuePacket&> | Creates a JSON string from App_CUE packet data |
createJsonFrom()<BarePacket&> | Creates a JSON string from all packet data |
TWELITE Configuration
In lines 66-71, Twelite.begin() is called to configure and start the TWELITE parent module mounted on the TWELITE SPOT.
    Serial2.begin(115200, SERIAL_8N1, ESP_RXD1, ESP_TXD1);
    if (Twelite.begin(Serial2,
                      LED, TWE_RST, TWE_PRG,
                      TWE_CH, TWE_APPID, TWE_RETRY, TWE_POWER)) {
        Serial.println("Started TWELITE.");
    }
| Argument | Type | Description |
|---|---|---|
Serial2 | HardwareSerial& | Serial port used for communication with TWELITE |
LED | int | Pin number connected to the status LED |
TWE_RST | int | Pin number connected to the RST pin of TWELITE |
TWE_PRG | int | Pin number connected to the PRG pin of TWELITE |
TWE_CHANNEL | uint8_t | TWELITE frequency channel |
TWE_APP_ID | uint32_t | TWELITE Application ID |
TWE_RETRY | uint8_t | TWELITE retransmission count (on transmit) |
TWE_POWER | uint8_t | TWELITE transmit power |
App_Twelite: Registering Event Handler
In lines 73-80, Twelite.on() <ParsedAppTwelitePacket> is called to register the process to be executed when a packet is received from a child device running the super-easy standard app.
Twelite.on([](const ParsedAppTwelitePacket& packet) {
    Serial.println("Received a packet from App_Twelite");
    String jsonStr = createJsonFrom(packet);
    if (not(jsonStr.length() <= 0)) {
        events.send(jsonStr.c_str(), "data_app_twelite", millis());
    }
    events.send("parsed_app_twelite", "data_parsing_result", millis());
});
Creating a JSON String
In line 75, a JSON string is generated from the received data.
String jsonStr = createJsonFrom(packet);
To display received data on the web page, it is necessary to send the data to the client-side JavaScript. Since string data is easier to handle in this case, a JSON string is used.
Sending Events to the Web Page
In lines 76-78, the generated JSON string is sent to the “Signal Viewer” page.
if (not(jsonStr.length() <= 0)) {
    events.send(jsonStr.c_str(), "data_app_twelite", millis());
}
The event name is data_app_twelite.
The ID assigned to each event uses the current time obtained by
millis().In line 79, notification that a packet has been received from App_Twelite is sent to the “Serial Viewer” page.
events.send("parsed_app_twelite", "data_parsing_result", millis());
App_ARIA: Registering Event Handler
In lines 82-92, Twelite.on() <ParsedAppAriaPacket> is called to register the process to be executed when a packet is received from a child device running the ARIA app (TWELITE ARIA mode).
Twelite.on([](const ParsedAppAriaPacket& packet) {
        Serial.println("Received a packet from App_ARIA");
        static uint32_t firstSourceSerialId = packet.u32SourceSerialId;
        if (packet.u32SourceSerialId == firstSourceSerialId) {
            String jsonStr = createJsonFrom(packet);
            if (not(jsonStr.length() <= 0)) {
                events.send(jsonStr.c_str(), "data_app_aria_twelite_aria_mode", millis());
            }
        }
        events.send("parsed_app_aria_twelite_aria_mode", "data_parsing_result", millis());
    });
Target Filtering
In lines 84-85, the processing is limited to the first child device received.
static uint32_t firstSourceSerialId = packet.u32SourceSerialId;
if (packet.u32SourceSerialId == firstSourceSerialId) {
This is done to maintain graph consistency when there are multiple child devices.
Creating a JSON String
In line 86, a JSON string is generated from the received data.
String jsonStr = createJsonFrom(packet);
Sending Events to the Web Page
In lines 87-89, the generated JSON string is sent to the “ARIA Viewer” page.
if (not(jsonStr.length() <= 0)) {
    events.send(jsonStr.c_str(), "data_app_aria_twelite_aria_mode", millis());
}
The event name is data_app_aria_twelite_aria_mode.
In line 91, notification that a packet has been received from App_Twelite is sent to the “Serial Viewer” page.
events.send("parsed_app_aria_twelite_aria_mode", "data_parsing_result", millis());
App_CUE: Registering Event Handler
In lines 94-104, Twelite.on() <ParsedAppCuePacket> is called to register the process to be executed when a packet is received from a child device running the CUE app (TWELITE CUE mode).
Twelite.on([](const ParsedAppCuePacket& packet) {
    Serial.println("Received a packet from App_CUE");
    static uint32_t firstSourceSerialId = packet.u32SourceSerialId;
    if (packet.u32SourceSerialId == firstSourceSerialId) {
        String jsonStr = createJsonFrom(packet);
        if (not(jsonStr.length() <= 0)) {
            events.send(jsonStr.c_str(), "data_app_cue_twelite_cue_mode", millis());
        }
    }
    events.send("parsed_app_cue_twelite_cue_mode", "data_parsing_result", millis());
});
The contents of the processing are the same as in App_ARIA.
Others: Registering Event Handlers
In lines 106-134, the processes to be executed when packets are received from child devices running other apps are registered.
As with the ARIA app, events are sent to the “Serial Viewer.”
All: Registering Event Handler
In lines 136-142, the process to be executed when packets are received from all apps’ child devices is registered.
Twelite.on([](const BarePacket& packet) {
    String jsonStr = createJsonFrom(packet);
    if (not(jsonStr.length() <= 0)) {
        events.send(jsonStr.c_str(), "data_bare_packet", millis());
    }
    events.send("unparsed_bare_packet", "data_parsing_result", millis());
});
Here too, the packet data string is sent to the “Serial Viewer.”
OLED Display Configuration
In lines 145-151, the OLED display is configured.
    esp_log_level_set("i2c.master", ESP_LOG_NONE);
    Wire.begin();
    SeeedGrayOled.init(SSD1327);
    SeeedGrayOled.setNormalDisplay();
    SeeedGrayOled.setVerticalMode();
    SeeedGrayOled.setGrayLevel(0x0F);
    SeeedGrayOled.clearDisplay();
If the OLED is not connected, nothing will happenerrors are ignored.
Wireless LAN Configuration
In lines 155-166, the wireless LAN is configured.
    WiFi.mode(WIFI_AP);
    esp_wifi_set_country(&WIFI_COUNTRY_JP);
    char uidCString[8];
    sprintf(uidCString, " (%02X)", createUidFromMac());
    char ssidCString[20];
    sprintf(ssidCString, "%s%s", WIFI_SSID_BASE, uidCString);
    if (not WiFi.softAP(ssidCString, WIFI_PASSWORD, WIFI_CH, false, 10)) {
      Serial.println("Failed to start AP");
    }
    delay(100);    // IMPORTANT: Waiting for SYSTEM_EVENT_AP_START
    WiFi.softAPConfig(WIFI_IP, WIFI_IP, WIFI_MASK);
    MDNS.begin(HOSTNAME);
If you omit
delay(100), initialization may fail.Configuring the File System
In line 199, the LittleFS file system is configured.
if (LittleFS.begin()) { Serial.println("Mounted file system."); }
This allows files such as HTML written in the flash area to be retrieved as web pages.
Web Server Configuration
In lines 202-229, the web server is configured.
Handling GET Requests
For example, in lines 207-211, a GET request to /signal-viewer returns /signal-viewer.html from the LittleFS file system.
server.on("/signal-viewer", HTTP_GET,
          [](AsyncWebServerRequest* request) {
              Serial.println("HTTP_GET: signal-viewer.html");
              request->send(LittleFS, "/signal-viewer.html", "text/html");
          });
Server Initialization
In lines 227-229, the root of the file system is set as the server root, the event source is registered, and the server is started.
server.serveStatic("/", LittleFS, "/");
server.addHandler(&events);
server.begin();
Updating TWELITE Data
In line 235, Twelite.update() is called.
Twelite.update();
Twelite.update() is a function that sequentially reads out packet data (in ModBus ASCII format) sent from the TWELITE parent module, one byte at a time.
By repeatedly calling
Twelite.update() inside the loop(), packet data sent from the TWELITE parent module is interpreted. When the interpretation of a packet is complete, an event such as above is triggered.If you block the call to this function with processing such as
delay(), it may not be possible to read packet data strings in time. Always implement time-consuming processes asynchronously and make the loop() function run as quickly as possible.Web Page
We will not provide a detailed explanation of the web page here. Instead, we will focus on the important points.
Here, as an example, we will look at the CUE Viewer page data/cue-viewer.html.
HTML: Grid System
This sample’s HTML uses Flexbox Grid (the source file is data/css/flexboxgrid.min.css).
A 12-column grid system similar to Bootstrap is used as shown below.
      <div class="col-xs-6 col-sm-6 col-md-5 col-lg-4">
        <div class="neumorphic inset dense row center-xs middle-xs">
          <div class="col-xs-12 col-sm-12 col-md-12 col-lg-12 npr npl">
            <img src="./images/logo-lands.svg" class="logo" />
          </div>
        </div>
      </div>

      <div class="col-xs-6 col-sm-6 col-md-7 col-lg-8">
        <div class="neumorphic inset dense row center-xs middle-xs">
          <div class="col-xs-12 col-sm-12 col-md-12 col-lg-12 nwp npr npl">
            <span class="medium bold">TWELITE SPOT</span>
          </div>
          <div class="col-xs-12 col-sm-12 col-md-12 col-lg-12 nwp npr npl">
            <span class="small bold">CUE Viewer</span>
          </div>
        </div>
      </div>
Here, the element centered on the logo has a width of 6/12, and the element centered on the text also has a width of 6/12; that is, both are placed side by side with equal width in one row. Also, the elements centered on the text TWELITE SPOT and CUE Viewer both have a width of 12/12, so they are arranged as two separate rows.
xs- and sm- and similar classes specify the screen width. These are useful for responsive design.HTML: Data Display Section
Elements that display data received from TWELITE child devices are assigned unique IDs.
Below is an excerpt of the section that displays the X-axis acceleration received from TWELITE CUE.
<div class="col-xs-4 nwp npr npl">
  <code class="medium"
        id="latest-accel-x">±--.--</code>
  <code class="small">G</code>
</div>
Here, the ID latest-accel-x is assigned. Using this ID, the value is updated from the script.
JS: Global Variables
From here, we will explain the scripts corresponding to each HTML file.
As an example, we will look at data/js/cue-viewer.js.
In lines 4-8, global variables are declared to store the latest acceleration values.
let latest_accel = {
    x: 0.0,
    y: 0.0,
    z: 0.0
};
These values are also used by the graph, so global variables are used to simplify the implementation.
JS: Graph Settings
In lines 11-133, configuration is done for the graph drawing library Chart.js | Chart.js and its plugin chartjs-plugin-streaming.
For details, see the Chart.js documentation and chartjs-plugin-streaming documentation.
JS: Updating Page Content
The function processDataAppCueTweliteCueMode() in lines 136-235 updates the page content when a data_app_cue_twelite_cue_mode event is received from the sketch.
For example, in lines 184-208, the voltage value and emoji are updated according to the power supply voltage of TWELITE CUE.
if (data.vcc >= 3000) {
    document.getElementById("latest-vcc-icon").innerHTML = "🔋";
    document.getElementById("latest-vcc-data").innerHTML = `${(data.vcc / 1000.0).toFixed(2).toString().padStart(4)}`;
    document.getElementById("latest-vcc-data").classList.remove("red");
    document.getElementById("latest-vcc-data").classList.remove("yellow");
    document.getElementById("latest-vcc-data").classList.add("green");
} else if (data.vcc >= 2700) {
    document.getElementById("latest-vcc-icon").innerHTML = "🔋";
    document.getElementById("latest-vcc-data").innerHTML = `${(data.vcc / 1000.0).toFixed(2).toString().padStart(4)}`;
    document.getElementById("latest-vcc-data").classList.remove("red");
    document.getElementById("latest-vcc-data").classList.remove("yellow");
    document.getElementById("latest-vcc-data").classList.remove("green");
} else if (data.vcc >= 2400) {
    document.getElementById("latest-vcc-icon").innerHTML = "🪫";
    document.getElementById("latest-vcc-data").innerHTML = `${(data.vcc / 1000.0).toFixed(2).toString().padStart(4)}`;
    document.getElementById("latest-vcc-data").classList.remove("red");
    document.getElementById("latest-vcc-data").classList.add("yellow");
    document.getElementById("latest-vcc-data").classList.remove("green");
} else {
    document.getElementById("latest-vcc-icon").innerHTML = "🪫";
    document.getElementById("latest-vcc-data").innerHTML = `${(data.vcc / 1000.0).toFixed(2).toString().padStart(4)}`;
    document.getElementById("latest-vcc-data").classList.add("red");
    document.getElementById("latest-vcc-data").classList.remove("yellow");
    document.getElementById("latest-vcc-data").classList.remove("green");
}
Here, when the power supply voltage drops below 2700mV, the emoji changes from 🔋 to 🪫, and as the voltage decreases from 3000mV → 2700mV → 2400mV, the CSS class applied to the voltage value text color is changed accordingly.
Registering Event Listeners
In lines 254-257, the process for handling events received from the sketch is registered.
source.addEventListener("data_app_cue_twelite_cue_mode", (e) => {
    console.log("data_app_cue_twelite_cue_mode", e.data);
    processDataAppCueTweliteCueMode(JSON.parse(e.data));
}, false);
Here, the event message received from the sketch is parsed from a JSON string and the parsed data is passed to the function processDataAppCueTweliteCueMode().
Related Information
Arduino
- Official site: Arduino - Home
- API Reference: Arduino Reference - Arduino Reference
- Coding Style Guide: Arduino Style Guide for Creating Libraries | Arduino Documentation
- Official JSON Library: arduino-libraries/Arduino_JSON: Official JSON Library for Arduino
ESP32
- Product Information: ESP32 Wi-Fi & Bluetooth MCU I Espressif Systems
- Datasheet: esp32_datasheet_en.pdf
- Arduino Toolchain: espressif/arduino-esp32: Arduino core for the ESP32
- Getting Started: Getting Started — Arduino-ESP32 documentation
- Installation: Installing — Arduino-ESP32 documentation
- API Reference: Libraries — Arduino-ESP32 documentation
- Wi-Fi API: Wi-Fi API — Arduino-ESP32 documentation
- Tutorials: Tutorials — Arduino-ESP32 documentation
- Troubleshooting: Troubleshooting — Arduino-ESP32 documentation
Community
Libraries
- Async TCP:
me-no-dev/AsyncTCP: Async TCP Library for ESP32ESP32Async/AsyncTCP: Async TCP Library for ESP32 - Async Web Server:
me-no-dev/ESPAsyncWebServer: Async Web Server for ESP8266 and ESP32ESP32Async/ESPAsyncWebServer: Async Web Server for ESP32 - Seeed 96x96 / 128x128 OLED: Seeed-Studio/OLED_Display_96X96: Seeed OLED Display 96*96 library
Plugins
- File Writing IDE 1.x: me-no-dev/arduino-esp32fs-plugin: Arduino plugin for uploading files to ESP32 file system
- File Writing IDE 2.x: earlephilhower/arduino-littlefs-upload: Build and uploads LittleFS filesystems for the Arduino-Pico RP2040, RP2350, ESP8266, and ESP32 cores under Arduino IDE 2.2.1 or higher
- Stack Trace Decoder IDE 1.x: me-no-dev/EspExceptionDecoder: Exception Stack Trace Decoder for ESP8266 and ESP32
Web-related
ECMAScript (JavaScript)
- API Reference: Web technology for developers | MDN
- ECMAScript 2016+ compatibility table: ECMAScript 2016+ compatibility table
Community
- CSS
- Web colors and examples: Traditional Colors of World
- Grid system like Bootstrap: Flexbox Grid
- Neumorphism CSS generator: Neumorphism/Soft UI CSS shadow generator
- ECMAScript
- Graph drawing: Chart.js | Chart.js
- Real-time streaming plugin: Getting Started | chartjs-plugin-streaming
- Clock and time: Luxon Home
- Graph drawing: Chart.js | Chart.js
1.2 - Pre-installed Sketch
ESP32 Arduino Core v2.x.x Version
This is an explanation of the sample sketch
spot-server, which acts as a wireless LAN access point and displays data from child devices on a web page.spot-server is pre-installed on TWELITE SPOT at the time of factory shipment.
This article requires Arduino IDE 1.x. As of May 2023, Arduino IDE 2.x is not supported due to technical limitations.
The plugin used in this article is written in Java, so unlike Arduino IDE 1.x, it does not work with Arduino IDE 2.x, which is not Java-based. For more details on this issue, please refer to the Arduino IDE GitHub Issue (Missing support for external tools / plugins · Issue #58 · arduino/arduino-ide) (in English).
Note added October 2024: Although unverified, you may be able to use the plugin earlephilhower/arduino-littlefs-upload as an alternative on Arduino IDE 2.x.
This article uses third-party open-source software.
We are unable to provide detailed instructions on how to use third-party software. Also, we are not responsible for any damage or loss resulting from the use of third-party software.
Obtaining the Source Code
You can obtain it from GitHub (monowireless/spot-server).
System Overview
spot-server consists of an Arduino sketch (.ino) that receives and relays data from TWELITE, and a web page (.html / .css / .js) delivered to smartphones.
Image diagram
The data sent by TWELITE child devices is received by the Arduino sketch, which then fires events to the published web page. The published web page dynamically rewrites its HTML content in response to these events.
Developing the web page requires knowledge of web technologies such as HTML, CSS, and ECMAScript (JavaScript).
Requirements for Development
-
Wireless LAN Gateway TWELITE SPOT
- USB-C cable for power supply
- USB AC adapter (must supply 1A or more)
-
Accelerometer Sensor Wireless Tag TWELITE CUE or other child devices (If you do not have one, please purchase 👉 List of retailers)
- Power supply such as CR2032 coin battery
-
USB Adapter TWELITE R3 (If you do not have one, please purchase 👉 List of retailers)
- USB-C cable for communication
- Grove - OLED Display 1.12 (The sketch works even without this)
- Grove cable
- 💻 Computer
Environment Setup
Installing the IDE and Toolchain
See How to set up the development environment using Arduino IDE 1.x.
Installing Libraries
First, if there is no libraries folder in your Arduino sketchbook location (as specified in Arduino IDE preferences, e.g., C:\Users\foo\Documents\Arduino), create it.
Asynchronous TCP Communication Library
- Download the Zip file from GitHub (me-no-dev/AsyncTCP).
- Extract the Zip file and rename the folder from
AsyncTCP-mastertoAsyncTCP. - Place the
AsyncTCPfolder into yourlibrariesfolder.
Asynchronous Web Server Library
- Download the Zip file from GitHub (me-no-dev/ESPAsyncWebServer).
- Extract the Zip file and rename the folder from
AsyncWebServer-mastertoAsyncWebServer. - Place the
AsyncWebServerfolder into yourlibrariesfolder.
OLED Display Library
- Download the Zip file from GitHub (Seeed-Studio/OLED_Display_96X96).
- Extract the Zip file and rename the folder from
OLED_Display_96X96-mastertoOLED_Display_96X96. - Place the
OLED_Display_96X96folder into yourlibrariesfolder.
JSON Library
Open the Library Manager and install Arduino_JSON.
Use the official
Arduino_JSON, not the third-party ArduinoJson.Installing Plugins
File System Writing Plugin
To write files such as HTML to the ESP32’s flash area, you need an Arduino plugin.
Here, we use lorol/arduino-esp32fs-plugin: Arduino plugin for uploading files to ESP32 file system.
For installation instructions, see TWELITE SPOT Manual: How to Write Files to ESP32.
Downloading Project Files
- Download the Zip file from GitHub (monowireless/spot-server).
- Extract the Zip file and rename the folder from
spot-server-maintospot-server. - Place the
spot-serverfolder into your Arduino sketchbook location (as specified in Arduino IDE preferences, e.g.,C:\Users\foo\Documents\Arduino).
How to Write Project Files
Sketch
See How to write a sketch to ESP32.
Web Page
See How to write files to ESP32.
Sketch
This section explains the Arduino sketch spot-server.ino.
Including Libraries
Official Arduino and ESP32 Libraries
Lines 4-9 include the official Arduino and ESP32 libraries.
#include <Arduino.h>
#include <Arduino_JSON.h>
#include <ESPmDNS.h>
#include <LittleFS.h>
#include <WiFi.h>
#include <Wire.h>
| Header File | Description | Remarks |
|---|---|---|
Arduino.h | Basic Arduino library | May be omitted, but included just in case |
Arduino_JSON.h | Handles JSON strings | Different from ArduinoJson |
ESPmDNS.h | Uses mDNS | Required for using hostnames |
LittleFS.h | Handles LittleFS file system | Needed for serving pages |
WiFi.h | Uses ESP32 WiFi | |
Wire.h | Uses I2C | For OLED display |
Third-party Libraries
Lines 12-14 include third-party libraries.
#include <AsyncTCP.h>
#include <ESPAsyncWebServer.h>
#include <SeeedGrayOLED.h>
| Header File | Description | Remarks |
|---|---|---|
AsyncTCP.h | Performs asynchronous TCP communication | |
ESPAsyncWebServer.h | Runs asynchronous web server | Depends on AsyncTCP |
SeeedGrayOLED.h | Uses OLED display |
MWings Library
Line 17 includes the MWings library.
#include <MWings.h>
Definition of Pin Numbers
Lines 20-24 define the pin numbers.
const uint8_t TWE_RST = 5;
const uint8_t TWE_PRG = 4;
const uint8_t LED = 18;
const uint8_t ESP_RXD1 = 16;
const uint8_t ESP_TXD1 = 17;
Unlike other simple samples, this sketch strictly specifies the UART pins for ESP32.
| Name | Description |
|---|---|
TWE_RST | Pin number connected to the RST pin of TWELITE |
TWE_PRG | Pin number connected to the PRG pin of TWELITE |
LED | Pin number connected to the ESP32 onboard LED |
ESP_RXD1 | Pin number connected to the TX pin of TWELITE |
ESP_TXD1 | Pin number connected to the RX pin of TWELITE |
For connection details, refer to the circuit diagram in the TWELITE SPOT datasheet.
TWELITE Settings Definition
Lines 27-30 define the settings applied to the TWELITE parent device mounted on TWELITE SPOT.
const uint8_t TWE_CH = 18;
const uint32_t TWE_APPID = 0x67720102;
const uint8_t TWE_RETRY = 2;
const uint8_t TWE_POWER = 3;
| Name | Description |
|---|---|
TWE_CH | TWELITE frequency channel |
TWE_APPID | TWELITE application ID |
TWE_RETRY | TWELITE retransmission count (on transmission) |
TWE_POWER | TWELITE transmission output |
In this sample, commands are not sent from the TWELITE parent, so the settings on lines 29-30 are not relevant.
Wireless LAN Settings Definition
Lines 33-38 define the wireless LAN settings applied to the ESP32 mounted on TWELITE SPOT.
const char* WIFI_SSID_BASE = "TWELITE SPOT";
const char* WIFI_PASSWORD = "twelitespot";
const uint8_t WIFI_CH = 13;
const IPAddress WIFI_IP = IPAddress(192, 168, 1, 1);
const IPAddress WIFI_MASK = IPAddress(255, 255, 255, 0);
const char* HOSTNAME = "spot";    // spot.local
| Name | Description |
|---|---|
WIFI_SSID_BASE | Common part of the SSID string |
WIFI_PASSWORD | Password |
WIFI_CH | ESP32 frequency channel |
WIFI_IP | IP address |
WIFI_MASK | Subnet mask |
HOSTNAME | Host name |
Declaration of Global Objects
Lines 41-42 declare global objects.
AsyncWebServer server(80);
AsyncEventSource events("/events");
| Name | Description |
|---|---|
server | Interface for asynchronous web server on port 80 |
events | Interface for server-sent events at /events ? |
Declaration of Function Prototypes
Lines 45-49 declare function prototypes.
uint16_t createUidFromMac();
String createJsonFrom(const ParsedAppTwelitePacket& packet);
String createJsonFrom(const ParsedAppAriaPacket& packet);
String createJsonFrom(const ParsedAppCuePacket& packet);
String createJsonFrom(const BarePacket& packet);
| Name | Description |
|---|---|
createUidFromMac() | Creates an identifier for SSID from MAC address |
createJsonFrom()<ParsedAppTwelitePacket&> | Creates a JSON string from App_Twelite packet data |
createJsonFrom()<ParsedAppAriaPacket&> | Creates a JSON string from App_ARIA packet data |
createJsonFrom()<ParsedAppCuePacket&> | Creates a JSON string from App_CUE packet data |
createJsonFrom()<BarePacket&> | Creates a JSON string from all packet data |
TWELITE Settings
Lines 58-63 call Twelite.begin() to configure and start the TWELITE parent device mounted on TWELITE SPOT.
Serial2.begin(115200, SERIAL_8N1, ESP_RXD1, ESP_TXD1);
    if (Twelite.begin(Serial2,
                      LED, TWE_RST, TWE_PRG,
                      TWE_CH, TWE_APPID, TWE_RETRY, TWE_POWER)) {
        Serial.println("Started TWELITE.");
    }
| Argument | Type | Description |
|---|---|---|
Serial2 | HardwareSerial& | Serial port used for communication with TWELITE |
LED | int | Pin number connected to status LED |
TWE_RST | int | Pin number connected to TWELITE RST pin |
TWE_PRG | int | Pin number connected to TWELITE PRG pin |
TWE_CHANNEL | uint8_t | TWELITE frequency channel |
TWE_APP_ID | uint32_t | TWELITE application ID |
TWE_RETRY | uint8_t | TWELITE retransmission count (on transmission) |
TWE_POWER | uint8_t | TWELITE transmission output |
App_Twelite: Registering Event Handler
Lines 65-72 call Twelite.on() <ParsedAppTwelitePacket> to register the process to execute when a packet is received from a child device using the super-easy standard app.
Twelite.on([](const ParsedAppTwelitePacket& packet) {
    Serial.println("Received a packet from App_Twelite");
    String jsonStr = createJsonFrom(packet);
    if (not(jsonStr.length() <= 0)) {
        events.send(jsonStr.c_str(), "data_app_twelite", millis());
    }
    events.send("parsed_app_twelite", "data_parsing_result", millis());
});
Creating JSON String
Line 67 generates a JSON string from the received data.
String jsonStr = createJsonFrom(packet);
To display the received data on the web page, it is necessary to send the data to client-side JavaScript, and string data is easier to handle, so it is converted to a JSON string.
Sending Events to the Web Page
Lines 68-70 send the generated JSON string to the “Signal Viewer” page.
if (not(jsonStr.length() <= 0)) {
    events.send(jsonStr.c_str(), "data_app_twelite", millis());
}
The event name is data_app_twelite.
The ID assigned to each event uses the current time obtained by
millis().Line 71 sends a notification to the “Serial Viewer” page that a packet has been received from App_Twelite.
events.send("parsed_app_twelite", "data_parsing_result", millis());
App_ARIA: Registering Event Handler
Lines 74-84 call Twelite.on() <ParsedAppAriaPacket> to register the process to execute when a packet is received from a child device in ARIA app (TWELITE ARIA mode).
Twelite.on([](const ParsedAppAriaPacket& packet) {
        Serial.println("Received a packet from App_ARIA");
        static uint32_t firstSourceSerialId = packet.u32SourceSerialId;
        if (packet.u32SourceSerialId == firstSourceSerialId) {
            String jsonStr = createJsonFrom(packet);
            if (not(jsonStr.length() <= 0)) {
                events.send(jsonStr.c_str(), "data_app_aria_twelite_aria_mode", millis());
            }
        }
        events.send("parsed_app_aria_twelite_aria_mode", "data_parsing_result", millis());
    });
Filtering the Target
Lines 76-77 limit the processing to the first child device received.
static uint32_t firstSourceSerialId = packet.u32SourceSerialId;
if (packet.u32SourceSerialId == firstSourceSerialId) {
This is done to maintain consistency in the graph when there are multiple child devices.
Creating JSON String
Line 78 generates a JSON string from the received data.
String jsonStr = createJsonFrom(packet);
Sending Events to the Web Page
Lines 79-81 send the generated JSON string to the “ARIA Viewer” page.
if (not(jsonStr.length() <= 0)) {
    events.send(jsonStr.c_str(), "data_app_aria_twelite_aria_mode", millis());
}
The event name is data_app_aria_twelite_aria_mode.
Line 83 sends a notification to the “Serial Viewer” page that a packet has been received from App_Twelite.
events.send("parsed_app_aria_twelite_aria_mode", "data_parsing_result", millis());
App_CUE: Registering Event Handler
Lines 86-96 call Twelite.on() <ParsedAppCuePacket> to register the process to execute when a packet is received from a child device in CUE app (TWELITE CUE mode).
Twelite.on([](const ParsedAppCuePacket& packet) {
    Serial.println("Received a packet from App_CUE");
    static uint32_t firstSourceSerialId = packet.u32SourceSerialId;
    if (packet.u32SourceSerialId == firstSourceSerialId) {
        String jsonStr = createJsonFrom(packet);
        if (not(jsonStr.length() <= 0)) {
            events.send(jsonStr.c_str(), "data_app_cue_twelite_cue_mode", millis());
        }
    }
    events.send("parsed_app_cue_twelite_cue_mode", "data_parsing_result", millis());
});
The process is the same as in App_ARIA.
Others: Registering Event Handlers
Lines 98-126 register the process to execute when packets are received from child devices of other apps.
As with the ARIA app, events are sent to the “Serial Viewer”.
All: Registering Event Handlers
Lines 128-134 register the process to execute when packets are received from child devices of any app.
Twelite.on([](const BarePacket& packet) {
    String jsonStr = createJsonFrom(packet);
    if (not(jsonStr.length() <= 0)) {
        events.send(jsonStr.c_str(), "data_bare_packet", millis());
    }
    events.send("unparsed_bare_packet", "data_parsing_result", millis());
});
Here as well, the packet data string is sent to the “Serial Viewer”.
OLED Display Settings
Lines 137-142 configure the OLED display.
    Wire.begin();
    SeeedGrayOled.init(SSD1327);
    SeeedGrayOled.setNormalDisplay();
    SeeedGrayOled.setVerticalMode();
    SeeedGrayOled.setGrayLevel(0x0F);
    SeeedGrayOled.clearDisplay();
If the OLED is not connected, nothing will happen.
Wireless LAN Settings
Lines 146-154 configure the wireless LAN.
WiFi.mode(WIFI_AP);
char uidCString[8];
sprintf(uidCString, " (%02X)", createUidFromMac());
char ssidCString[20];
sprintf(ssidCString, "%s%s", WIFI_SSID_BASE, uidCString);
WiFi.softAP(ssidCString, WIFI_PASSWORD, WIFI_CH, false, 8);
delay(100);    // IMPORTANT: Waiting for SYSTEM_EVENT_AP_START
WiFi.softAPConfig(WIFI_IP, WIFI_IP, WIFI_MASK);
MDNS.begin(HOSTNAME);
If you omit
delay(100), initialization may fail.File System Settings
Line 187 configures the LittleFS file system.
if (LittleFS.begin()) { Serial.println("Mounted file system."); }
This allows you to retrieve files such as HTML written to the flash area as web pages.
Web Server Settings
Lines 190-217 configure the web server.
Handling GET Requests
For example, lines 195-199 return /signal-viewer.html from the LittleFS file system in response to a GET request to /signal-viewer.
server.on("/signal-viewer", HTTP_GET,
          [](AsyncWebServerRequest* request) {
              Serial.println("HTTP_GET: signal-viewer.html");
              request->send(LittleFS, "/signal-viewer.html", "text/html");
          });
Server Initialization
Lines 215-217 set the root of the file system as the server root, register the event source, and start the server.
server.serveStatic("/", LittleFS, "/");
server.addHandler(&events);
server.begin();
Updating TWELITE Data
Line 223 calls Twelite.update().
Twelite.update();
Twelite.update() is a function that sequentially reads packet data (in ModBus ASCII format) sent from the TWELITE parent device, one byte at a time.
By repeatedly calling
Twelite.update() in the loop(), the interpretation of packet data sent from the TWELITE parent progresses. When the interpretation of the packet data is completed, an event like above is triggered.If the call to this function is blocked by processing such as
delay(), reading the packet data string may not be fast enough. Always implement time-consuming processes asynchronously, and make the loop() function run as fast as possible.Web Page
This section does not provide a detailed explanation of the web page. Only important points are explained.
Here, as an example, we will look at the CUE viewer page data/cue-viewer.html.
HTML: Grid System
The HTML of this sample uses Flexbox Grid (the source file is data/css/flexboxgrid.min.css).
It uses a 12-column grid system similar to Bootstrap, as shown below.
      <div class="col-xs-6 col-sm-6 col-md-5 col-lg-4">
        <div class="neumorphic inset dense row center-xs middle-xs">
          <div class="col-xs-12 col-sm-12 col-md-12 col-lg-12 npr npl">
            <img src="./images/logo-lands.svg" class="logo" />
          </div>
        </div>
      </div>

      <div class="col-xs-6 col-sm-6 col-md-7 col-lg-8">
        <div class="neumorphic inset dense row center-xs middle-xs">
          <div class="col-xs-12 col-sm-12 col-md-12 col-lg-12 nwp npr npl">
            <span class="medium bold">TWELITE SPOT</span>
          </div>
          <div class="col-xs-12 col-sm-12 col-md-12 col-lg-12 nwp npr npl">
            <span class="small bold">CUE Viewer</span>
          </div>
        </div>
      </div>
Here, the element centered on the logo is set to 6/12 width, and the element centered on the text is also 6/12 width, so both are arranged in a row with equal width. The elements centered on the text TWELITE SPOT and CUE Viewer are both 12/12 width, meaning they are arranged in two rows, each occupying one full row.
Classes like
xs- and sm- specify screen widths and can be used for responsive design.HTML: Data Display Section
Elements displaying data received from TWELITE child devices are given unique IDs.
Below is an excerpt showing the part that displays the X-axis acceleration received from TWELITE CUE.
<div class="col-xs-4 nwp npr npl">
  <code class="medium"
        id="latest-accel-x">±--.--</code>
  <code class="small">G</code>
</div>
Here, the ID latest-accel-x is assigned. This ID is used to update the value from the script.
JS: Global Variables
From here, we explain the scripts corresponding to each HTML file.
As an example, we will look at data/js/cue-viewer.js.
Lines 4-8 declare global variables for storing the latest acceleration values.
let latest_accel = {
    x: 0.0,
    y: 0.0,
    z: 0.0
};
These values are also used by the graph, so global variables are used to simplify the implementation.
JS: Graph Settings
Lines 11-133 configure the graph drawing library Chart.js | Chart.js and its plugin chartjs-plugin-streaming.
For details, refer to the Chart.js documentation or chartjs-plugin-streaming documentation.
JS: Updating Page Content
The function processDataAppCueTweliteCueMode() on lines 136-235 updates the page content when the data_app_cue_twelite_cue_mode event is received from the sketch.
For example, lines 184-208 update the voltage value and emoji according to the power supply voltage of TWELITE CUE.
if (data.vcc >= 3000) {
    document.getElementById("latest-vcc-icon").innerHTML = "🔋";
    document.getElementById("latest-vcc-data").innerHTML = `${(data.vcc / 1000.0).toFixed(2).toString().padStart(4)}`;
    document.getElementById("latest-vcc-data").classList.remove("red");
    document.getElementById("latest-vcc-data").classList.remove("yellow");
    document.getElementById("latest-vcc-data").classList.add("green");
} else if (data.vcc >= 2700) {
    document.getElementById("latest-vcc-icon").innerHTML = "🔋";
    document.getElementById("latest-vcc-data").innerHTML = `${(data.vcc / 1000.0).toFixed(2).toString().padStart(4)}`;
    document.getElementById("latest-vcc-data").classList.remove("red");
    document.getElementById("latest-vcc-data").classList.remove("yellow");
    document.getElementById("latest-vcc-data").classList.remove("green");
} else if (data.vcc >= 2400) {
    document.getElementById("latest-vcc-icon").innerHTML = "🪫";
    document.getElementById("latest-vcc-data").innerHTML = `${(data.vcc / 1000.0).toFixed(2).toString().padStart(4)}`;
    document.getElementById("latest-vcc-data").classList.remove("red");
    document.getElementById("latest-vcc-data").classList.add("yellow");
    document.getElementById("latest-vcc-data").classList.remove("green");
} else {
    document.getElementById("latest-vcc-icon").innerHTML = "🪫";
    document.getElementById("latest-vcc-data").innerHTML = `${(data.vcc / 1000.0).toFixed(2).toString().padStart(4)}`;
    document.getElementById("latest-vcc-data").classList.add("red");
    document.getElementById("latest-vcc-data").classList.remove("yellow");
    document.getElementById("latest-vcc-data").classList.remove("green");
}
Here, when the power supply voltage drops below 2700mV, the emoji changes from 🔋 to 🪫, and as the voltage drops from 3000mV → 2700mV → 2400mV, the CSS class applied to the voltage value text color is switched accordingly.
Registering Event Listeners
Lines 254-257 register the process to execute when events are received from the sketch.
source.addEventListener("data_app_cue_twelite_cue_mode", (e) => {
    console.log("data_app_cue_twelite_cue_mode", e.data);
    processDataAppCueTweliteCueMode(JSON.parse(e.data));
}, false);
Here, the event message received from the sketch is parsed as a JSON string, and the resulting data is passed to the function processDataAppCueTweliteCueMode().
Related Information
Arduino
- Official Site: Arduino - Home
- API Reference: Arduino Reference - Arduino Reference
- Coding Style Guide: Arduino Style Guide for Creating Libraries | Arduino Documentation
- Official JSON Library: arduino-libraries/Arduino_JSON: Official JSON Library for Arduino
ESP32
- Product Information: ESP32 Wi-Fi & Bluetooth MCU I Espressif Systems
- Datasheet: esp32_datasheet_en.pdf
- Arduino Toolchain: espressif/arduino-esp32: Arduino core for the ESP32
- Getting Started: Getting Started — Arduino-ESP32 documentation
- Installation: Installing — Arduino-ESP32 documentation
- API Reference: Libraries — Arduino-ESP32 documentation
- Wi-Fi API: Wi-Fi API — Arduino-ESP32 documentation
- Tutorials: Tutorials — Arduino-ESP32 documentation
- Troubleshooting: Troubleshooting — Arduino-ESP32 documentation
Community
Libraries
- Asynchronous TCP: me-no-dev/AsyncTCP: Async TCP Library for ESP32
- Asynchronous Web Server: me-no-dev/ESPAsyncWebServer: Async Web Server for ESP8266 and ESP32
- Seeed 96x96 / 128x128 OLED: Seeed-Studio/OLED_Display_96X96: Seeed OLED Display 96*96 library
Plugins
- File Writing: me-no-dev/arduino-esp32fs-plugin: Arduino plugin for uploading files to ESP32 file system
- Stack Trace: me-no-dev/EspExceptionDecoder: Exception Stack Trace Decoder for ESP8266 and ESP32
The plugins are written in Java, so unlike Arduino IDE 1.x, they do not work on Arduino IDE 2.x, which is not Java-based. For more details, see the Arduino IDE GitHub Issue (Missing support for external tools / plugins · Issue #58 · arduino/arduino-ide).
Web Related
ECMAScript (JavaScript)
- API Reference: Web technology for developers | MDN
- ES2016+ compatibility list by version: ECMAScript 2016+ compatibility table
Community
- CSS
- Web colors and color schemes: Traditional Colors of World
- Bootstrap-like grid system: Flexbox Grid
- Neumorphism CSS generator: Neumorphism/Soft UI CSS shadow generator
- ECMAScript
- Graph drawing: Chart.js | Chart.js
- Real-time streaming plugin: Getting Started | chartjs-plugin-streaming
- Clock and time: Luxon Home
- Graph drawing: Chart.js | Chart.js
2 - Relay for WebSocket
An explanation of the sample sketch spot-router, which relays data from the end device to a WebSocket server.
This is an explanation of the sample sketch
spot-router, which acts as a wireless LAN end device and relays received packet data strings to a WebSocket server on the LAN.2.1 - Relay for WebSocket
Latest version
This is an explanation of the sample sketch
spot-router, which acts as a wireless LAN client and relays received packet data strings to a WebSocket server on the LAN.This article uses third-party open source software.
We cannot provide detailed instructions on how to use third-party software. We also assume no responsibility for any damages caused by using third-party software.
Obtaining the source code
Available from GitHub (monowireless/spot-router).
System overview
spot-router forwards strings output based on data received by the TWELITE parent device (in ModBus ASCII format of App_Wings) to a WebSocket server.
To receive data relayed by spot-server, you need to set up a WebSocket server.
Requirements for development
-
Wireless LAN Gateway TWELITE SPOT
- USB-C cable for power
- USB AC adapter (capable of supplying 1A or more)
-
Accelerometer Sensor Wireless Tag TWELITE CUE or other client devices (If you do not have one, please purchase 👉 List of retailers)
- Power source such as CR2032 coin battery
-
USB Adapter TWELITE R3 (If you do not have one, please purchase 👉 List of retailers)
- USB-C cable for communication
- 💻 WebSocket server
- 💻 Development computer
Environment setup
Installing IDE and toolchain
Please refer to How to set up a development environment with Arduino IDE 1.x.
Or
Please refer to How to set up a development environment with Arduino IDE 2.x.
Installing libraries
First, if there is no libraries folder in the Arduino sketchbook location (specified in Arduino IDE preferences, e.g., C:\Users\foo\Documents\Arduino), create it.
WebSocket library
- Download the Zip file from GitHub (Links2004/arduinoWebSockets)
- Extract the Zip file and place the
arduinoWebSockets-<version>folder into thelibrariesfolder
Obtaining the project files
- Download the Zip file from GitHub (monowireless/spot-router)
- Extract the Zip file and rename the folder from
spot-router-maintospot-router - Place the
spot-routerfolder into the Arduino sketchbook location (specified in Arduino IDE preferences, e.g.,C:\Users\foo\Documents\Arduino)
Changing user settings
Open config.h from the top tab in Arduino IDE and modify the wireless LAN and WebSocket server settings (Details).
How to upload the project file
Please refer to How to upload sketches to ESP32.
Sketch
This is an explanation of the Arduino sketch spot-router.ino.
Including libraries
Arduino and ESP32 official libraries
Lines 4-5 include the official Arduino and ESP32 libraries.
#include <Arduino.h>
#include <WiFi.h>
| Header file | Description | Notes |
|---|---|---|
Arduino.h | Basic Arduino library | Sometimes can be omitted but included here for completeness |
WiFi.h | ESP32 WiFi |
Third-party libraries
Line 8 includes a third-party library.
#include <WebSocketsClient.h>
| Header file | Description | Notes |
|---|---|---|
WebSocketsClient.h | Acts as a WebSocket client |
MWings library
Line 11 includes the MWings library.
#include <MWings.h>
Defining user settings
Line 14 includes config.h.
#include "config.h"
config.h defines user settings. Please modify these settings before running.Defining wireless LAN settings
Lines 4-5 in config.h define wireless LAN settings applied to the ESP32 onboard TWELITE SPOT.
const char* WIFI_SSID = "YOUR SSID";            // Modify it
const char* WIFI_PASSWORD = "YOUR PASSWORD";    // Modify it
| Name | Description |
|---|---|
WIFI_SSID | SSID of the network to connect to |
WIFI_PASSWORD | Password of the network to connect to |
Defining WebSocket settings
Lines 8-10 in config.h define WebSocket client settings.
const char* WS_SERVER_IP = "YOUR ADDRESS";    // Modify it
const int WS_SERVER_PORT = 8080;
const char* WS_SERVER_PATH = "/";
| Name | Description |
|---|---|
WS_SERVER_IP | IP address of the server to send to |
WS_SERVER_PORT | Port number of the server to send to |
WS_SERVER_PATH | Path of the WebSocket server to send to |
Defining pin numbers
Lines 17-21 define pin numbers.
const uint8_t TWE_RST = 5;
const uint8_t TWE_PRG = 4;
const uint8_t LED = 18;
const uint8_t ESP_RXD1 = 16;
const uint8_t ESP_TXD1 = 17;
| Name | Description |
|---|---|
TWE_RST | Pin number connected to TWELITE’s RST pin |
TWE_PRG | Pin number connected to TWELITE’s PRG pin |
LED | Pin number connected to the ESP32 onboard LED |
ESP_RXD1 | Pin number connected to TWELITE’s TX pin |
ESP_TXD1 | Pin number connected to TWELITE’s RX pin |
For connection details, please refer to the circuit diagram in the TWELITE SPOT datasheet.
Defining TWELITE settings
Lines 24-27 define settings applied to the TWELITE parent device onboard TWELITE SPOT.
const uint8_t TWE_CH = 18;
const uint32_t TWE_APPID = 0x67720102;
const uint8_t TWE_RETRY = 2;
const uint8_t TWE_POWER = 3;
| Name | Description |
|---|---|
TWE_CH | TWELITE frequency channel |
TWE_APPID | TWELITE application ID |
TWE_RETRY | TWELITE retry count (when sending) |
TWE_POWER | TWELITE transmission power |
Since this sample does not send commands from the TWELITE parent device, the contents of lines 29-30 are not relevant.
Declaring global objects
Line 30 declares a global object.
WebSocketsClient webSocket;
| Name | Description |
|---|---|
webSocket | WebSocket client interface |
Declaring function prototypes
Line 33 declares a function prototype.
String createPacketStringFrom(const BarePacket& packet);
| Name | Description |
|---|---|
createPacketStringFrom() | Reconstructs a formatted string from received packet data |
Setting up TWELITE
Lines 42-47 call Twelite.begin() to configure and start the TWELITE parent device onboard TWELITE SPOT.
Serial2.begin(115200, SERIAL_8N1, ESP_RXD1, ESP_TXD1);
    if (Twelite.begin(Serial2,
                      LED, TWE_RST, TWE_PRG,
                      TWE_CH, TWE_APPID, TWE_RETRY, TWE_POWER)) {
        Serial.println("Started TWELITE.");
    }
| Parameter | Type | Description |
|---|---|---|
Serial2 | HardwareSerial& | Serial port used for communication with TWELITE |
LED | int | Pin number connected to status LED |
TWE_RST | int | Pin number connected to TWELITE’s RST pin |
TWE_PRG | int | Pin number connected to TWELITE’s PRG pin |
TWE_CHANNEL | uint8_t | TWELITE frequency channel |
TWE_APP_ID | uint32_t | TWELITE application ID |
TWE_RETRY | uint8_t | TWELITE retry count (when sending) |
TWE_POWER | uint8_t | TWELITE transmission power |
Registering event handlers
Lines 49-54 register processing to be performed when packets are received from any client application.
Twelite.on([](const BarePacket& packet) {
    String packetStr = createPacketStringFrom(packet);
    if (not(packetStr.length() <= 0)) {
        webSocket.sendTXT(packetStr.c_str());
    }
});
Here, a formatted string (in ModBus ASCII format) is reconstructed from the packet data and sent to the WebSocket server.
Configuring wireless LAN
Lines 57-71 configure the wireless LAN.
WiFi.mode(WIFI_STA);
WiFi.setAutoReconnect(true);
WiFi.begin(WIFI_SSID, WIFI_PASSWORD);
Serial.print("Connecting to WiFi ..");
while (WiFi.status() != WL_CONNECTED) {
    static int count = 0;
    Serial.print('.');
    delay(500);
    // Retry every 5 seconds
    if (count++ % 10 == 0) {
        WiFi.disconnect();
        WiFi.reconnect();
        Serial.print('!');
    }
}
Here, the device is set as a wireless LAN client and connects to the specified network.
The
while loop does not exit until the network connection is established.Configuring WebSocket
Lines 76-77 configure the WebSocket.
webSocket.begin(WS_SERVER_IP, WS_SERVER_PORT, WS_SERVER_PATH);
webSocket.setReconnectInterval(5000);
Here, the WebSocket server and reconnection interval are specified.
Also, lines 78-97 register events for when the connection to the server is disconnected, connected, and when messages are received.
webSocket.onEvent([](WStype_t type, uint8_t* payload, size_t length) {
    switch (type) {
    case WStype_DISCONNECTED: {
        Serial.println("Disconnected!");
        break;
    }
    case WStype_CONNECTED: {
        Serial.print("Connected to url: ");
        Serial.println(reinterpret_cast<char*>(payload));
        webSocket.sendTXT("This is TWELITE SPOT to ground control");
        break;
    }
    case WStype_TEXT: {
        Serial.print("Got text: ");
        Serial.println(reinterpret_cast<char*>(payload));
        break;
    }
    default: break;
    }
});
In particular, when connected to the server, a message is sent to the server.
webSocket.sendTXT("This is TWELITE SPOT to ground control");
Updating TWELITE data
Line 102 calls Twelite.update().
Twelite.update();
Twelite.update() reads packet data bytes (in ModBus ASCII format) sequentially from the TWELITE parent device.
By repeatedly calling
Twelite.update() inside loop(), the interpretation of packet data sent from the TWELITE parent device progresses. When packet data interpretation is complete, events like those above (Packet reception event registration) are triggered.Blocking this function call with processes like
delay() may cause packet data string reading to fall behind. Always implement time-consuming processes asynchronously and keep the loop() function running as fast as possible.Updating WebSocket data
Line 103 calls the process to update WebSocket data.
webSocket.loop();
As with
Twelite.update(), blocking this function call with processes like delay() may cause data updates to fall behind. Always implement time-consuming processes asynchronously and keep the loop() function running as fast as possible.Appendix: Verifying operation with WebSocket server
extra/python-websocket-server/server.py is a Python script that sets up a WebSocket server and displays packet data strings from the ESP32. Using this script, you can verify the sketch operation.
# -*- coding: utf-8-unix -*-
# Python 3.11

import logging
from websocket_server import WebsocketServer

def new_client(client, server):
    server.send_message_to_all("This is ground control to TWELITE SPOT")

def new_message(client, server, message):
    print("Received an message:")
    print(message)

server = WebsocketServer(host="YOUR IP ADDRESS", port=8080, loglevel=logging.INFO)
server.set_fn_new_client(new_client)
server.set_fn_message_received(new_message)
server.run_forever()
The
codingvariable is specified because the author’s environment is Emacs. It is not a magic spell.
Verification procedure
Running the script
Install dependencies and then run.
pip3 install websocket-server
python3 server.py
When running, the following messages appear.
INFO:websocket_server.websocket_server:Listening on port 8080 for clients..
INFO:websocket_server.websocket_server:Starting WebsocketServer on main thread.
Confirming client connection
When the ESP32 successfully connects to the wireless LAN, it attempts to connect to the WebSocket server.
Upon successful connection, the client-side serial console outputs as follows.
Started TWELITE.
Connecting to WiFi .....
Connected. IP: xxx.xxx.xxx.xxx
Connected to url: /
Got text: This is ground control to TWELITE SPOT
On the server-side terminal, the output is as follows.
Received an message:
This is TWELITE SPOT to ground control
Afterwards, when TWELITE SPOT receives packets from client devices, the packet data strings are output to the server terminal as follows.
Received an message:
:80000000DE10098201BC8201800607003400038135001205350401000000113008020A8C1130010203AF0000000180050100020AC60102000211D7AF30

Received an message:
:80000000E4100A8201BC8201800607003400038135001205350401000000113008020A8C1130010203AC0000000180050100020AC40102000211DB0DCC
The format of the output string is the same as Parent/relay application manual reception message.
Related information
TWELITE
- Packet data string output format: Parent/relay application manual reception message
Arduino
- Official site: Arduino - Home
- API reference: Arduino Reference - Arduino Reference
- Coding style guide: Arduino Style Guide for Creating Libraries | Arduino Documentation
- Official JSON library: arduino-libraries/Arduino_JSON: Official JSON Library for Arduino
ESP32
- Product information: ESP32 Wi-Fi & Bluetooth MCU I Espressif Systems
- Datasheet: esp32_datasheet_en.pdf
- Arduino toolchain: espressif/arduino-esp32: Arduino core for the ESP32
- Getting started guide: Getting Started — Arduino-ESP32 documentation
- Installation: Installing — Arduino-ESP32 documentation
- API reference: Libraries — Arduino-ESP32 documentation
- Wi-Fi API: Wi-Fi API — Arduino-ESP32 documentation
- Tutorials: Tutorials — Arduino-ESP32 documentation
- Troubleshooting: Troubleshooting — Arduino-ESP32 documentation
Community
Libraries
Plugins
Because the plugin is written in Java, it does not work with Arduino IDE 2.x, which is not Java-based, unlike Arduino IDE 1.x. For details, please see the Arduino IDE GitHub page Issue (Missing support for external tools / plugins · Issue #58 · arduino/arduino-ide).
Network-related
WebSocket
- Reference: WebSocket API (WebSockets) - Web API | MDN
Community
3 - Using the REST API
An explanation of the sample sketch spot-httpbin, which uses data from a child device in an HTTP GET request
This is an explanation of the sample sketch
spot-httpbin, which acts as a Wi-Fi child device and sends received packet data to the mock server httpbin.org on the web.3.1 - Using REST API
Latest Edition
This is a sample sketch spot-httpbin that behaves as a Wi-Fi sub-device and sends received packet data to the mock server httpbin.org on the Web.
This article uses third-party open source software.
We are unable to provide detailed instructions on how to use third-party software. Also, we assume no responsibility for any damages caused by the use of such software.
Obtaining the Source Code
Available on GitHub repository monowireless/spot-httpbin.
System Overview
spot-httpbin sends part of the data received by the TWELITE parent device and the current time obtained via NTP to the mock server as an HTTP GET request, and displays the response on the serial monitor.
Supports HTTPS.
This sample uses TWELITE ARIA as an example sub-device, but it does not affect the usage of HTTP requests.
Required Components for Development
-
Wireless LAN Gateway TWELITE SPOT
- USB-C cable for power supply
- USB AC adapter (must supply 1A or more)
-
Magnetic, Temperature, and Humidity Sensor Wireless Tag TWELITE ARIA or other sub-device (If you do not have one, please purchase 👉 List of Retailers)
- Power supply such as CR2032 coin battery
-
USB Adapter TWELITE R3 (If you do not have one, please purchase 👉 List of Retailers)
- USB-C cable for communication
- 💻 Development computer
Environment Setup
Installing IDE and Toolchain
See How to set up a development environment with Arduino IDE 1.x.
Or
See How to set up a development environment with Arduino IDE 2.x.
Installing Libraries
This sample includes all required libraries by default.
The contents of the ‘src’ folder at the same level as the sketch are not shown in the IDE but are recursively built.
Getting the Project Files
- Download the zip file from GitHub (monowireless/spot-httpbin)
- Extract the zip file and rename the folder from
spot-httpbin-maintospot-httpbin - Place the
spot-httpbinfolder in the Arduino sketchbook location (as noted in Arduino IDE preferences, e.g.,C:\Users\foo\Documents\Arduino)
Changing User Settings
Open ‘config.h’ from the top tab in Arduino IDE and set the Wi-Fi SSID and password. WPA2-PSK network is assumed. Also, register the root certificate. You can obtain the root certificate from the security panel of each page in web browsers such as Chrome.
The root certificate (extension .cer) is a text file in the following format:
-----BEGIN CERTIFICATE-----
xxxxxxxxxxxxxxxxxxxxxxxxxxxxxxxxxxxxxxxxxxxxxxxxxxxxxxxxxxxxxxxx
xxxxxxxxxxxxxxxxxxxxxxxxxxxxxxxxxxxxxxxxxxxxxxxxxxxxxxxxxxxxxxxx
xxxxxxxxxxxxxxxxxxxxxxxxxxxxxxxxxxxxxxxxxxxxxxxxxxxxxxxxxxxxxxxx
-----END CERTIFICATE-----
Writing the Project Files
See How to upload the sketch to ESP32.
Sketch
Explanation of the Arduino sketch spot-httpbin.ino and config.h.
Including Libraries
Official Arduino and ESP32 Libraries
Lines 4–6 include official Arduino and ESP32 libraries.
#include <Arduino.h>
#include <WiFiClientSecure.h>
#include <WiFiUdp.h>
| Header File | Description | Note |
|---|---|---|
Arduino.h | Basic Arduino library | Sometimes can be omitted |
WiFiClientSecure.h | SSL communication on ESP32 | |
WiFiUdp.h | UDP communication | Required for NTP |
Third-party Libraries
Lines 9–10 include bundled third-party libraries.
#include "src/NTPClient/NTPClient.h"
#include "src/Time/TimeLib.h"
| Header File | Description | Note |
|---|---|---|
NTPClient.h | Access NTP servers | |
TimeLib.h | Convert epoch time |
MWings Library
Line 13 includes the MWings library.
#include <MWings.h>
User Configuration
Line 16 includes config.h.
#include "config.h"
In config.h, user-specific settings are defined. Modify them at runtime as needed.
Defining Data Types
Lines 19–26 define a structure type for storing data received from the sub-device.
struct DataFromAria {
    uint32_t serialId;
    uint8_t logicalId;
    uint16_t supplyVoltage;
    uint8_t linkQuality;
    int16_t temp100x;
    uint16_t humid100x;
};
| Name | Description |
|---|---|
serialId | Serial ID |
logicalId | Logical device ID |
supplyVoltage | Supply voltage |
linkQuality | LQI |
temp100x | Temperature ×100 |
humid100x | Humidity ×100 |
This structure assumes the use of TWELITE ARIA.
config.h
Defining Reboot Interval
Line 4 in config.h specifies the reboot interval for the ESP32.
const uint32_t REBOOT_INTERVAL = 21600; // seconds
21600 seconds = 6 hours.
In long-term operation, memory leaks may accumulate and cause malfunction.
Therefore, we implement periodic rebooting similar to a Wi-Fi router.
Defining TWELITE Settings
Lines 7–8 in config.h define the settings to be applied to the TWELITE parent module mounted on TWELITE SPOT.
const uint8_t TWE_CH = 18;
const uint32_t TWE_APPID = 0x67720102;
| Name | Description |
|---|---|
TWE_CH | TWELITE frequency channel |
TWE_APPID | TWELITE application ID |
Defining Wi-Fi Settings
Lines 11–12 in config.h define the Wi-Fi settings to be applied to the ESP32 mounted on TWELITE SPOT.
const char* WIFI_SSID = "YOUR SSID";
const char* WIFI_PASSWORD = "YOUR PASSWORD";
| Name | Description |
|---|---|
WIFI_SSID | SSID of the network to connect |
WIFI_PASSWORD | Password for the network |
Root Certificate
The template for the root certificate is provided at lines 14–16 in config.h.
const char *CA_CERT =
    "-----BEGIN CERTIFICATE-----\n"
    "-----END CERTIFICATE-----\n";
Obtain the root certificate from the security panel of the relevant page in browsers such as Chrome.
Enclose each line in double quotes and append the newline character \n before the closing quote.
Defining Host Settings
Lines 18–19 in config.h define the host settings.
const char *SERVER_HOST = "www.httpbin.org";
const uint16_t SERVER_PORT = 443;
| Name | Description |
|---|---|
SERVER_HOST | Host name of the server |
SERVER_PORT | Port number of the server |
Defining Constants
From line 21 in config.h, various constants are defined.
const uint32_t NTP_UPDATE_INTERVAL = 10000; // ms

const int QUERIES_MAX_LENGTH = 128;         // bytes (without \0)
const int32_t CONNECT_TIMEOUT = 10;     // seconds
const uint32_t RECONNECT_MIN_INTERVAL = 5; // seconds
// SEND_MIN_INTERVAL must be longer than NTP_UPDATE_INTERVAL
const uint32_t SEND_MIN_INTERVAL = 10; // seconds
const uint32_t REQUEST_TIMEOUT = 10;   // seconds
| Name | Description |
|---|---|
NTP_UPDATE_INTERVAL | Interval for obtaining NTP time |
QUERIES_MAX_LENGTH | Max length of query string (excluding null terminator) |
CONNECT_TIMEOUT | Timeout for connecting to the server |
RECONNECT_MIN_INTERVAL | Minimum interval to reconnect to Wi-Fi AP |
SEND_MIN_INTERVAL | Minimum interval between requests |
REQUEST_TIMEOUT | Timeout from request to response |
SEND_MIN_INTERVAL is set longer than NTP_UPDATE_INTERVAL.
This prevents timestamp duplication when requests are sent in rapid succession.
If SEND_MIN_INTERVAL is too short, it may overload the server when receiving consecutive packets.
Always leave a sufficient interval between requests.
Defining Pin Numbers
Lines 29–34 define pin numbers.
static const int RST_PIN = 5;
static const int PRG_PIN = 4;
static const int LED_PIN = 18;

static const int8_t RX1_PIN = 16;
static const int8_t TX1_PIN = 17;
| Name | Description |
|---|---|
RST_PIN | Pin connected to the RST pin of TWELITE |
PRG_PIN | Pin connected to the PRG pin of TWELITE |
LED_PIN | Pin connected to the ESP32 LED on the board |
RX1_PIN | Pin connected to the RX1 pin of TWELITE |
TX1_PIN | Pin connected to the TX1 pin of TWELITE |
For wiring details, refer to the schematic diagram in the TWELITE SPOT datasheet.
Declaring Global Objects
Lines 37–40 declare global objects.
static WiFiClientSecure client;
static WiFiUDP ntpUDP;
static NTPClient timeClient(ntpUDP, "ntp.nict.jp",
                            32400, NTP_UPDATE_INTERVAL); // JST(UTC+9)
| Name | Description |
|---|---|
client | Interface for HTTPS communication |
ntpUDP | Interface for UDP communication for NTP |
timeClient | Interface for NTP |
Declaring Global Variables
Lines 43–44 declare global variables.
static DataFromAria LatestDataFromAria;
static bool IsThereNewDataFromAria;
| Name | Description |
|---|---|
LatestDataFromAria | Latest data received from TWELITE ARIA |
IsThereNewDataFromAria | Flag indicating new data was received from TWELITE ARIA |
Declaring Function Prototypes
Lines 47–59 declare function prototypes.
void anotherLoopForTWELITE();
void anotherLoopForNTP();
| Name | Description |
|---|---|
anotherLoopForTWELITE | Loop function for processing TWELITE data |
anotherLoopForNTP | Loop function for retrieving time from NTP |
To enable concurrent processing with time-consuming tasks such as HTTP requests, each is registered as a separate task using FreeRTOS’s [xTaskCreatePinnedToCore()].
void initTWELITE();
void initWiFi();
void initNTP();
| Name | Description |
|---|---|
initTWELITE | Initialization function for TWELITE |
initWiFi | Initialization function for Wi-Fi |
initNTP | Initialization function for NTP |
void onAppAriaPacket(const ParsedAppAriaPacket& packet);
| Name | Description |
|---|---|
onAppAriaPacket | Callback function triggered when data is received from TWELITE ARIA |
void sendAriaData(const DataFromAria& data)
| Name | Description |
|---|---|
sendAriaData | Sends TWELITE ARIA data via HTTP GET request |
setup()
Lines 62–90 perform the overall initialization.
void setup() {
    Serial.begin(115200);

    initTWELITE();
    initWiFi();
    initNTP();

    // Attach another loop function for TWELITE
    // Note: Core 0 is also used for the WiFi task, which priority is 19 (ESP_TASKD_EVENT_PRIO - 1)
    xTaskCreatePinnedToCore(
        [](void *params) {
            while (true) {
                anotherLoopForTWELITE();
                vTaskDelay(1); // IMPORTANT for Watchdog
            }
        },
        "Task for anotherLoopForTWELITE()", 8192, nullptr, 18, nullptr,
        0); // Priority is 18 (lower than WiFi)
    // Attach another loop function for NTP
    xTaskCreatePinnedToCore(
        [](void *params) {
            while (true) {
                anotherLoopForNTP();
                vTaskDelay(1); // IMPORTANT for Watchdog
            }
        },
        "Task for anotherLoopForNTP()", 8192, nullptr, 17, nullptr,
        0); // Priority is 17 (lower than WiFi and TWELITE)
}
By using xTaskCreatePinnedToCore(), tasks other than loop() are registered.
The following section is an anonymous lambda function with no capture. This avoids unnecessary pollution of the global namespace.
        [](void *params) {
            while (true) {
                anotherLoopForTWELITE();
                vTaskDelay(1); // IMPORTANT for Watchdog
            }
        },
vTaskDelay() is inserted to allow the watchdog timer to intervene.loop()
Lines 93–114 are the main loop processing.
This section handles HTTP request processing, reconnection when Wi-Fi is disconnected, and periodic resets.
void loop() {
    static uint32_t lastTimeReconnected = 0;
    if (WiFi.status() == WL_CONNECTED) {
        // Regular operations
        // Check for new data
        if (IsThereNewDataFromAria) {
            IsThereNewDataFromAria = false; // Clear first; data is updated on another thread
            DataFromAria data = LatestDataFromAria; // Now, the buffer is open for incoming data
            sendAriaData(data);
        }
    } else if (millis() - lastTimeReconnected > RECONNECT_MIN_INTERVAL * 1000) {
        // Lost connection, reconnect periodically
        Serial.println("Disconnected. Reconnecting to WiFi...");
        WiFi.begin(WIFI_SSID, WIFI_PASSWORD);
        lastTimeReconnected = millis();
    }
    // Reboot every x interval
    if (millis() > REBOOT_INTERVAL * 1000) {
        Serial.println("Rebooting...");
        ESP.restart();
    }
}
anotherLoopForTWELITE()
Lines 117–119 are the loop processing for TWELITE.
To sequentially receive and interpret data, this is made a separate task from loop(), which may contain blocking processing.
void anotherLoopForTWELITE() {
    Twelite.update();
}
anotherLoopForNTP()
Lines 120–123 are the loop processing for NTP.
This is also made a separate task from loop() because UDP communication may involve blocking processing.
void anotherLoopForNTP() {
    timeClient.update();
    setTime(timeClient.getEpochTime());
}
initTWELITE()
Lines 126–133 are the initialization process for TWELITE.
This starts the TWELITE mounted on TWELITE SPOT with the specified settings and registers a callback function for packet reception.
void initTWELITE() {
    Serial2.begin(115200);
    if (Twelite.begin(Serial2, LED_PIN, RST_PIN, PRG_PIN, TWE_CHANNEL, TWE_APP_ID)) {
        Serial.println("Started TWELITE.");
    }
    // Attach event handlers to process packets
    Twelite.on(onAppAriaPacket);
}
Please also refer to the following references:
Twelite.begin()mwings::MWings class | MWings API ReferenceTwelite.on()mwings::MWings class | MWings API Reference
initWiFi()
Lines 136–160 are the Wi-Fi initialization process.
If not connected, it retries to connect every 5 seconds.
void initWiFi() {
    Serial.print("\nConnecting to the WiFi network ");
    Serial.print(WIFI_SSID);
    Serial.println("...");
    // Begin
    WiFi.mode(WIFI_STA);
    WiFi.setAutoReconnect(true);
    WiFi.begin(WIFI_SSID, WIFI_PASSWORD);
    // Wait for connection
    Serial.print("Connecting.");
    while (WiFi.status() != WL_CONNECTED) {
        static int count = 0;
        Serial.print('.');
        delay(500);
        // Retry every 5 seconds
        if (count++ % 10 == 0) {
            WiFi.disconnect();
            WiFi.reconnect();
            Serial.print('!');
        }
    }
    Serial.println("\nConnected!");
    // Set Root CA certificate
    client.setCACert(CA_CERT);
}
initNTP()
Lines 163–167 are the initialization process for NTP.
void initNTP() {
    timeClient.begin();
    timeClient.update();
    setTime(timeClient.getEpochTime());
}
onAppAriaPacket()
Lines 170–180 describe the processing when data is received from TWELITE ARIA.
Here, HTTP transmission is not performed; instead, the data is set to a global variable.
The data set to the global variable is processed by sendAriaData() in another task.
void onAppAriaPacket(const ParsedAppAriaPacket& packet)
{
    // Store data
    LatestDataFromAria.serialId = packet.u32SourceSerialId;
    LatestDataFromAria.logicalId = packet.u8SourceLogicalId;
    LatestDataFromAria.supplyVoltage = packet.u16SupplyVoltage;
    LatestDataFromAria.linkQuality = packet.u8Lqi;
    LatestDataFromAria.temp100x = packet.i16Temp100x;
    LatestDataFromAria.humid100x = packet.u16Humid100x;
    IsThereNewDataFromAria = true;
}
sendAriaData()
Lines 183–240 are a function that sets the data from TWELITE ARIA into the query string of an HTTP GET request and sends it.
HTTP GET is used for code simplicity.
If you wish to use HTTP POST, please add a request body.
To prevent excessive server load, sending is skipped if packets arrive too frequently.
void sendAriaData(const DataFromAria& data)
{
    static uint32_t lastTimeRequested = 0;
    if (millis() - lastTimeRequested > SEND_MIN_INTERVAL * 1000 or lastTimeRequested == 0) {
        Serial.println("Connecting to the server...");
        if (not client.connect(SERVER_HOST, SERVER_PORT, CONNECT_TIMEOUT * 1000)) {
            Serial.println("Connection failed!");
        } else {
            Serial.println("Connected to the server!");
            // Make a query string
            char queries[QUERIES_MAX_LENGTH+1];
            snprintf(queries, sizeof(queries),
                     "datetime=%04d%02d%02d%02d%02d%02d&sid=%X&lid=%d&temp=%d&humid=%d&bat=%d&lqi=%d",
                     // Note that NTP_UPDATE_INTERVAL is set for 10000ms by default; second() delays up to 10s.
                     // To prevent duplication of datetime, SEND_MIN_INTERVAL is set for 10s.
                     year(), month(), day(), hour(), minute(), second(),
                     data.serialId,
                     data.logicalId,
                     data.temp100x,
                     data.humid100x,
                     data.supplyVoltage,
                     data.linkQuality);

            // Send a request
            client.println(String("GET https://") +
                           SERVER_HOST +
                           String("/get?") +
                           queries +
                           String(" HTTP/1.1"));
            client.println("Accept: */*");
            client.println(String("Host: ") + SERVER_HOST);
            client.println("Connection: close");
            client.println();
            uint32_t timeSentRequest = millis();

            // Handle a response
            while (client.connected()) {
                String line = client.readStringUntil('\n');
                if (line == "\r") {
                    Serial.println("Headers received");
                    break;
                }
                if (millis() - timeSentRequest > REQUEST_TIMEOUT * 1000) {
                    Serial.println("Request was timed out");
                    break;
                }
            }
            while (client.available()) {
                char c = client.read();
                Serial.write(c);
            }
            client.stop();
        }
        lastTimeRequested = millis();
    } else {
        Serial.println("Requests are too frequently; skip.");
    }
}
3.2 - Using the REST API
mwings-v1.1.3
This is an explanation of the sample sketch
spot-httpbin, which acts as a Wi-Fi child device and sends received packet data to the mock server httpbin.org.This article uses third-party open-source software.
We are unable to provide detailed instructions on how to use third-party software. In addition, we assume no responsibility for any damages arising from the use of such software.
Getting the Source Code
You can obtain it from the GitHub repository monowireless/spot-httpbin.
System Overview
spot-httpbin sends part of the data received by the TWELITE parent device along with the current time obtained via NTP as an HTTP GET request to a mock server, and displays the response on the serial monitor.
Supports HTTPS.
In this sample, TWELITE ARIA is used as an example child device, but it is not relevant to the use of HTTP requests.
Requirements for Development
-
Wi-Fi Gateway TWELITE SPOT
- USB-C cable for power
- USB AC adapter (must provide at least 1A)
-
Wireless tag with magnet, temperature, and humidity sensors TWELITE ARIA and other child devices (If you do not have one, please purchase 👉 List of retailers)
- Power source such as a CR2032 coin cell battery
-
USB Adapter TWELITE R3 (If you do not have one, please purchase 👉 List of retailers)
- USB-C cable for data communication
- 💻 Development Computer
Environment Setup
Installing IDE and Toolchain
See Setting up the development environment using Arduino IDE 1.x.
Installing Libraries
This sample includes required libraries from the beginning.
Although the contents of the
src folder at the same level as the sketch are not shown in the IDE, they are built recursively.Obtaining the Project Files
- Download the ZIP file from GitHub (monowireless/spot-httpbin)
- Extract the ZIP file and rename the folder from
spot-httpbin-maintospot-httpbin - Place the
spot-httpbinfolder in your Arduino sketchbook directory (set in Arduino IDE preferences, e.g.C:\Users\foo\Documents\Arduino)
Modifying User Settings
Open config.h from the tabs at the top of the Arduino IDE and set your Wi-Fi SSID and password. WPA2-PSK network is assumed. Also, register the root certificate. The root certificate can be obtained from the security page for each website using Chrome or another browser.
The root certificate (with .cer extension) is a text file in the following format:
-----BEGIN CERTIFICATE-----
xxxxxxxxxxxxxxxxxxxxxxxxxxxxxxxxxxxxxxxxxxxxxxxxxxxxxxxxxxxxxxxx
xxxxxxxxxxxxxxxxxxxxxxxxxxxxxxxxxxxxxxxxxxxxxxxxxxxxxxxxxxxxxxxx
xxxxxxxxxxxxxxxxxxxxxxxxxxxxxxxxxxxxxxxxxxxxxxxxxxxxxxxxxxxxxxxx
-----END CERTIFICATE-----
Writing the Project File
See How to upload a sketch to the ESP32.
Sketch
This section explains the Arduino sketch spot-httpbin.ino and config.h.
Including Libraries
Official Arduino and ESP32 Libraries
Lines 4–6 include official Arduino and ESP32 libraries.
#include <Arduino.h>
#include <WiFiClientSecure.h>
#include <WiFiUdp.h>
| Header File | Description | Remarks |
|---|---|---|
Arduino.h | Basic Arduino library | Can sometimes be omitted, but included for safety |
WiFiClientSecure.h | Enables SSL communication on ESP32 | |
WiFiUdp.h | Handles UDP communication | Required for NTP |
Third-Party Libraries
Lines 9–10 include bundled third-party libraries.
#include "src/NTPClient/NTPClient.h"
#include "src/Time/TimeLib.h"
| Header File | Description | Remarks |
|---|---|---|
NTPClient.h | Accesses NTP servers | |
TimeLib.h | Converts epoch time |
MWings Library
Line 13 includes the MWings library.
#include <MWings.h>
Defining User Settings
Line 16 includes the configuration file.
#include "config.h"
User settings are defined in
config.h. Modify this file before execution.Definition of Data Types
Lines 19–26 define the struct type used to store data received from the child device.
struct DataFromAria {
    uint32_t serialId;
    uint8_t logicalId;
    uint16_t supplyVoltage;
    uint8_t linkQuality;
    int16_t temp100x;
    uint16_t humid100x;
};
| Name | Description |
|---|---|
serialId | Serial ID |
logicalId | Logical device ID |
supplyVoltage | Supply voltage |
linkQuality | LQI (Link Quality Index) |
temp100x | Temperature ×100 |
humid100x | Humidity ×100 |
Here, TWELITE ARIA is used.
config.h
Definition of Reboot Interval
Line 4 of config.h specifies the reboot interval for the ESP32.
const uint32_t REBOOT_INTERVAL = 21600; // seconds
Here, 21600 seconds = 6 hours.
For long-term operation, memory leaks can accumulate and cause issues.
Therefore, like a Wi-Fi router, periodic reboots are performed.
Definition of TWELITE Settings
Lines 7–8 of config.h define the settings applied to the TWELITE parent device installed in TWELITE SPOT.
const uint8_t TWE_CH = 18;
const uint32_t TWE_APPID = 0x67720102;
| Name | Description |
|---|---|
TWE_CH | TWELITE channel |
TWE_APPID | TWELITE application ID |
Definition of Wi-Fi Settings
Lines 11–12 of config.h define the Wi-Fi settings applied to the ESP32 installed in TWELITE SPOT.
const char* WIFI_SSID = "YOUR SSID";
const char* WIFI_PASSWORD = "YOUR PASSWORD";
| Name | Description |
|---|---|
WIFI_SSID | SSID of the network to connect to |
WIFI_PASSWORD | Password of the network to connect to |
Root Certificate
Lines 14–16 of config.h provide a template for describing the contents of the root certificate.
const char *CA_CERT =
    "-----BEGIN CERTIFICATE-----\n"
    "-----END CERTIFICATE-----\n";
Obtain the root certificate from the security screen for each website using Chrome or another web browser.
All lines must be enclosed in double quotes, and a newline character \n must be added before the ending double quote.
Host Settings
Lines 18–19 of config.h define the host settings.
const char *SERVER_HOST = "www.httpbin.org";
const uint16_t SERVER_PORT = 443;
| Name | Description |
|---|---|
SERVER_HOST | Server host name |
SERVER_PORT | Server port number |
Definition of Various Constants
From line 21 of config.h, various constants are defined.
const uint32_t NTP_UPDATE_INTERVAL = 10000; // ms

const int QUERIES_MAX_LENGTH = 128;         // bytes (without \0)
const int32_t CONNECT_TIMEOUT = 10;     // seconds
const uint32_t RECONNECT_MIN_INTERVAL = 5; // seconds
// SEND_MIN_INTERVAL must be longer than NTP_UPDATE_INTERVAL
const uint32_t SEND_MIN_INTERVAL = 10; // seconds
const uint32_t REQUEST_TIMEOUT = 10;   // seconds
| Name | Description |
|---|---|
NTP_UPDATE_INTERVAL | Interval for obtaining NTP time |
QUERIES_MAX_LENGTH | Maximum length of query string (excluding null character) |
CONNECT_TIMEOUT | Timeout when connecting to the server |
RECONNECT_MIN_INTERVAL | Minimum interval when reconnecting to Wi-Fi access point |
SEND_MIN_INTERVAL | Minimum interval between requests |
REQUEST_TIMEOUT | Timeout from request to response |
SEND_MIN_INTERVAL is set to be longer than NTP_UPDATE_INTERVAL.
If the request interval is too short, timestamps may overlap between requests.
If you set SEND_MIN_INTERVAL too short, the server may be overloaded when packets are received in rapid succession.
Be sure to leave an appropriate interval.
Definition of Pin Numbers
Lines 29–31 define the pin numbers.
static const int RST_PIN = 5;
static const int PRG_PIN = 4;
static const int LED_PIN = 18;
| Name | Description |
|---|---|
RST_PIN | Pin number connected to TWELITE’s RST pin |
PRG_PIN | Pin number connected to TWELITE’s PRG pin |
LED_PIN | Pin number connected to the ESP32 LED on the board |
For connection details, see the schematic diagram in the TWELITE SPOT data sheet.
Declaration of Global Objects
Lines 34–37 declare global objects.
static WiFiClientSecure client;
static WiFiUDP ntpUDP;
static NTPClient timeClient(ntpUDP, "ntp.nict.jp",
                            32400, NTP_UPDATE_INTERVAL); // JST(UTC+9)
| Name | Description |
|---|---|
client | Interface for HTTPS communication |
ntpUDP | Interface for UDP communication for NTP |
timeClient | Interface for NTP |
Declaration of Global Variables
Lines 40–41 declare global variables.
static DataFromAria LatestDataFromAria;
static bool IsThereNewDataFromAria;
| Name | Description |
|---|---|
LatestDataFromAria | Latest data received from TWELITE ARIA |
IsThereNewDataFromAria | Flag indicating new data has been received from TWELITE ARIA |
Declaration of Function Prototypes
Lines 44–56 declare function prototypes.
void anotherLoopForTWELITE();
void anotherLoopForNTP();
| Name | Description |
|---|---|
anotherLoopForTWELITE | Loop function for processing TWELITE data |
anotherLoopForNTP | Loop function for obtaining time via NTP |
xTaskCreatePinnedToCore() is used to register a separate task from the loop() function.
void initTWELITE();
void initWiFi();
void initNTP();
| Name | Description |
|---|---|
initTWELITE | Function to initialize TWELITE |
initWiFi | Function to initialize Wi-Fi |
initNTP | Function to initialize NTP |
void onAppAriaPacket(const ParsedAppAriaPacket& packet);
| Name | Description |
|---|---|
onAppAriaPacket | Callback function when data is received from TWELITE ARIA |
void sendAriaData(const DataFromAria& data)
| Name | Description |
|---|---|
sendAriaData | Function to send TWELITE ARIA data via HTTP GET request |
setup()
Lines 59–87 perform overall initialization.
void setup() {
    Serial.begin(115200);

    initTWELITE();
    initWiFi();
    initNTP();

    // Attach another loop function for TWELITE
    // Note: Core 0 is also used for the WiFi task, which priority is 19 (ESP_TASKD_EVENT_PRIO - 1)
    xTaskCreatePinnedToCore(
        [](void *params) {
            while (true) {
                anotherLoopForTWELITE();
                vTaskDelay(1); // IMPORTANT for Watchdog
            }
        },
        "Task for anotherLoopForTWELITE()", 8192, nullptr, 18, nullptr,
        0); // Priority is 18 (lower than WiFi)
    // Attach another loop function for NTP
    xTaskCreatePinnedToCore(
        [](void *params) {
            while (true) {
                anotherLoopForNTP();
                vTaskDelay(1); // IMPORTANT for Watchdog
            }
        },
        "Task for anotherLoopForNTP()", 8192, nullptr, 17, nullptr,
        0); // Priority is 17 (lower than WiFi and TWELITE)
}
xTaskCreatePinnedToCore() is used to register a separate task from the loop() function.
The following part is an unnamed function without a capture. This avoids unnecessary pollution of the global namespace.
        [](void *params) {
            while (true) {
                anotherLoopForTWELITE();
                vTaskDelay(1); // IMPORTANT for Watchdog
            }
        },
vTaskDelay() is inserted to allow intervention for the watchdog timer.loop()
Lines 90–111 are the main loop process.
This handles HTTP requests, reconnection to Wi-Fi when disconnected, and periodic resets.
void loop() {
    static uint32_t lastTimeReconnected = 0;
    if (WiFi.status() == WL_CONNECTED) {
        // Regular operations
        // Check for new data
        if (IsThereNewDataFromAria) {
            IsThereNewDataFromAria = false; // Clear first; data is updated on another thread
            DataFromAria data = LatestDataFromAria; // Now, the buffer is open for incoming data
            sendAriaData(data);
        }
    } else if (millis() - lastTimeReconnected > RECONNECT_MIN_INTERVAL * 1000) {
        // Lost connection, reconnect periodically
        Serial.println("Disconnected. Reconnecting to WiFi...");
        WiFi.begin(WIFI_SSID, WIFI_PASSWORD);
        lastTimeReconnected = millis();
    }
    // Reboot every x interval
    if (millis() > REBOOT_INTERVAL * 1000) {
        Serial.println("Rebooting...");
        ESP.restart();
    }
}
anotherLoopForTWELITE()
Lines 114–116 are the loop process for TWELITE.
To sequentially receive and interpret data, this is run as a separate task from the (potentially blocking) loop().
void anotherLoopForTWELITE() {
    Twelite.update();
}
anotherLoopForNTP()
Lines 117–120 are the loop process for NTP.
Since this involves UDP communication, it is also run as a separate task from the (potentially blocking) loop().
void anotherLoopForNTP() {
    timeClient.update();
    setTime(timeClient.getEpochTime());
}
initTWELITE()
Lines 123–130 perform the initialization process for TWELITE.
This starts the TWELITE installed in TWELITE SPOT with the specified settings and registers a callback function for packet reception.
void initTWELITE() {
    Serial2.begin(115200);
    if (Twelite.begin(Serial2, LED_PIN, RST_PIN, PRG_PIN, TWE_CHANNEL, TWE_APP_ID)) {
        Serial.println("Started TWELITE.");
    }
    // Attach event handlers to process packets
    Twelite.on(onAppAriaPacket);
}
See also the following references:
Twelite.begin()mwings::MWings class | MWings API ReferenceTwelite.on()mwings::MWings class | MWings API Reference
initWiFi()
Lines 133–157 perform Wi-Fi initialization.
If not connected, reconnection is attempted every 5 seconds.
void initWiFi() {
    Serial.print("\nConnecting to the WiFi network ");
    Serial.print(WIFI_SSID);
    Serial.println("...");
    // Begin
    WiFi.mode(WIFI_STA);
    WiFi.setAutoReconnect(true);
    WiFi.begin(WIFI_SSID, WIFI_PASSWORD);
    // Wait for connection
    Serial.print("Connecting.");
    while (WiFi.status() != WL_CONNECTED) x
        static int count = 0;
        Serial.print('.');
        delay(500);
        // Retry every 5 seconds
        if (count++ % 10 == 0) {
            WiFi.disconnect();
            WiFi.reconnect();
            Serial.print('!');
        }
    }
    Serial.println("\nConnected!");
    // Set Root CA certificate
    client.setCACert(CA_CERT);
}
initNTP()
Lines 160–164 perform NTP initialization.
void initNTP() {
    timeClient.begin();
    timeClient.update();
    setTime(timeClient.getEpochTime());
}
onAppAriaPacket()
Lines 167–177 describe the process performed when data is received from TWELITE ARIA.
Here, HTTP transmission is not performed; instead, the data is set to a global variable.
The data set in the global variable is processed by sendAriaData() in a separate task.
void onAppAriaPacket(const ParsedAppAriaPacket& packet)
{
    // Store data
    LatestDataFromAria.serialId = packet.u32SourceSerialId;
    LatestDataFromAria.logicalId = packet.u8SourceLogicalId;
    LatestDataFromAria.supplyVoltage = packet.u16SupplyVoltage;
    LatestDataFromAria.linkQuality = packet.u8Lqi;
    LatestDataFromAria.temp100x = packet.i16Temp100x;
    LatestDataFromAria.humid100x = packet.u16Humid100x;
    IsThereNewDataFromAria = true;
}
sendAriaData()
Lines 180–237 define a function that sets TWELITE ARIA data into the query string of an HTTP GET request and sends it.
HTTP GET is used for simplicity.
If you want to use HTTP POST, please add a request body.
To avoid excessive load on the server, transmission is skipped if packets arrive too frequently.
void sendAriaData(const DataFromAria& data)
{
    static uint32_t lastTimeRequested = 0;
    if (millis() - lastTimeRequested > SEND_MIN_INTERVAL * 1000 or lastTimeRequested == 0) {
        Serial.println("Connecting to the server...");
        if (not client.connect(SERVER_HOST, SERVER_PORT, CONNECT_TIMEOUT * 1000)) {
            Serial.println("Connection failed!");
        } else {
            Serial.println("Connected to the server!");
            // Make a query string
            char queries[QUERIES_MAX_LENGTH+1];
            snprintf(queries, sizeof(queries),
                     "datetime=%04d%02d%02d%02d%02d%02d&sid=%X&lid=%d&temp=%d&humid=%d&bat=%d&lqi=%d",
                     // Note that NTP_UPDATE_INTERVAL is set for 10000ms by default; second() delays up to 10s.
                     // To prevent duplication of datetime, SEND_MIN_INTERVAL is set for 10s.
                     year(), month(), day(), hour(), minute(), second(),
                     data.serialId,
                     data.logicalId,
                     data.temp100x,
                     data.humid100x,
                     data.supplyVoltage,
                     data.linkQuality);

            // Send a request
            client.println(String("GET https://") +
                           SERVER_HOST +
                           String("/get?") +
                           queries +
                           String(" HTTP/1.1"));
            client.println("Accept: */*");
            client.println(String("Host: ") + SERVER_HOST);
            client.println("Connection: close");
            client.println();
            uint32_t timeSentRequest = millis();

            // Handle a response
            while (client.connected()) {
                String line = client.readStringUntil('\n');
                if (line == "\r") {
                    Serial.println("Headers received");
                    break;
                }
                if (millis() - timeSentRequest > REQUEST_TIMEOUT * 1000) {
                    Serial.println("Request was timed out");
                    break;
                }
            }
            while (client.available()) {
                char c = client.read();
                Serial.write(c);
            }
            client.stop();
        }
        lastTimeRequested = millis();
    } else {
        Serial.println("Requests are too frequently; skip.");
    }
}
4 - Using Google Sheets
Explanation of the sample sketch ‘spot-google-sheets’ for uploading data from TWELITE ARIA to Google Sheets
This section explains the sample sketch
spot-google-sheets, which acts as a Wi-Fi client and uploads data received from TWELITE ARIA to Google Sheets in the cloud.4.1 - Using Google Sheets
Latest Edition
This is an explanation of the sample sketch
spot-google-sheets, which acts as a Wi-Fi client and uploads data received from TWELITE ARIA to Google Sheets in the cloud. This sketch uses FreeRTOS functions from the ESP32 Arduino environment.This article uses third-party open-source software.
We are unable to provide detailed instructions on how to use third-party software. We are also not responsible for any damages caused by the use of third-party software.
This sample mainly uses the Google Sheets API v4.
Getting the Source Code
You can obtain it from GitHub (monowireless/spot-google-sheets).
System Overview
TWELITE SPOT automatically creates a spreadsheet using a pre-created service account and shares the file with a specified user account.
By logging into the user account, the user can view and edit the spreadsheet created by TWELITE SPOT from the “Shared with me” page in Google Drive.
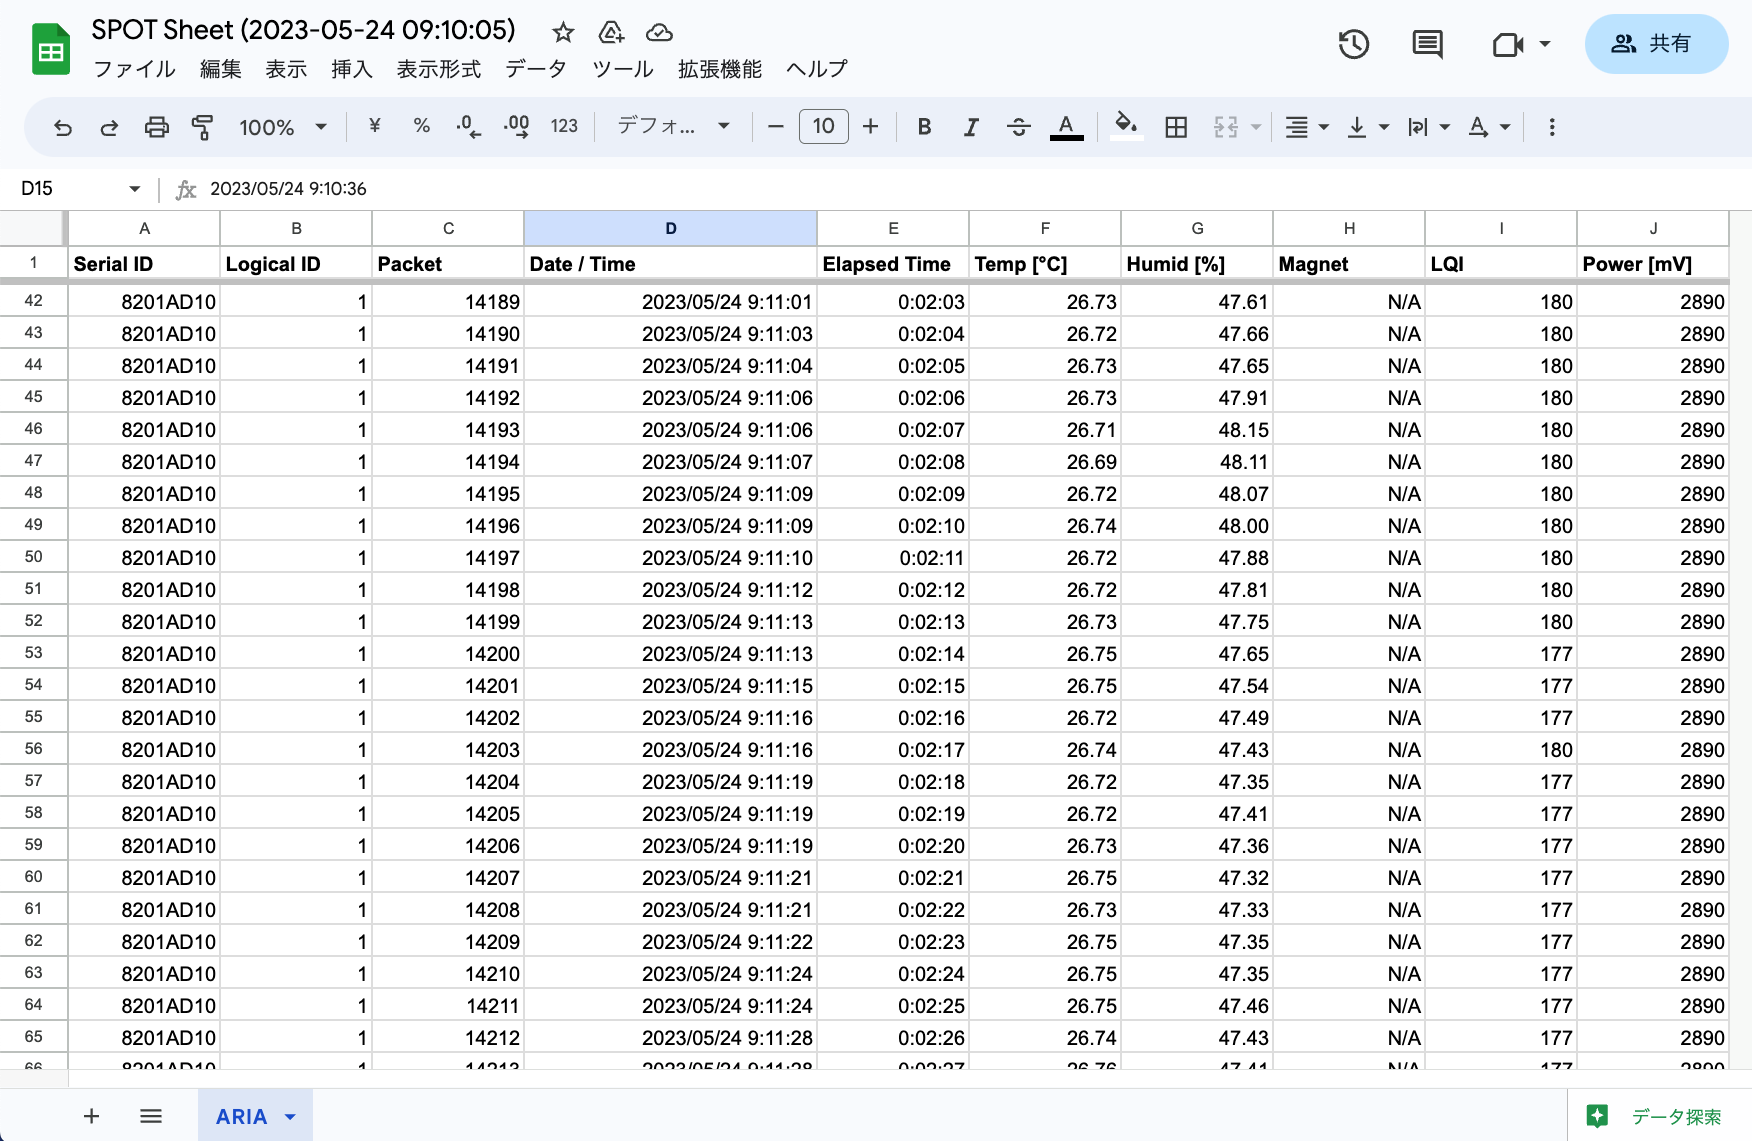
Image of the created spreadsheet
TWELITE SPOT continuously adds data rows to the created spreadsheet.
As of May 2023, there are no additional charges for using the Google Sheets / Drive API.
However, there are usage limits such as the number of queries (Sheets API / Drive API).
For example, the Google Sheets API must limit requests to 60 times per minute. Exceeding this will result in errors.
A service account is a Google account used by applications.
For more details, see the Google documentation.
Requirements for Development
-
Wireless LAN Gateway TWELITE SPOT
- USB-C cable for power
- USB AC adapter (must supply at least 1A)
-
Temperature and Humidity Sensor Wireless Tag TWELITE ARIA (If you don’t have one, please purchase 👉 Retailers)
- CR2032 coin battery
-
USB Adapter TWELITE R3 (If you don’t have one, please purchase 👉 Retailers)
- USB-C cable for communication
- 💻 Development computer
- Google account
This article uses TWELITE ARIA, but by modifying the source code, it can also support child devices such as TWELITE CUE.
However, if the amount of data written to the sheet increases, be mindful of the API usage limits.
Environment Setup
Installing the IDE and Toolchain
See How to set up the development environment using Arduino IDE 1.x.
Or
See How to set up the development environment using Arduino IDE 2.x.
Installing Libraries
ESP-Google-Sheet-Client Library
Open the Library Manager and search for esp-google-sheet to install it.
You can also obtain it from GitHub (mobizt/ESP-Google-Sheet-Client).
Official NTP Library
Open the Library Manager and search for ntpclient to install it.
TimeLib Library
Open the Library Manager and search for timelib to install it.
Preliminary Setup: API Configuration
Before using the API, you need to set up your environment. A Google account is required.
The following steps will be performed here:
- Create a Google Cloud project
- Enable the Google Sheets API
- Enable the Google Drive API
- Create and configure a service account
- Obtain authentication credentials for the service account
Creating the Project
To use the API, first create a Google Cloud project.
A Google Cloud project encompasses the entire system. It’s recommended to name the project after the system you’re building. Here, we will use SPOT-DEV as an example.
Visit the following link and create a project.
https://console.cloud.google.com/projectcreate
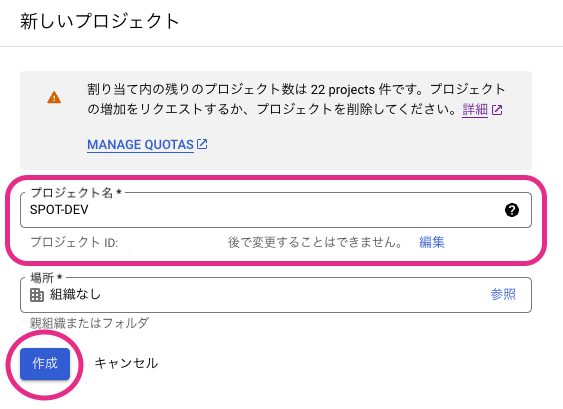
Example screen for creating a project (personal)
For accounts that belong to an organization, options to select the organization will be displayed.
Enabling the Sheets API
To operate spreadsheets from TWELITE SPOT, enable the Sheets API.
Visit the following link and enable the API.
https://console.cloud.google.com/apis/library/sheets.googleapis.com
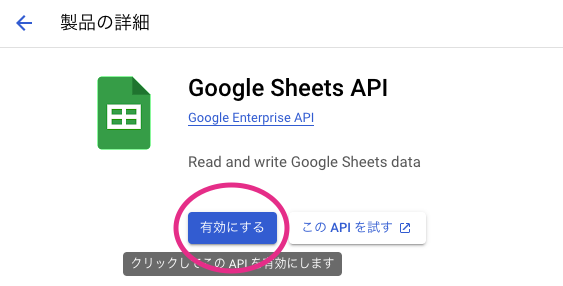
Example screen for enabling the Sheets API
Enabling the Drive API
To share spreadsheets from TWELITE SPOT, enable the Drive API.
Visit the following link and enable the API.
https://console.cloud.google.com/apis/library/drive.googleapis.com
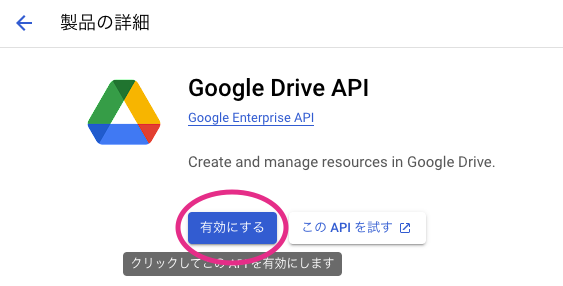
Example screen for enabling the Drive API
Creating and Configuring the Service Account
To create spreadsheets from TWELITE SPOT, you need to create a service account.
Visit the following link, select your project (here, SPOT-DEV), and display the list of service accounts. Then, use the button at the top of the page to begin creating a service account.
https://console.cloud.google.com/iam-admin/serviceaccounts
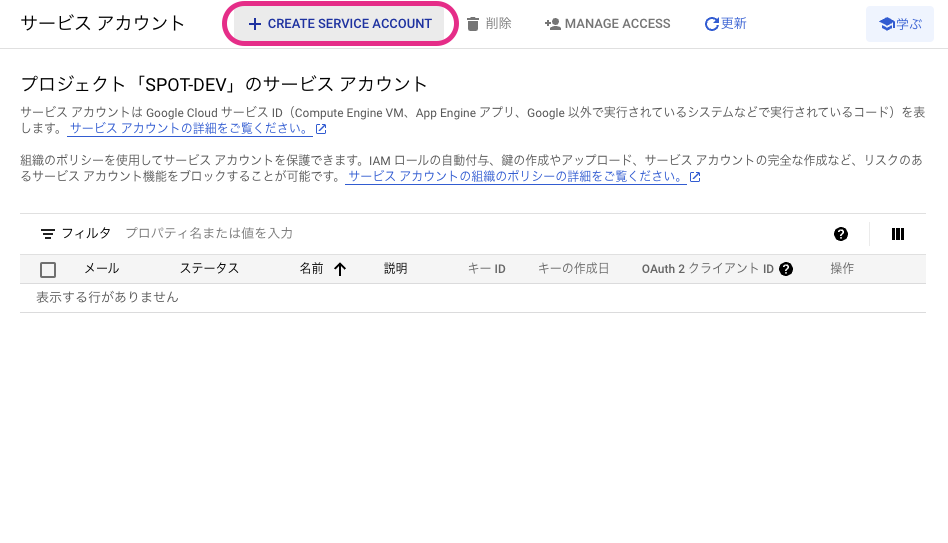
Example screen showing the list of service accounts
In “① Service account details”, enter the name of the service account.
In the example below, the name is set as spot-dev-sa.
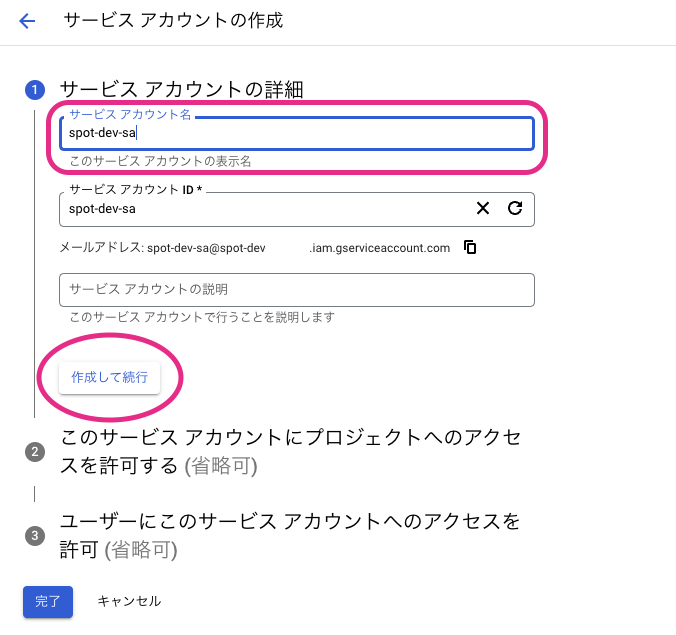
Example screen for entering the service account name
After entering the name, click the “Create and continue” button to proceed.
In “② Grant this service account access to the project (optional)”, configure the permissions for the service account.
Here, select “Owner” as shown in the example below.
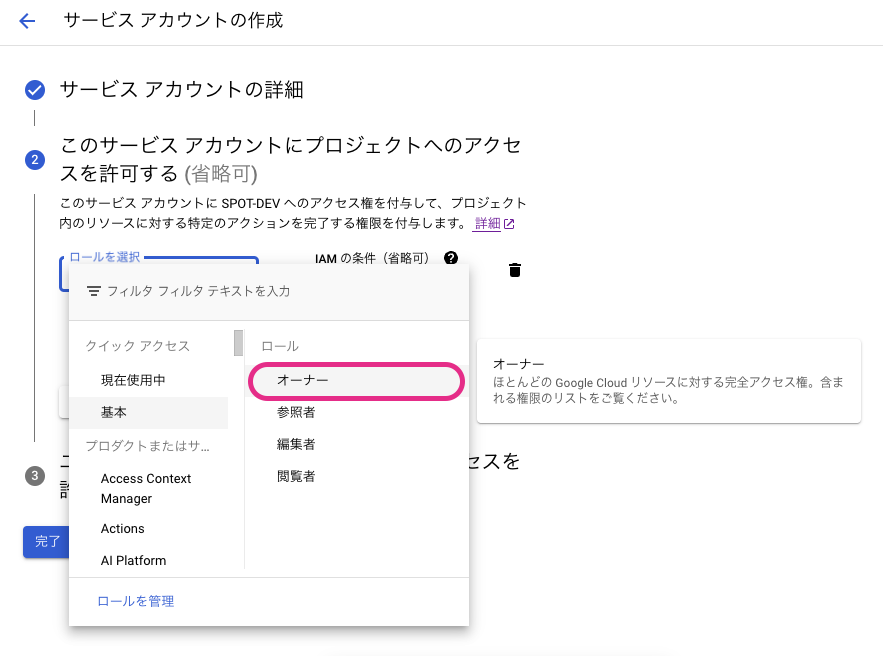
Example screen for entering service account permissions
After selecting the role, click the “Continue” button to proceed.
In “③ Grant users access to this service account (optional)”, do nothing and click “Done” to skip.
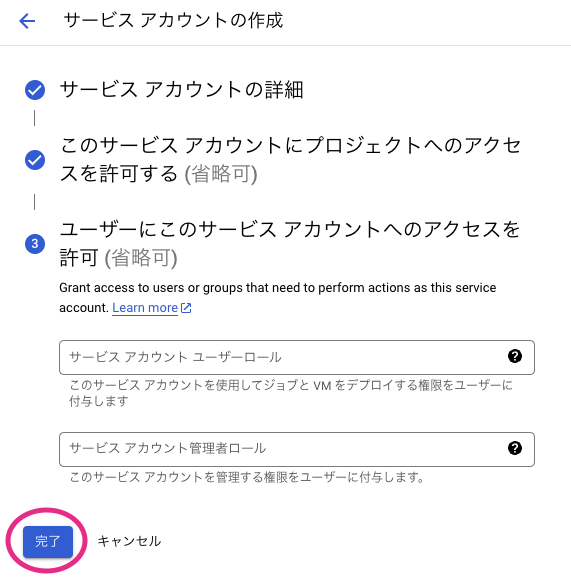
Example screen to be skipped
Once the service account is created, you will return to the service account list. Verify that the newly created service account appears.
Obtaining Service Account Credentials
Once you have confirmed the created service account, click the link in the “Email” column to open the service account details page.
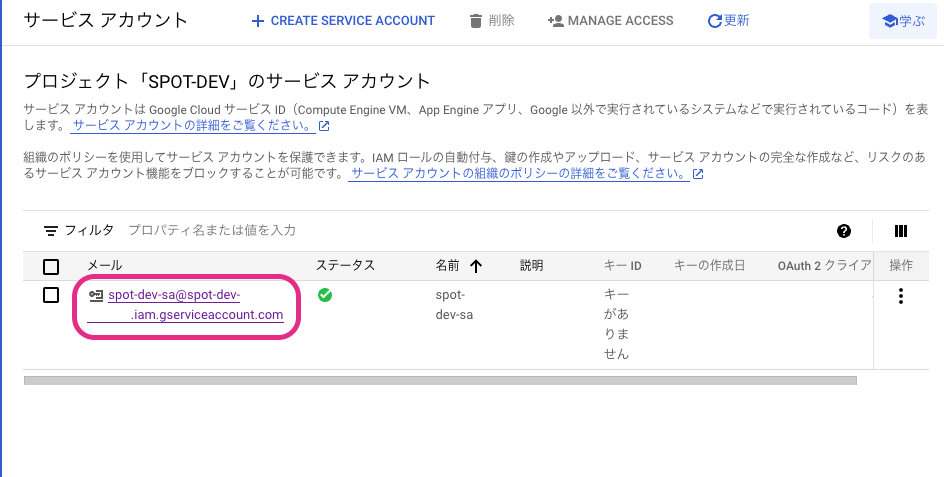
Example screen after creating a service account
Select the “Keys” tab at the top to navigate to the screen for managing the private key required for service account authentication.
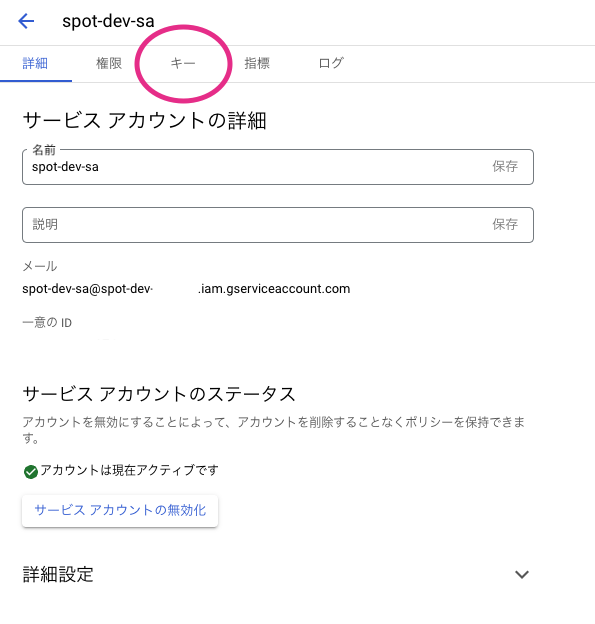
Example screen of the service account details page
Click the “Add Key” button and select “Create new key” to begin creating a private key.
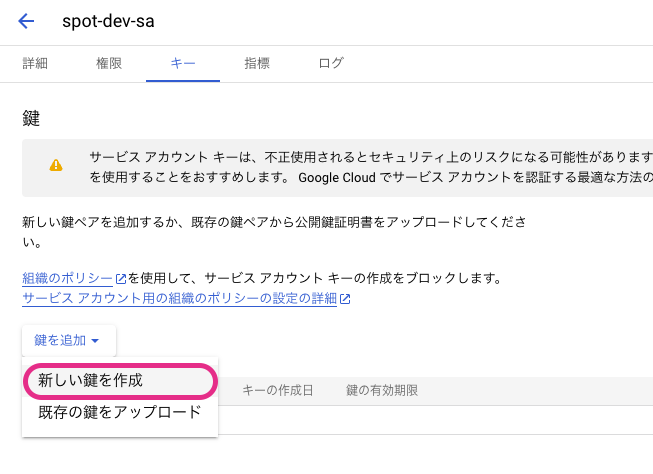
Example of the key creation button
On the next screen, leave “JSON” selected and click the “Create” button.
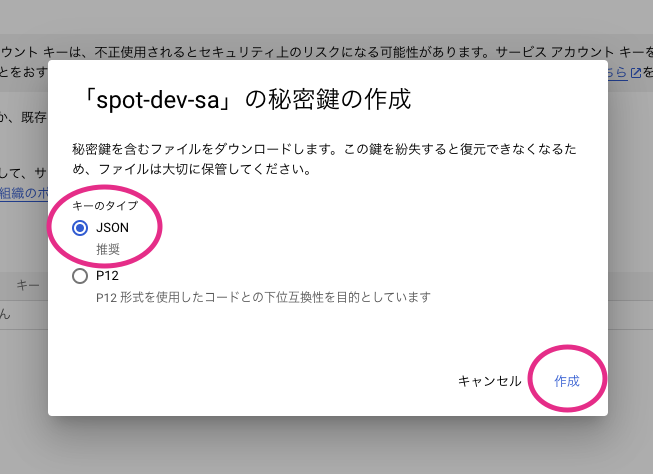
Example screen for selecting the key type
Clicking the “Create” button will automatically download the private key file (.json).
Handle the private key file with great care.
When you open the private key file in a text editor, it should look like the following.
{
  "type": "service_account",
  "project_id": "???",
  "private_key_id": "???",
  "private_key": "-----BEGIN PRIVATE KEY-----\n???\n-----END PRIVATE KEY-----\n",
  "client_email": "???@???.iam.gserviceaccount.com",
  "client_id": "???",
  "auth_uri": "https://accounts.google.com/o/oauth2/auth",
  "token_uri": "https://oauth2.googleapis.com/token",
  "auth_provider_x509_cert_url": "https://www.googleapis.com/oauth2/v1/certs",
  "client_x509_cert_url": "???",
  "universe_domain": "googleapis.com"
}
Among the above, the values of project_id, private_key, and client_email will be used during the operation check.
Operation Check
Let’s start by checking the operation.
Obtaining the Project Files
- Download the Zip file from GitHub (monowireless/spot-google-sheets)
- Extract the Zip file and rename the folder from
spot-google-sheets-maintospot-google-sheets - Place the
spot-google-sheetsfolder in your Arduino sketchbook location (as specified in the Arduino IDE settings, e.g.,C:\Users\foo\Documents\Arduino)
Editing the Sketch Configuration File
Open the Arduino sketch spot-google-sheets.ino, select the config.h tab at the top of the screen, and modify the values from lines 4 to 11.
Lines 4–5 are Wi-Fi related settings.
const char* WIFI_SSID = "YOUR SSID";            // Modify it
const char* WIFI_PASSWORD = "YOUR PASSWORD";    // Modify it
These specify the SSID and password.
On the other hand, lines 8–11 are spreadsheet-related settings.
const char* PROJECT_ID = "YOUR-PROJECT-ID";                                                                         // Modify it
const char* SERVICE_ACCOUNT_EMAIL = "YOUR-SERVICE-ACCOUNT@YOUR-PROJECT-ID.iam.gserviceaccount.com";                 // Modify it
const char PRIVATE_KEY[] PROGMEM = "-----BEGIN PRIVATE KEY-----\nYOUR-PRIVATE-KEY\n-----END PRIVATE KEY-----\n";    // Modify it
const char* USER_ACCOUNT_EMAIL = "YOUR-ACCOUNT@EMAIL";                                                              // Modify it
For the first three items, copy the values from the .json file, and for USER_ACCOUNT_EMAIL, enter your logged-in Google account email address.
Uploading the Sketch
Refer to How to upload a sketch to ESP32 to upload the sketch.
The setting under Tools → Flash Size must be set to 16MB or it will not function correctly.
The partition table uses
paritions.csv, and if the total size is too small, writing will fail.
Starting the Parent and Child Devices
Press the reset button on TWELITE SPOT (ESP32 side).
If you see the following output in the Arduino serial console, the startup was successful.
Initializing queue...
Completed.
Started TWELITE.
Connecting to WiFi ...!...
Connected. IP: xxx.xxx.xxx.xxx
Initializing NTP...Completed. UNIX time: xxxxxxxxxx
Initializing sheets...
Creating sheets...
OAuth2.0 access token on initializing
OAuth2.0 access token on signing
OAuth2.0 access token on exchange request
OAuth2.0 access token ready
Requesting to create...
Succeeded.
Adding headers for ARIA...
Requesting to add header...
Succeeded.
Formatting the sheet for ARIA...
Requesting to format...
Succeeded.
Extending the sheet for ARIA...
Requesting to extend...
Succeeded.
Completed.
Insert the coin battery into TWELITE ARIA (with default settings) and power it on.
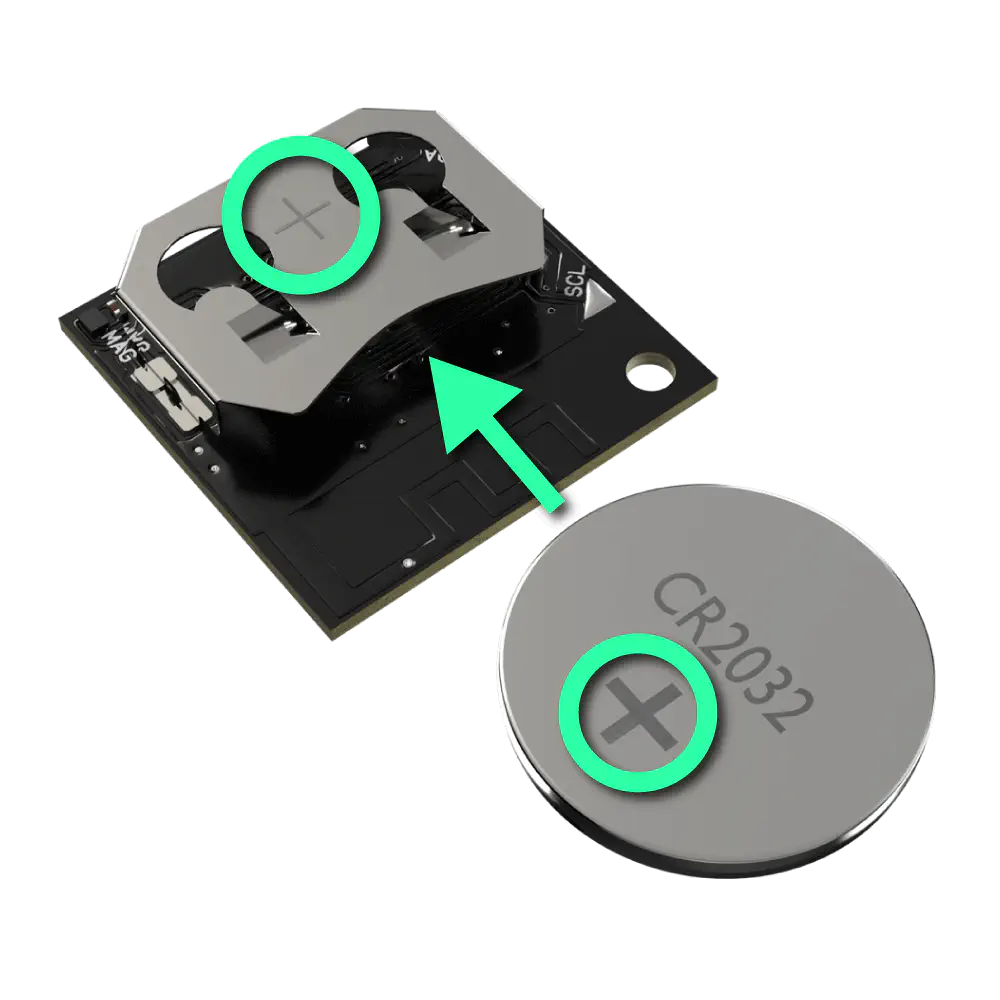
Inserting the coin battery
When TWELITE SPOT successfully receives packets from TWELITE ARIA and adds the data rows, you will see the following output.
Got a new packet from ARIA.
Got a new packet from ARIA.
Requesting to add data...
Got a new packet from ARIA.
Succeeded.
Incidentally, in the example above, packets are being received during a request — this indicates successful multitasking (see Task Registration).
Accessing Google
Access Shared with me on Google Drive and open the spreadsheet named SPOT Sheet (xxx).
You should see a screen similar to the one below.
Example of the spreadsheet screen
Scroll down to find the data received from TWELITE ARIA.
To jump to the latest row, click any cell containing data and press
Ctrl (⌘) + ↓.Data from the TWELITE child device has been successfully uploaded to Google Sheets!
Sketch Explanation
This section explains the Arduino sketch spot-google-sheets.ino.
Including Libraries
Official Arduino and ESP32 Libraries
Lines 4-7 include the official Arduino and ESP32 libraries.
#include <Arduino.h>
#include <NTPClient.h>
#include <WiFi.h>
#include <WiFiUdp.h>
| Header File | Description | Remarks |
|---|---|---|
Arduino.h | Basic Arduino library | |
NTPClient.h | Use NTP | Used for file name and receive time |
WiFi.h | Use ESP32 WiFi | |
WiFiUdp.h | Use UDP | Required for NTPClient |
Third-Party Libraries
Lines 10-11 include third-party libraries.
#include <ESP_Google_Sheet_Client.h>
#include <TimeLib.h>
| Header File | Description | Remarks |
|---|---|---|
ESP_Google_Sheet_Client.h | Access Google | |
TimeLib.h | Format UNIX time |
MWings Library
Line 14 includes the MWings library.
#include <MWings.h>
User Configuration Definitions
Line 17 includes config.h.
#include "config.h"
config.h defines user settings. Modify these settings at runtime.Wi-Fi Configuration Definition
Lines 4-5 of config.h define the Wi-Fi settings applied to the ESP32 on TWELITE SPOT.
const char* WIFI_SSID = "YOUR SSID";            // Modify it
const char* WIFI_PASSWORD = "YOUR PASSWORD";    // Modify it
| Name | Description |
|---|---|
WIFI_SSID | SSID of the network to connect to |
WIFI_PASSWORD | Password of the network to connect to |
API Configuration Definition
Lines 8-11 of config.h define the API settings.
const char* PROJECT_ID = "YOUR-PROJECT-ID";                                                                         // Modify it
const char* SERVICE_ACCOUNT_EMAIL = "YOUR-SERVICE-ACCOUNT@YOUR-PROJECT-ID.iam.gserviceaccount.com";                 // Modify it
const char PRIVATE_KEY[] PROGMEM = "-----BEGIN PRIVATE KEY-----\nYOUR-PRIVATE-KEY\n-----END PRIVATE KEY-----\n";    // Modify it
const char* USER_ACCOUNT_EMAIL = "YOUR-ACCOUNT@EMAIL";                                                              // Modify it
| Name | Description |
|---|---|
PROJECT_ID | Project ID |
SERVICE_ACCOUNT_EMAIL | Email address of the service account |
PRIVATE_KEY | Content of the private key |
USER_ACCOUNT_EMAIL | Email address of the user account to share the spreadsheet with |
Definition of Pin Numbers
Lines 20-24 define the pin numbers.
const uint8_t TWE_RST = 5;
const uint8_t TWE_PRG = 4;
const uint8_t LED = 18;
const uint8_t ESP_RXD1 = 16;
const uint8_t ESP_TXD1 = 17;
| Name | Description |
|---|---|
TWE_RST | Pin number connected to the RST pin of TWELITE |
TWE_PRG | Pin number connected to the PRG pin of TWELITE |
LED | Pin number connected to the ESP32 LED on the board |
ESP_RXD1 | Pin number connected to the TX pin of TWELITE |
ESP_TXD1 | Pin number connected to the RX pin of TWELITE |
For connection details, refer to the circuit diagram in the TWELITE SPOT datasheet.
Definition of TWELITE Settings
Lines 27-30 define the settings applied to the TWELITE parent device mounted on TWELITE SPOT.
const uint8_t TWE_CH = 18;
const uint32_t TWE_APPID = 0x67720102;
const uint8_t TWE_RETRY = 2;
const uint8_t TWE_POWER = 3;
| Name | Description |
|---|---|
TWE_CH | TWELITE frequency channel |
TWE_APPID | TWELITE application ID |
TWE_RETRY | TWELITE retransmission count (when transmitting) |
TWE_POWER | TWELITE transmission output |
In this sample, no commands are sent from the TWELITE parent device, so lines 29-30 are not relevant.
Sheet-Related Definitions
Lines 32-43 define information related to the sheet.
const char* SPREADSHEET_TITLE_PREFIX = "SPOT Sheet";
const char* SPREADSHEET_LOCALE = "ja_JP";
const char* SPREADSHEET_TIME_ZONE = "Asia/Tokyo";

const int MIN_REQUEST_INTERVAL = 1000;    // 60 requests per minute

const int SHEETS_DEFAULT_ROWS = 1000;            // Default length is 1000 rows
const int SHEETS_ROWS = 100000;                  // Max 1,000,000 rows at 10 columns

const int ARIA_SHEET_ID = 1;
const char* ARIA_SHEET_TITLE = "ARIA";
constexpr int ARIA_BUFFER_PACKETS = 32;    // Maximum number of rows per addition request
| Name | Description |
|---|---|
SPREADSHEET_TITLE_PREFIX | Fixed part of the spreadsheet file name |
SPREADSHEET_LOCALE | Spreadsheet locale |
SPREADSHEET_TIME_ZONE | Spreadsheet time zone |
MIN_REQUEST_INTERVAL | Minimum interval between requests |
SHEETS_DEFAULT_ROWS | Default number of rows per sheet |
SHEETS_ROWS | Number of rows per sheet |
ARIA_SHEET_ID | Sheet ID for ARIA |
ARIA_SHEET_TITLE | Sheet name for ARIA |
ARIA_BUFFER_PACKETS | Queue length for storing packets from ARIA |
When supporting child devices other than TWELITE ARIA, it is recommended to create additional sheets within the same spreadsheet (workbook).
Therefore, you will need to add three items: ID, title, and queue length.
Type Declarations
Lines 46-50 declare types.
struct ParsedAppAriaPacketWithTime {
    ParsedAppAriaPacket packet;
    uint32_t elapsedMillis;
    uint32_t unixTime;
};
| Name | Description |
|---|---|
ParsedAppAriaPacketWithTime | Type for storing received packet data together with the reception time in the queue |
elapsedMillis: Elapsed time since startup at the time the packet was received (milliseconds)unixTime: UNIX time (seconds) when the packet was received
When supporting child devices other than TWELITE ARIA, you will need to create a new queue.
Accordingly, you will also need to add queue storage types like ParsedAppAriaPacketWithTime.
Declaration of Global Objects
Lines 53-61 declare global objects.
WiFiUDP ntpUDP;
NTPClient timeClient(ntpUDP, "ntp.nict.jp", 32400);

String spreadsheetIdString;    // Identifier of newly created file
bool readyForNewRequests = false;
uint32_t lastTimeRequestWasSent = UINT32_MAX;

QueueHandle_t ariaPacketQueue;       // Store received data from ARIA
uint32_t rowToAddNewAriaData = 2;    // Starting with the Row 2
| Name | Description |
|---|---|
ntpUDP | UDP interface for NTP |
timeClient | NTP interface |
spreadsheetIdString | ID of the created spreadsheet |
readyForNewRequests | Becomes true when ready to send new requests |
lastTimeRequestWasSent | Time when the last request was sent |
ariaPacketQueue | Queue to store packets and reception times received from ARIA |
rowToAddNewAriaData | Row number to add the next data received from ARIA |
ariaPacketQueue uses the Queue feature of FreeRTOS, which is the basis of Arduino core for the ESP32.When supporting child devices other than TWELITE ARIA, add variables to store the queue for received data and the row number for writing.
Function Prototype Declarations
Lines 64-71 declare function prototypes.
void anotherLoop();

void waitUntilNewRequestsReady();
String createSpreadsheet();
bool formatSheet(const String spreadsheetId, const int sheetId);
bool extendSheet(const String spreadsheetId, const int sheetId, const int rows);
bool addSheetAriaHeaderRow(const String spreadsheetId, const char* const sheetTitle);
bool addSheetsDataRow(const String spreadsheetId);
| Name | Description |
|---|---|
anotherLoop() | Another loop() for asynchronously processing TWELITE |
waitUntilNewRequestsReady() | Wait until the next request can be sent |
createSpreadsheet() | Create a new spreadsheet |
formatSheet() | Format the specified sheet |
extendSheet() | Increase the number of rows in the specified sheet and format it |
addSheetAriaHeaderRow() | Add a header row for ARIA to the specified sheet |
addSheetsDataRow() | Add a data row to the sheet |
To avoid stopping the TWELITE reception process while waiting for API request responses, FreeRTOS multitasking is used to create
anotherLoop(), which executes Twelite.update() inside.When supporting child devices other than TWELITE ARIA, for example, you can add request contents as follows:
createSpreadsheet(): Modify to create additional spreadsheetsformatSheet(): Modify to format new sheets as wellextendSheet(): Call for new sheets as well, keeping the contents the sameaddSheet**HeaderRow(): Add a function for each header rowaddSheetsDataRow(): Add processing to add data to the new sheets
Queue Initialization
Lines 82-83 initialize the queue for storing received packet data along with the reception time.
ariaPacketQueue = xQueueCreate(ARIA_BUFFER_PACKETS, sizeof(ParsedAppAriaPacketWithTime));
if (ariaPacketQueue == 0) { Serial.println("Failed to init a queue."); }
xQueueCreate() is a FreeRTOS function running inside the ESP32. It allows you to easily create queues that support multitasking.
When supporting child devices other than TWELITE ARIA, also initialize the new queues.
TWELITE Configuration
Lines 88-92 call Twelite.begin() to configure and start the TWELITE parent device mounted on TWELITE SPOT.
Serial2.begin(115200, SERIAL_8N1, ESP_RXD1, ESP_TXD1);
    if (Twelite.begin(Serial2,
                      LED, TWE_RST, TWE_PRG,
                      TWE_CH, TWE_APPID, TWE_RETRY, TWE_POWER)) {
        Serial.println("Started TWELITE.");
    }
| Argument | Type | Description |
|---|---|---|
Serial2 | HardwareSerial& | Serial port used for communication with TWELITE |
LED | int | Pin number connected to the status LED |
TWE_RST | int | Pin number connected to the RST pin of TWELITE |
TWE_PRG | int | Pin number connected to the PRG pin of TWELITE |
TWE_CHANNEL | uint8_t | TWELITE frequency channel |
TWE_APP_ID | uint32_t | TWELITE application ID |
TWE_RETRY | uint8_t | TWELITE retransmission count (when transmitting) |
TWE_POWER | uint8_t | TWELITE transmission output |
Event Handler Registration
Lines 94-103 register the process to be executed when a packet is received from TWELITE ARIA.
Twelite.on([](const ParsedAppAriaPacket& packet) {
    Serial.println("Got a new packet from ARIA.");
    ParsedAppAriaPacketWithTime packetWithTime;
    packetWithTime.elapsedMillis = millis();
    packetWithTime.unixTime = timeClient.getEpochTime();
    packetWithTime.packet = packet;
    if (not(xQueueSend(ariaPacketQueue, &packetWithTime, 0) == pdPASS)) {
        Serial.println("Failed to add packet data to the queue.");
    }
});
If you use other child devices such as TWELITE CUE, add new event handlers accordingly.
Here, xQueueSend() is used to store the received packet data along with the reception time at the end of the queue.
Wi-Fi Settings
Lines 106-120 perform the Wi-Fi settings.
WiFi.mode(WIFI_STA);
WiFi.setAutoReconnect(true);
WiFi.begin(WIFI_SSID, WIFI_PASSWORD);
Serial.print("Connecting to WiFi ..");
while (WiFi.status() != WL_CONNECTED) {
    static int count = 0;
    Serial.print('.');
    delay(500);
    // Retry every 5 seconds
    if (count++ % 10 == 0) {
        WiFi.disconnect();
        WiFi.reconnect();
        Serial.print('!');
    }
}
Here, it is set as a Wi-Fi station and connects to the specified network.
The while loop will not exit until a connection to the network is established.
In the above implementation, a reconnection is attempted once every 5 seconds.
NTP Settings
Lines 126-127 perform the NTP settings.
timeClient.begin();
timeClient.update();
Google Spreadsheet Settings
Lines 132-145 configure the Google Spreadsheet.
GSheet.setTokenCallback([](TokenInfo info) {
    // Print token initialization states
    if (info.status == esp_signer_token_status_error) {
        Serial.print("Token error ");
        Serial.println(GSheet.getTokenError(info));
    }
    Serial.print(GSheet.getTokenType(info));
    Serial.print(" ");
    Serial.println(GSheet.getTokenStatus(info));
});
GSheet.setPrerefreshSeconds(60);    // Set refresh rate for auth token

Serial.println("Initializing sheets...");
GSheet.begin(SERVICE_ACCOUNT_EMAIL, PROJECT_ID, PRIVATE_KEY);
In lines 132-141, it registers processing to display the status when obtaining a service account token, sets the token refresh interval in line 142, and initializes the service account in line 145.
Additionally, lines 147-173 create the spreadsheet, add the header row for ARIA, format the cells, and extend the number of rows.
Serial.println("Creating sheets...");
waitUntilNewRequestsReady();    // Wait for token
spreadsheetIdString = createSpreadsheet();
if (not(spreadsheetIdString.length() > 0)) {
    Serial.println("Failed to create sheets.");
}

Serial.println("Adding headers for ARIA...");
delay(MIN_REQUEST_INTERVAL);
waitUntilNewRequestsReady();
if (not addSheetAriaHeaderRow(spreadsheetIdString, ARIA_SHEET_TITLE)) {
    Serial.println("Failed to add headers.");
}

Serial.println("Formatting the sheet for ARIA...");
delay(MIN_REQUEST_INTERVAL);
waitUntilNewRequestsReady();
if (not formatSheet(spreadsheetIdString, ARIA_SHEET_ID)) {
    Serial.println("Failed to format.");
}

Serial.println("Extending the sheet for ARIA...");
delay(MIN_REQUEST_INTERVAL);
waitUntilNewRequestsReady();
if (not extendSheet(spreadsheetIdString, ARIA_SHEET_ID, SHEETS_ROWS - SHEETS_DEFAULT_ROWS)) {
    Serial.println("Failed to extend.");
}
By default, there are 1,000 rows for columns A-Z. Here, the columns are limited to A-J (10 columns), and the number of rows is increased 100 times to 100,000 rows.
If this is still not enough, you need to increase the number of rows further. However, the maximum number of cells is 10,000,000, so with 10 columns (A-J), the maximum is limited to 1,000,000 rows. Beyond that, you cannot add more cells, and you will need to create a new spreadsheet (workbook).
When supporting child devices other than TWELITE ARIA, add calls to the newly added header row creation functions as well.
Task Registration
Lines 179-186 register a task to update TWELITE data asynchronously.
xTaskCreatePinnedToCore(
    [](void* params) {
        while (true) {
            anotherLoop();
            vTaskDelay(1);
        }
    },
    "Task for anotherLoop()", 8192, nullptr, 18, nullptr, 0);
xTaskCreatePinnedToCore() is a function provided by the FreeRTOS multitasking framework.
Here, a lambda function (lines 180–185) is passed to create a task that calls anotherLoop() repeatedly.
[](void* params) {
    while (true) {
        anotherLoop();
        vTaskDelay(1);    // IMPORTANT for Watchdog
    }
},
For tasks that include an infinite loop, always insert
vTaskDelay(1); or similar to allow the watchdog timer to operate.The task is named Task for anotherLoop(), its stack size is 8192, it takes no parameters, its priority is 18 (the higher the number, the higher the priority; Wi-Fi-related processing is at 19), there is no interface to manipulate the task, and it runs on the same CPU core as Wi-Fi and other RF processing, Core 0 (loop() runs on Core 1).
"Task for anotherLoop()", 8192, nullptr, 18, nullptr, 0); // Priority is 18 (lower than WiFi)
Updating TWELITE Data
At line 203, Twelite.update() is called within anotherLoop().
Twelite.update();
Twelite.update() reads out the packet data (ModBus ASCII format) sent from the TWELITE parent device, one byte at a time.
By repeatedly calling
Twelite.update() in the loop(), interpretation of packet data sent from the TWELITE parent device progresses. When the interpretation of packet data is complete, an event like the one described above is triggered.Normally, if you block this function call with processes like
delay(), reading the packet data string may not be fast enough. However, in this sketch, anotherLoop() is separated using FreeRTOS features, so even if there is synchronous processing in loop(), it is not a problem.Updating the Spreadsheet
Lines 192–195 call the spreadsheet update process.
if (millis() - lastTimeRequestWasSent > MIN_REQUEST_INTERVAL) {
    // Add any available data
    addSheetsDataRow(spreadsheetIdString);
}
The if statement on line 192 ensures that at least 1 second has passed since the last request was sent, in order to comply with the API limit of 60 requests per minute (similar to “throttle” in JavaScript’s Throttle/Debounce).
Line 194 adds a new data row to the spreadsheet as needed.
addSheetsDataRow(spreadsheetIdString);
Updating the API Library
Line 196 updates the Google API library and checks whether new requests can be sent.
readyForNewRequests = GSheet.ready();
Updating the NTP Library
Line 197 updates the NTP library.
timeClient.update();
Spreadsheet Operations
Starting from line 217, operations on the spreadsheet are performed using the Sheets API.
For details, see the API reference for the library or Sheets API REST resources.
Related Information
- Google Cloud Console: Welcome – SPOT-DEV – Google Cloud Console
- Sheets REST API Reference: Google Sheets API | Google for Developers
- Create Spreadsheet: Method: spreadsheets.create | Google Sheets | Google for Developers
- Batch Update Spreadsheet: Method: spreadsheets.batchUpdate | Google Sheets | Google for Developers
- Update Spreadsheet Values: Method: spreadsheets.values.batchUpdate | Google Sheets | Google for Developers
- Sheets REST API Samples: Samples | Google Sheets | Google for Developers
- Row and Column Operations: Row and Column Operations | Google Sheets | Google for Developers
Arduino
- Official Site: Arduino - Home
- API Reference: Arduino Reference - Arduino Reference
- Coding Style Guide: Arduino Style Guide for Creating Libraries | Arduino Documentation
- Official NTP Library: arduino-libraries/NTPClient: Connect to a NTP server
ESP32
- Product Information: ESP32 Wi-Fi & Bluetooth MCU I Espressif Systems
- Datasheet: esp32_datasheet_en.pdf
- Arduino Toolchain: espressif/arduino-esp32: Arduino core for the ESP32
- Getting Started Guide: Getting Started — Arduino-ESP32 documentation
- Installation Guide: Installing — Arduino-ESP32 documentation
- API Reference: Libraries — Arduino-ESP32 documentation
- Wi-Fi API: Wi-Fi API — Arduino-ESP32 documentation
- Tutorials: Tutorials — Arduino-ESP32 documentation
- Troubleshooting: Troubleshooting — Arduino-ESP32 documentation
- ESP-IDF: espressif/esp-idf: Espressif IoT Development Framework
- Documentation: ESP-IDF Programming Guide - ESP32
- API Reference: FreeRTOS (ESP-IDF) - ESP32
- Documentation: ESP-IDF Programming Guide - ESP32
Community
Libraries
- Google Sheets / Drive API: mobizt/ESP-Google-Sheet-Client: Arduino Google Sheet REST client library for ESP8266, ESP32 and Raspberry Pi Pico RP2040
- Date and Time: PaulStoffregen/Time: Time library for Arduino
Plugins
- Stack Trace Decoder: me-no-dev/EspExceptionDecoder: Exception Stack Trace Decoder for ESP8266 and ESP32
Plugins are written in Java. Therefore, unlike Arduino IDE 1.x, they do not work in Arduino IDE 2.x, which is not Java-based. For more details on this issue, refer to the Issue on the Arduino IDE GitHub page (Missing support for external tools / plugins · Issue #58 · arduino/arduino-ide).
5 - Graph Display Using ThingSpeak
Explanation of the sample sketch spot-thingspeak for displaying TWELITE ARIA data on the ThingSpeak website
This is an explanation of the sample sketch
spot-thingspeak that acts as a wireless LAN client and uses MathWorks’ service ThingSpeak to graph temperature and humidity data.5.1 - Graph Display with ThingSpeak
Latest version
This is an explanation of the sample sketch
spot-thingspeak, which acts as a Wi-Fi client and uses MathWorks’ service ThingSpeak to graph temperature and humidity data.This article uses third-party open source software.
We are unable to provide detailed instructions for third-party software. In addition, we are not responsible for any damages incurred as a result of using third-party software.
Getting the Source Code
You can obtain it from the GitHub repository monowireless/spot-thingspeak.
System Overview
The spot-thingspeak sample receives data from TWELITE ARIA and sends it as an HTTP GET request to the ThingSpeak server, making it possible to display the data as a graph.
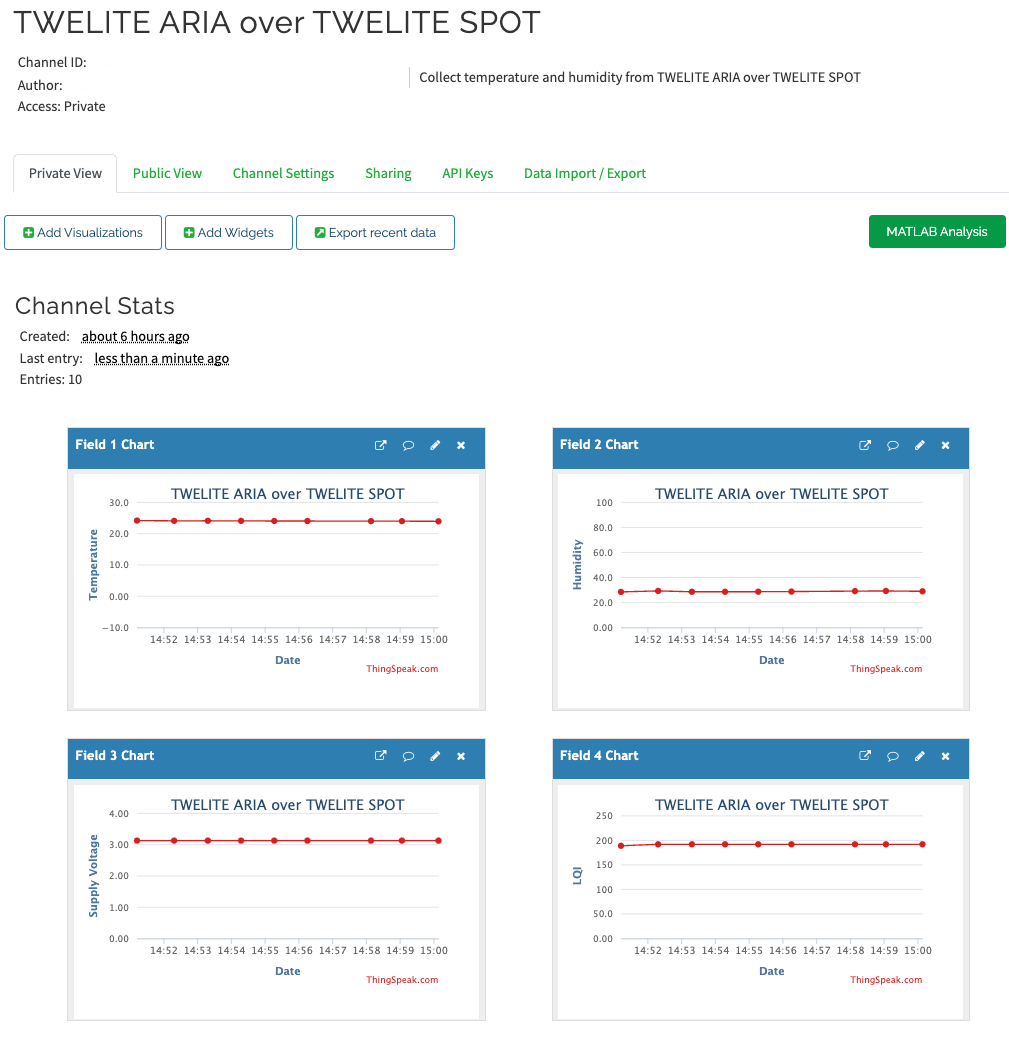
Display Example
In this sample, TWELITE ARIA is used as an example for the child device, but the way HTTP requests are used is not affected by this choice.
Basically, this sample is a modification of spot-httpbin. Please refer to its explanation as well.
The main differences are that NTP-related code is removed and the contents of the request have been changed.
What You Need for Development
-
Wireless LAN Gateway TWELITE SPOT
- USB-C cable for power supply
- USB AC adapter (must supply at least 1A)
-
Magnetic, Temperature, and Humidity Sensor Wireless Tag TWELITE ARIA or other child device (If you do not have one, please purchase 👉 List of retailers)
- Power supply such as CR2032 coin battery
-
USB Adapter TWELITE R3 (If you do not have one, please purchase 👉 List of retailers)
- USB-C cable for communication
- 💻 Development computer
Environment Setup
ThingSpeak Setup
- Access ThingSpeak’s website and create a MathWorks account.
- Create a “Channel” and set it as shown below.
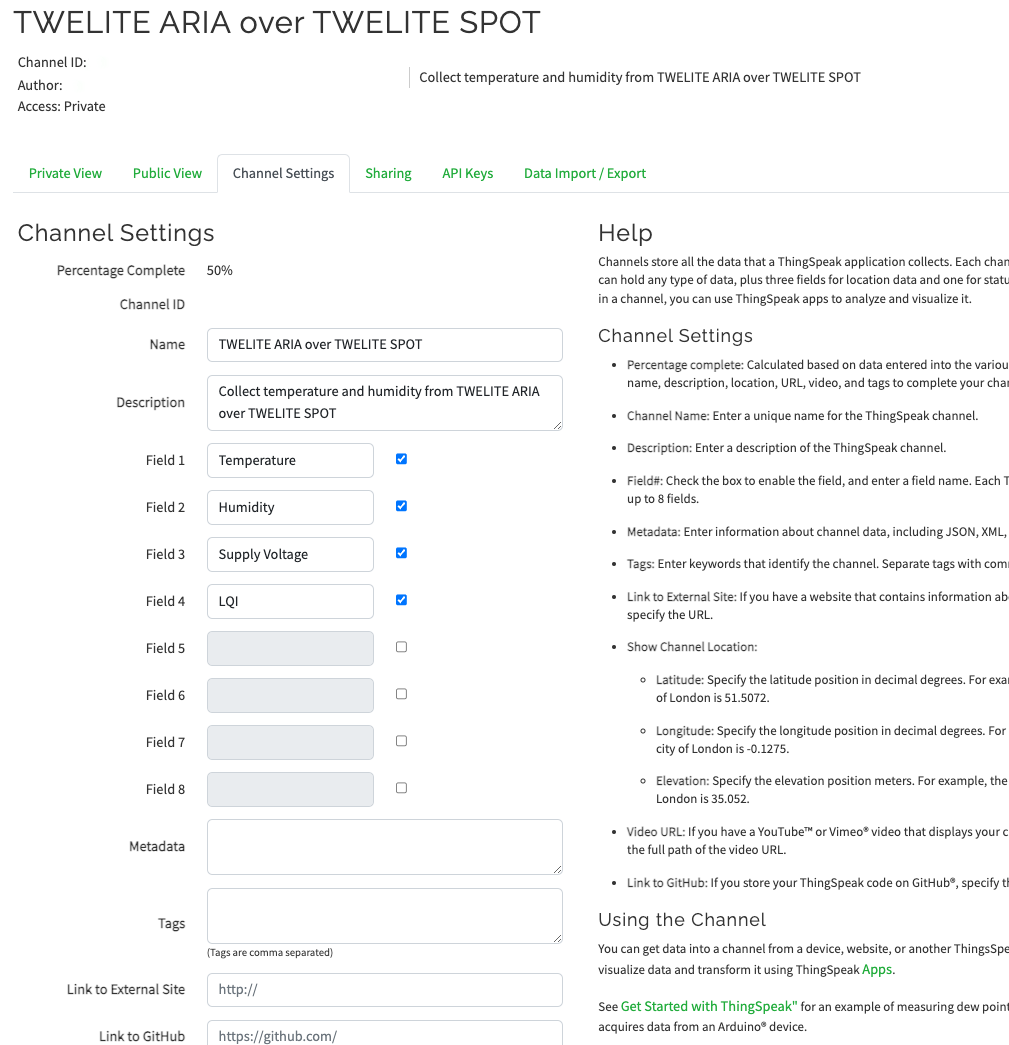
Example Channel Settings
- On the “API Keys” tab, make a note of the 16-character “Write API key”.
Installing the IDE and Toolchain
See How to set up the development environment with Arduino IDE 1.x.
Or
See How to set up the development environment with Arduino IDE 2.x.
Obtaining the Project Files
- Download the Zip file from GitHub (monowireless/spot-thingspeak)
- Extract the Zip file and rename the folder from
spot-thingspeak-maintospot-thingspeak - Place the
spot-thingspeakfolder in your Arduino sketchbook location (specified in Arduino IDE preferences, e.g.,C:\Users\foo\Documents\Arduino)
Changing User Settings
Open config.h from the tab at the top of the Arduino IDE and set the Wi-Fi SSID and password. WPA2-PSK networks are assumed.
Also, set the 16-character “Write API key” you noted earlier. If necessary, rewrite the root certificate as well.
Writing the Project Files
See How to upload sketches to ESP32.
Setting up and Starting TWELITE ARIA
- Change the settings for TWELITE ARIA and set the Transmission Interval in TWELITE ARIA Mode to 30 seconds or more (e.g., 60 seconds) to avoid overloading the server.
- Insert a CR2032 battery and start TWELITE ARIA.
Sketch
Explanation of the Arduino sketch spot-thingspeak.ino and config.h.
Including Libraries
Official Arduino and ESP32 Libraries
Lines 5-7 include the official Arduino and ESP32 libraries.
#include <Arduino.h>
#include <WiFiClientSecure.h>
#include <WiFi.h>
| Header File | Description | Notes |
|---|---|---|
Arduino.h | Basic Arduino library | Sometimes can be omitted, but included just in case |
WiFiClientSecure.h | SSL communication on ESP32 | |
WiFi.h | Handles Wi-Fi | Sometimes can be omitted, but included just in case |
MWings Library
Line 13 includes the MWings library.
#include <MWings.h>
Definition of User Settings
Line 16 includes config.h.
#include "config.h"
User settings are defined in
config.h. Please modify these settings before running.Definition of Data Types
Lines 19-26 define a struct type to store data received from the child device.
struct DataFromAria {
    uint32_t serialId;
    uint8_t logicalId;
    uint16_t supplyVoltage;
    uint8_t linkQuality;
    int16_t temp100x;
    uint16_t humid100x;
};
| Name | Description |
|---|---|
serialId | Serial ID |
logicalId | Logical Device ID |
supplyVoltage | Supply Voltage |
linkQuality | LQI |
temp100x | Temperature multiplied by 100 |
humid100x | Humidity multiplied by 100 |
Here, TWELITE ARIA is used.
config.h
Definition of Reboot Interval
Line 4 of config.h specifies the reboot interval for the ESP32.
const uint32_t REBOOT_INTERVAL = 21600; // seconds
Here, 21600 seconds = 6 hours.
For long-term operation, memory leaks may accumulate and cause malfunctions.
Therefore, periodic rebooting is performed just like a Wi-Fi router.
Definition of TWELITE Settings
Lines 7-8 of config.h define the settings applied to the TWELITE parent device mounted on TWELITE SPOT.
const uint8_t TWE_CH = 18;
const uint32_t TWE_APPID = 0x67720102;
| Name | Description |
|---|---|
TWE_CH | TWELITE frequency channel |
TWE_APPID | TWELITE application ID |
Definition of Wi-Fi Settings
Lines 11-12 of config.h define the Wi-Fi settings applied to the ESP32 mounted on TWELITE SPOT.
const char* WIFI_SSID = "YOUR SSID";
const char* WIFI_PASSWORD = "YOUR PASSWORD";
| Name | Description |
|---|---|
WIFI_SSID | SSID of the network to connect to |
WIFI_PASSWORD | Password of the network to connect to |
ThingSpeak Write API key
Line 15 of config.h defines the “Write API key” required to add data to a “Field” in a ThingSpeak “Channel”.
Root Certificate
Lines 18-41 of config.h contain the root certificate obtained from api.thingspeak.com using Google Chrome. Rewrite as necessary.
const char *CA_CERT = R"(
-----BEGIN CERTIFICATE-----
...
-----END CERTIFICATE-----
)";
A raw string literal from C++11 is used here.
Host Settings
Lines 43-44 of config.h define the host settings.
const char *SERVER_HOST = "api.thingspeak.com";
const uint16_t SERVER_PORT = 443;
| Name | Description |
|---|---|
SERVER_HOST | Server host name |
SERVER_PORT | Server port number |
Do not include
https:// in SERVER_HOST. This will cause a DNS Failed / with error '-54' error.Definition of Various Constants
From line 46 in config.h, various constants are defined.
const int QUERIES_MAX_LENGTH = 128;         // bytes (without \0)
const int32_t CONNECT_TIMEOUT = 10;     // seconds
const uint32_t RECONNECT_MIN_INTERVAL = 5; // seconds
// According to thingspeck free limitations, SEND_MIN_INTERVAL is set for 20s.
const uint32_t SEND_MIN_INTERVAL = 20; // seconds
const uint32_t REQUEST_TIMEOUT = 10;   // seconds
| Name | Description |
|---|---|
QUERIES_MAX_LENGTH | Maximum length of the query string (excluding null terminator) |
CONNECT_TIMEOUT | Timeout when connecting to the server |
RECONNECT_MIN_INTERVAL | Minimum interval for reconnecting to Wi-Fi access point |
SEND_MIN_INTERVAL | Minimum interval between requests |
REQUEST_TIMEOUT | Timeout from request to response |
SEND_MIN_INTERVAL is set to 20 seconds.
This is due to API call limitations of ThingSpeak.
If SEND_MIN_INTERVAL is too short, the server may be burdened if packets are received continuously.
Be sure to allow a sufficient interval.
Definition of Pin Numbers
Lines 29-34 of spot-thingspeak.ino define the pin numbers.
static const int RST_PIN = 5;
static const int PRG_PIN = 4;
static const int LED_PIN = 18;

static const int8_t RX1_PIN = 16;
static const int8_t TX1_PIN = 17;
| Name | Description |
|---|---|
RST_PIN | Pin number connected to TWELITE’s RST pin |
PRG_PIN | Pin number connected to TWELITE’s PRG pin |
LED_PIN | Pin number connected to the ESP32 LED on the board |
RX1_PIN | Pin number connected to TWELITE’s RX1 pin |
TX1_PIN | Pin number connected to TWELITE’s TX1 pin |
For connection details, see the schematic in the TWELITE SPOT data sheet.
Declaration of Global Objects
Line 37 declares a global object.
static WiFiClientSecure client;
| Name | Description |
|---|---|
client | Interface for HTTPS communication |
Declaration of Global Variables
Lines 40-41 declare global variables.
static DataFromAria LatestDataFromAria;
static bool IsThereNewDataFromAria;
| Name | Description |
|---|---|
LatestDataFromAria | Latest data received from TWELITE ARIA |
IsThereNewDataFromAria | Flag indicating new data received from TWELITE ARIA |
Declaration of Function Prototypes
Lines 44-54 declare function prototypes.
void anotherLoopForTWELITE();
| Name | Description |
|---|---|
anotherLoopForTWELITE | Loop function for processing TWELITE data |
To process tasks such as HTTP requests—which take time—in parallel, the FreeRTOS function
xTaskCreatePinnedToCore() provided by the ESP32 Arduino Core is used to register this as a separate task.
void initTWELITE();
void initWiFi();
| Name | Description |
|---|---|
initTWELITE | TWELITE initialization function |
initWiFi | Wi-Fi initialization function |
void onAppAriaPacket(const ParsedAppAriaPacket& packet);
| Name | Description |
|---|---|
onAppAriaPacket | Callback function when data is received from TWELITE ARIA |
void sendAriaData(const DataFromAria& data)
| Name | Description |
|---|---|
sendAriaData | Function to send TWELITE ARIA data via HTTP GET request |
setup()
Lines 57-74 perform overall initialization.
void setup() {
    Serial.begin(115200);

    initTWELITE();
    initWiFi();

    // Attach another loop function for TWELITE
    // Note: Core 0 is also used for the WiFi task, which priority is 19 (ESP_TASKD_EVENT_PRIO - 1)
    xTaskCreatePinnedToCore(
        [](void *params) {
            while (true) {
                anotherLoopForTWELITE();
                vTaskDelay(1); // IMPORTANT for Watchdog
            }
        },
        "Task for anotherLoopForTWELITE()", 8192, nullptr, 18, nullptr,
        0); // Priority is 18 (lower than WiFi)
}
xTaskCreatePinnedToCore() is used to register a task separate from loop().
The following part is an anonymous function without a capture. This avoids unnecessary pollution of the global namespace.
        [](void *params) {
            while (true) {
                anotherLoopForTWELITE();
                vTaskDelay(1); // IMPORTANT for Watchdog
            }
        },
vTaskDelay() is inserted to allow the watchdog timer to intervene.loop()
Lines 77-99 are the main loop process.
It handles HTTP requests, Wi-Fi reconnection if disconnected, and periodic resets.
void loop() {
    static uint32_t lastTimeReconnected = 0;
    if (WiFi.status() == WL_CONNECTED) {
        // Regular operations
        // Check for new data
        if (IsThereNewDataFromAria) {
            IsThereNewDataFromAria = false; // Clear first; data is updated on another thread
            DataFromAria data = LatestDataFromAria; // Now, the buffer is open for incoming data
            sendAriaData(data);
        }
    } else if (millis() - lastTimeReconnected > RECONNECT_MIN_INTERVAL * 1000) {
        // Lost connection, reconnect periodically
        Serial.println("Disconnected. Reconnecting to WiFi...");
        WiFi.begin(WIFI_SSID, WIFI_PASSWORD);
        lastTimeReconnected = millis();
    }

    // Reboot every x interval
    if (millis() > REBOOT_INTERVAL * 1000) {
        Serial.println("Rebooting...");
        ESP.restart();
    }
}
anotherLoopForTWELITE()
Lines 102-104 are the loop process for TWELITE.
To sequentially receive and interpret data, this is handled in a separate task from the blocking loop().
void anotherLoopForTWELITE() {
    Twelite.update();
}
initTWELITE()
Lines 107-114 handle initialization for TWELITE.
The TWELITE mounted on TWELITE SPOT is started with the specified settings, and a callback function is registered for packet reception.
void initTWELITE() {
    Serial2.begin(115200);
    if (Twelite.begin(Serial2, LED_PIN, RST_PIN, PRG_PIN, TWE_CHANNEL, TWE_APP_ID)) {
        Serial.println("Started TWELITE.");
    }
    // Attach event handlers to process packets
    Twelite.on(onAppAriaPacket);
}
See the following references as well:
Twelite.begin()mwings::MWings class | MWings API ReferenceTwelite.on()mwings::MWings class | MWings API Reference
initWiFi()
Lines 117-144 handle Wi-Fi initialization.
If connection fails, it will retry every 5 seconds.
void initWiFi() {
    Serial.print("\nConnecting to the WiFi network ");
    Serial.print(WIFI_SSID);
    Serial.println("...");

    // Begin
    WiFi.mode(WIFI_STA);
    WiFi.setAutoReconnect(true);
    WiFi.begin(WIFI_SSID, WIFI_PASSWORD);

    // Wait for connection
    Serial.print("Connecting.");
    while (WiFi.status() != WL_CONNECTED) {
        static int count = 0;
        Serial.print('.');
        delay(500);
        // Retry every 5 seconds
        if (count++ % 10 == 0) {
            WiFi.disconnect();
            WiFi.reconnect();
            Serial.print('!');
        }
    }
    Serial.println("\nConnected!");

    // Set Root CA certificate
    client.setCACert(CA_CERT);
}
onAppAriaPacket()
Lines 147-157 describe the processing when data is received from TWELITE ARIA.
Here, HTTP transmission is not performed; instead, the data is set to a global variable.
The data set in the global variable will be processed by sendAriaData() in a separate task.
void onAppAriaPacket(const ParsedAppAriaPacket& packet)
{
    // Store data
    LatestDataFromAria.serialId = packet.u32SourceSerialId;
    LatestDataFromAria.logicalId = packet.u8SourceLogicalId;
    LatestDataFromAria.supplyVoltage = packet.u16SupplyVoltage;
    LatestDataFromAria.linkQuality = packet.u8Lqi;
    LatestDataFromAria.temp100x = packet.i16Temp100x;
    LatestDataFromAria.humid100x = packet.u16Humid100x;
    IsThereNewDataFromAria = true;
}
sendAriaData()
Lines 160-220 define a function that sets TWELITE ARIA data in the query string of an HTTP GET request and sends it.
To prevent excessive load on the server, sending is skipped if packets arrive too frequently.
void sendAriaData(const DataFromAria& data)
{
    static uint32_t lastTimeRequested = 0;
    if (millis() - lastTimeRequested > SEND_MIN_INTERVAL * 1000 or lastTimeRequested == 0) {
        Serial.println("Connecting to the server...");
        if (not client.connect(SERVER_HOST, SERVER_PORT, CONNECT_TIMEOUT * 1000)) {
            Serial.println("Connection failed!");
        } else {
            Serial.println("Connected to the server!");

            // Make a query string for the Channel on the ThingSpeak
            char queries[QUERIES_MAX_LENGTH+1];
            snprintf(queries, sizeof(queries),
                     "api_key=%s&field1=%s&field2=%s&field3=%s&field4=%d",
                     // Write API key for the Channel
                     WRITE_API_KEY,
                     // Field 1: Temperature
                     String(data.temp100x / 100.0f, 2),
                     // Field 2: Humidity
                     String(data.humid100x / 100.0f, 2),
                     // Field 3: Supply Voltage
                     String(data.supplyVoltage / 1000.0f, 2),
                     // Field 4: Link Quality
                     data.linkQuality);

            // Send a request
            client.println(String("GET https://") +
                           SERVER_HOST +
                           String("/update?") +
                           queries +
                           String(" HTTP/1.1"));
            client.println("Accept: */*");
            client.println(String("Host: ") + SERVER_HOST);
            client.println("Connection: close");
            client.println();
            uint32_t timeSentRequest = millis();

            // Handle a response
            while (client.connected()) {
                String line = client.readStringUntil('\n');
                if (line == "\r") {
                    Serial.print("Index (if succeeded): ");
                    break;
                }
                if (millis() - timeSentRequest > REQUEST_TIMEOUT * 1000) {
                    Serial.println("Request was timed out");
                    break;
                }
            }
            while (client.available()) {
                char c = client.read();
                Serial.write(c);
            }
            client.stop();
            Serial.println("");
        }
        lastTimeRequested = millis();
    } else {
        Serial.println("Requests are too frequently; skip.");
    }
}