Using Google Sheets
spot-google-sheets, which acts as a Wi-Fi client and uploads data received from TWELITE ARIA to Google Sheets in the cloud. This sketch uses FreeRTOS functions from the ESP32 Arduino environment.This article uses third-party open-source software.
We are unable to provide detailed instructions on how to use third-party software. We are also not responsible for any damages caused by the use of third-party software.
Getting the Source Code
You can obtain it from GitHub (monowireless/spot-google-sheets).
System Overview
TWELITE SPOT automatically creates a spreadsheet using a pre-created service account and shares the file with a specified user account.
By logging into the user account, the user can view and edit the spreadsheet created by TWELITE SPOT from the “Shared with me” page in Google Drive.
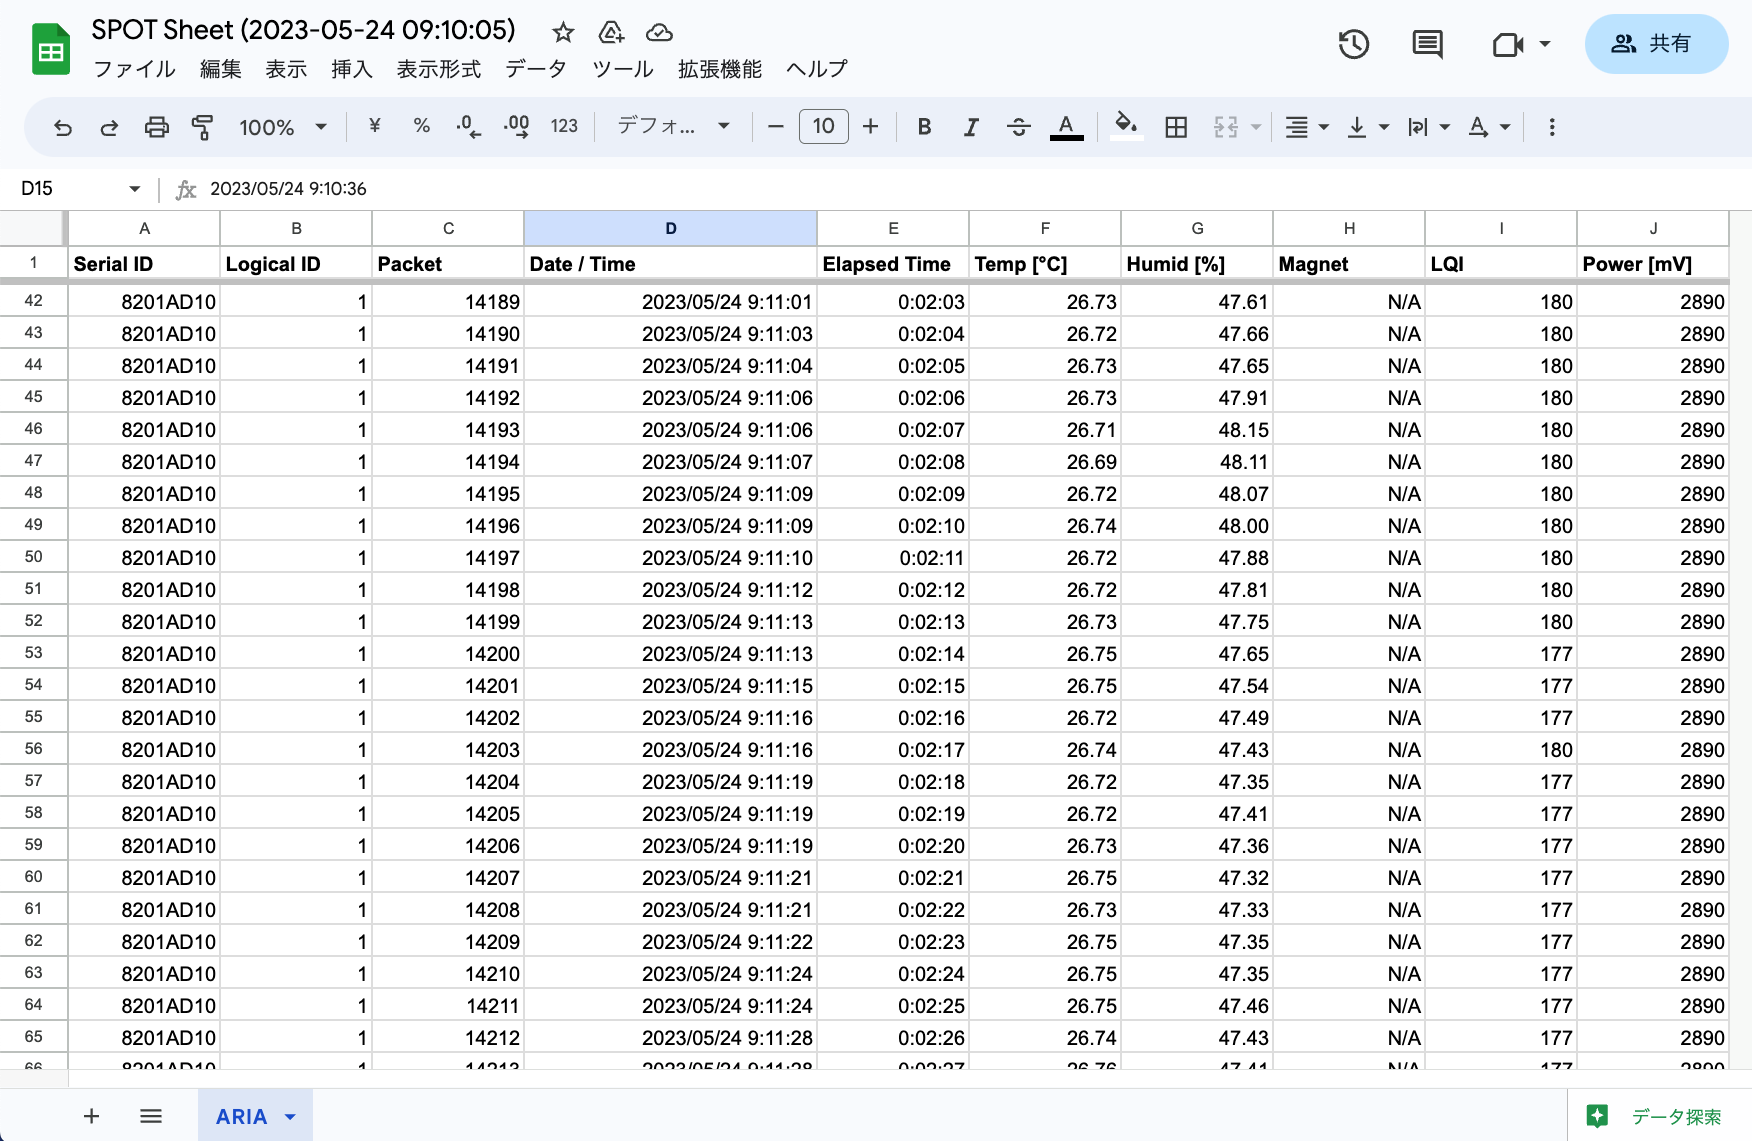
Image of the created spreadsheet
TWELITE SPOT continuously adds data rows to the created spreadsheet.
As of May 2023, there are no additional charges for using the Google Sheets / Drive API.
However, there are usage limits such as the number of queries (Sheets API / Drive API).
For example, the Google Sheets API must limit requests to 60 times per minute. Exceeding this will result in errors.
A service account is a Google account used by applications.
For more details, see the Google documentation.
Requirements for Development
-
Wireless LAN Gateway TWELITE SPOT
- USB-C cable for power
- USB AC adapter (must supply at least 1A)
-
Temperature and Humidity Sensor Wireless Tag TWELITE ARIA (If you don’t have one, please purchase 👉 Retailers)
- CR2032 coin battery
-
USB Adapter TWELITE R3 (If you don’t have one, please purchase 👉 Retailers)
- USB-C cable for communication
- 💻 Development computer
- Google account
This article uses TWELITE ARIA, but by modifying the source code, it can also support child devices such as TWELITE CUE.
However, if the amount of data written to the sheet increases, be mindful of the API usage limits.
Environment Setup
Installing the IDE and Toolchain
See How to set up the development environment using Arduino IDE 1.x.
Or
See How to set up the development environment using Arduino IDE 2.x.
Installing Libraries
ESP-Google-Sheet-Client Library
Open the Library Manager and search for esp-google-sheet to install it.
You can also obtain it from GitHub (mobizt/ESP-Google-Sheet-Client).
Official NTP Library
Open the Library Manager and search for ntpclient to install it.
TimeLib Library
Open the Library Manager and search for timelib to install it.
Preliminary Setup: API Configuration
Before using the API, you need to set up your environment. A Google account is required.
The following steps will be performed here:
- Create a Google Cloud project
- Enable the Google Sheets API
- Enable the Google Drive API
- Create and configure a service account
- Obtain authentication credentials for the service account
Creating the Project
To use the API, first create a Google Cloud project.
A Google Cloud project encompasses the entire system. It’s recommended to name the project after the system you’re building. Here, we will use SPOT-DEV as an example.
Visit the following link and create a project.
https://console.cloud.google.com/projectcreate
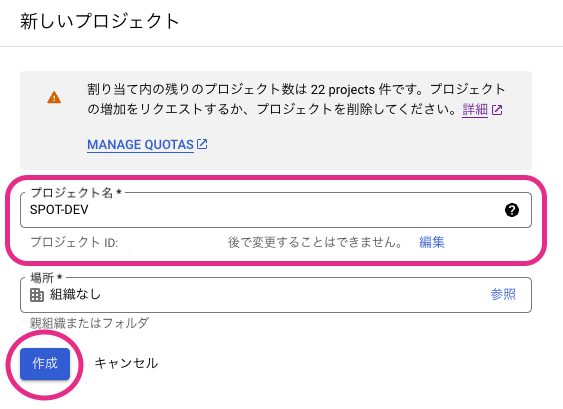
Example screen for creating a project (personal)
Enabling the Sheets API
To operate spreadsheets from TWELITE SPOT, enable the Sheets API.
Visit the following link and enable the API.
https://console.cloud.google.com/apis/library/sheets.googleapis.com
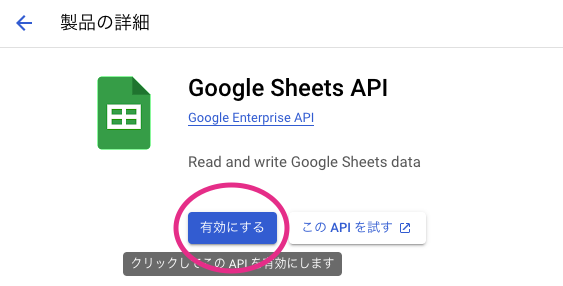
Example screen for enabling the Sheets API
Enabling the Drive API
To share spreadsheets from TWELITE SPOT, enable the Drive API.
Visit the following link and enable the API.
https://console.cloud.google.com/apis/library/drive.googleapis.com
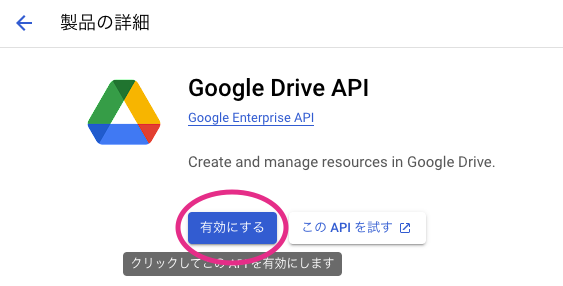
Example screen for enabling the Drive API
Creating and Configuring the Service Account
To create spreadsheets from TWELITE SPOT, you need to create a service account.
Visit the following link, select your project (here, SPOT-DEV), and display the list of service accounts. Then, use the button at the top of the page to begin creating a service account.
https://console.cloud.google.com/iam-admin/serviceaccounts
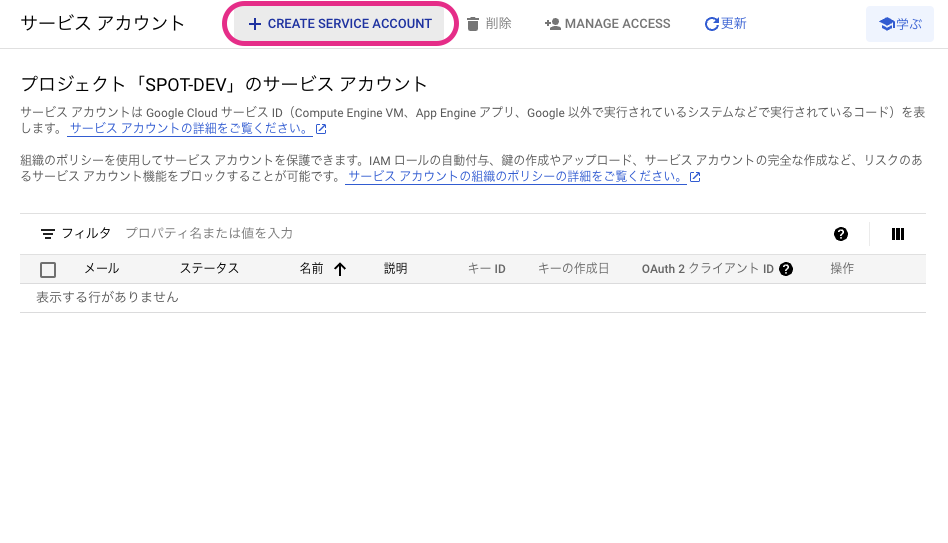
Example screen showing the list of service accounts
In “① Service account details”, enter the name of the service account.
In the example below, the name is set as spot-dev-sa.
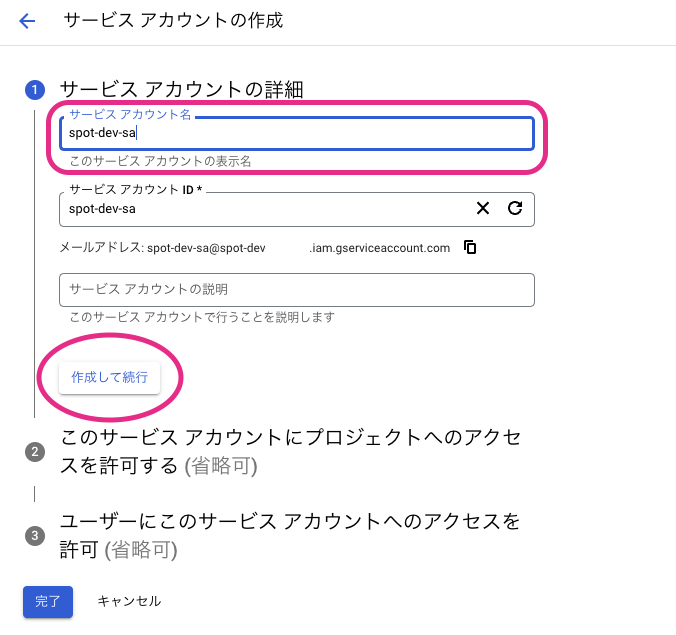
Example screen for entering the service account name
After entering the name, click the “Create and continue” button to proceed.
In “② Grant this service account access to the project (optional)”, configure the permissions for the service account.
Here, select “Owner” as shown in the example below.
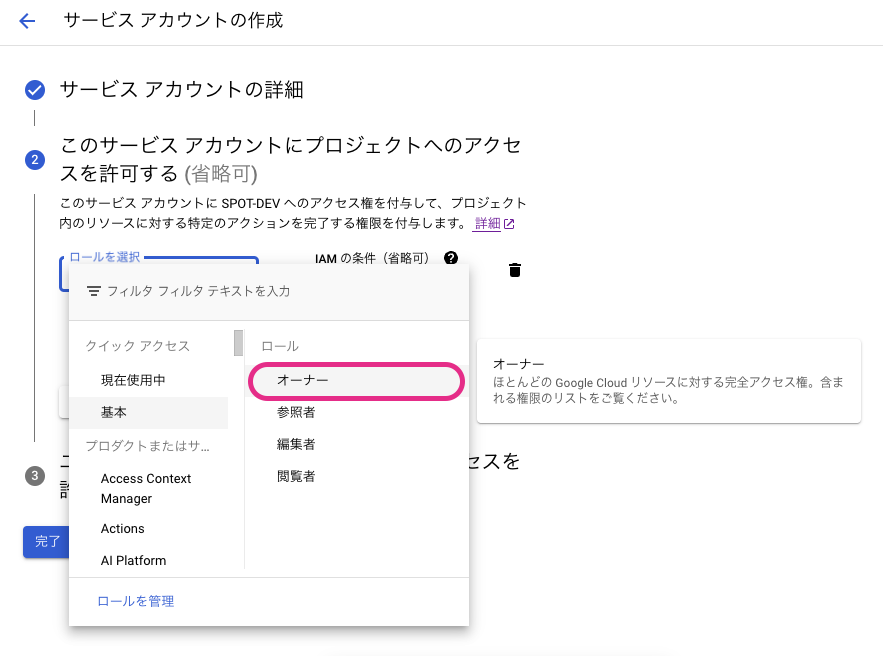
Example screen for entering service account permissions
After selecting the role, click the “Continue” button to proceed.
In “③ Grant users access to this service account (optional)”, do nothing and click “Done” to skip.
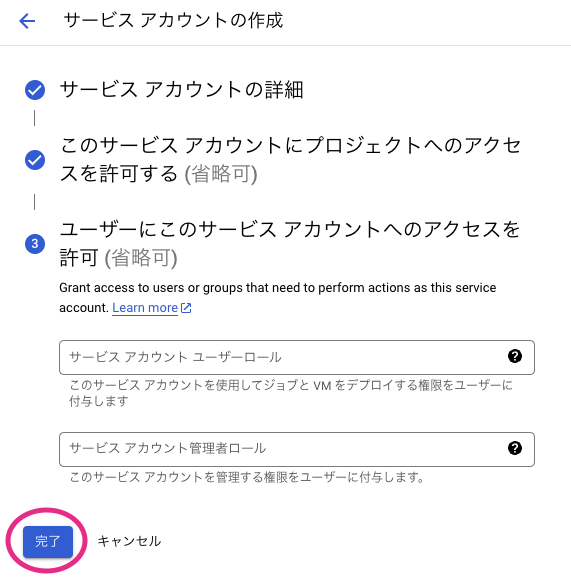
Example screen to be skipped
Once the service account is created, you will return to the service account list. Verify that the newly created service account appears.
Obtaining Service Account Credentials
Once you have confirmed the created service account, click the link in the “Email” column to open the service account details page.
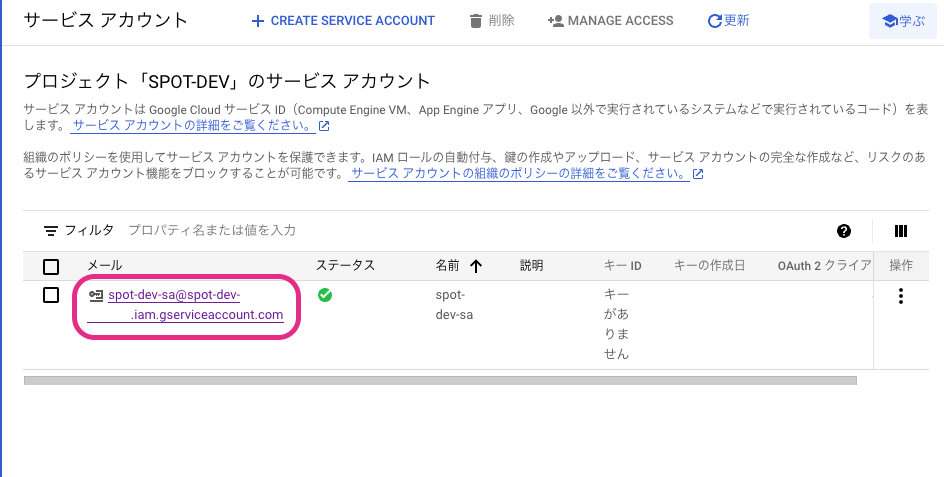
Example screen after creating a service account
Select the “Keys” tab at the top to navigate to the screen for managing the private key required for service account authentication.
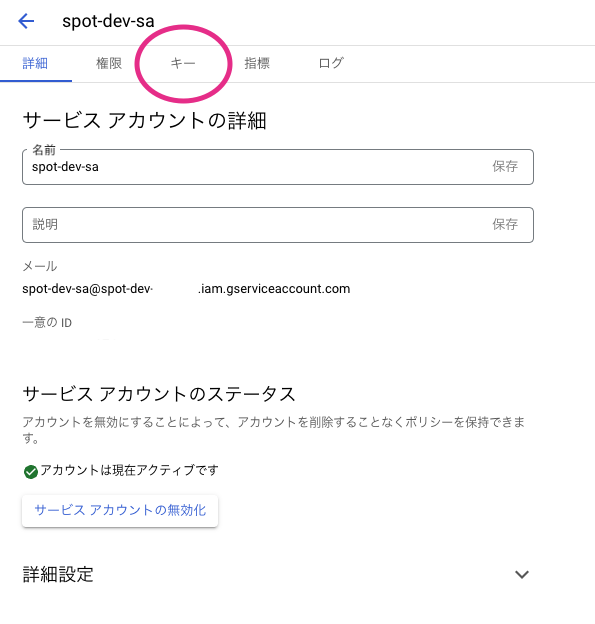
Example screen of the service account details page
Click the “Add Key” button and select “Create new key” to begin creating a private key.
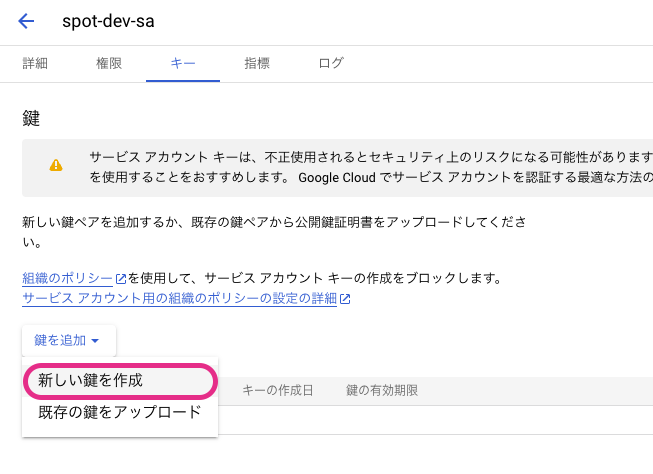
Example of the key creation button
On the next screen, leave “JSON” selected and click the “Create” button.
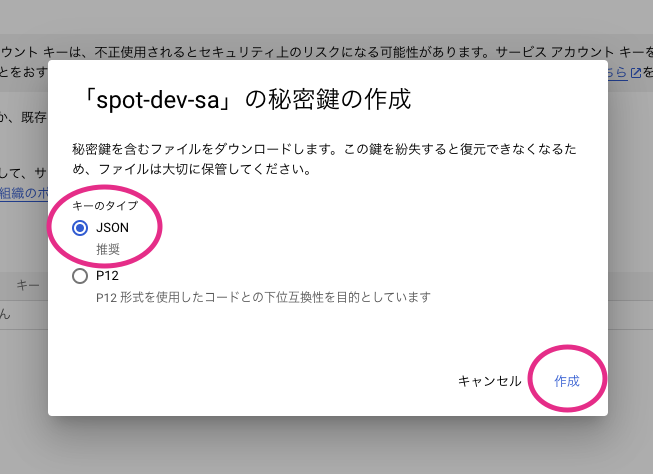
Example screen for selecting the key type
Clicking the “Create” button will automatically download the private key file (.json).
When you open the private key file in a text editor, it should look like the following.
{
  "type": "service_account",
  "project_id": "???",
  "private_key_id": "???",
  "private_key": "-----BEGIN PRIVATE KEY-----\n???\n-----END PRIVATE KEY-----\n",
  "client_email": "???@???.iam.gserviceaccount.com",
  "client_id": "???",
  "auth_uri": "https://accounts.google.com/o/oauth2/auth",
  "token_uri": "https://oauth2.googleapis.com/token",
  "auth_provider_x509_cert_url": "https://www.googleapis.com/oauth2/v1/certs",
  "client_x509_cert_url": "???",
  "universe_domain": "googleapis.com"
}
Among the above, the values of project_id, private_key, and client_email will be used during the operation check.
Operation Check
Let’s start by checking the operation.
Obtaining the Project Files
- Download the Zip file from GitHub (monowireless/spot-google-sheets)
- Extract the Zip file and rename the folder from
spot-google-sheets-maintospot-google-sheets - Place the
spot-google-sheetsfolder in your Arduino sketchbook location (as specified in the Arduino IDE settings, e.g.,C:\Users\foo\Documents\Arduino)
Editing the Sketch Configuration File
Open the Arduino sketch spot-google-sheets.ino, select the config.h tab at the top of the screen, and modify the values from lines 4 to 11.
Lines 4–5 are Wi-Fi related settings.
const char* WIFI_SSID = "YOUR SSID";            // Modify it
const char* WIFI_PASSWORD = "YOUR PASSWORD";    // Modify it
These specify the SSID and password.
On the other hand, lines 8–11 are spreadsheet-related settings.
const char* PROJECT_ID = "YOUR-PROJECT-ID";                                                                         // Modify it
const char* SERVICE_ACCOUNT_EMAIL = "YOUR-SERVICE-ACCOUNT@YOUR-PROJECT-ID.iam.gserviceaccount.com";                 // Modify it
const char PRIVATE_KEY[] PROGMEM = "-----BEGIN PRIVATE KEY-----\nYOUR-PRIVATE-KEY\n-----END PRIVATE KEY-----\n";    // Modify it
const char* USER_ACCOUNT_EMAIL = "YOUR-ACCOUNT@EMAIL";                                                              // Modify it
For the first three items, copy the values from the .json file, and for USER_ACCOUNT_EMAIL, enter your logged-in Google account email address.
Uploading the Sketch
Refer to How to upload a sketch to ESP32 to upload the sketch.
The setting under Tools → Flash Size must be set to 16MB or it will not function correctly.
The partition table uses
paritions.csv, and if the total size is too small, writing will fail.
Starting the Parent and Child Devices
Press the reset button on TWELITE SPOT (ESP32 side).
If you see the following output in the Arduino serial console, the startup was successful.
Initializing queue...
Completed.
Started TWELITE.
Connecting to WiFi ...!...
Connected. IP: xxx.xxx.xxx.xxx
Initializing NTP...Completed. UNIX time: xxxxxxxxxx
Initializing sheets...
Creating sheets...
OAuth2.0 access token on initializing
OAuth2.0 access token on signing
OAuth2.0 access token on exchange request
OAuth2.0 access token ready
Requesting to create...
Succeeded.
Adding headers for ARIA...
Requesting to add header...
Succeeded.
Formatting the sheet for ARIA...
Requesting to format...
Succeeded.
Extending the sheet for ARIA...
Requesting to extend...
Succeeded.
Completed.
Insert the coin battery into TWELITE ARIA (with default settings) and power it on.
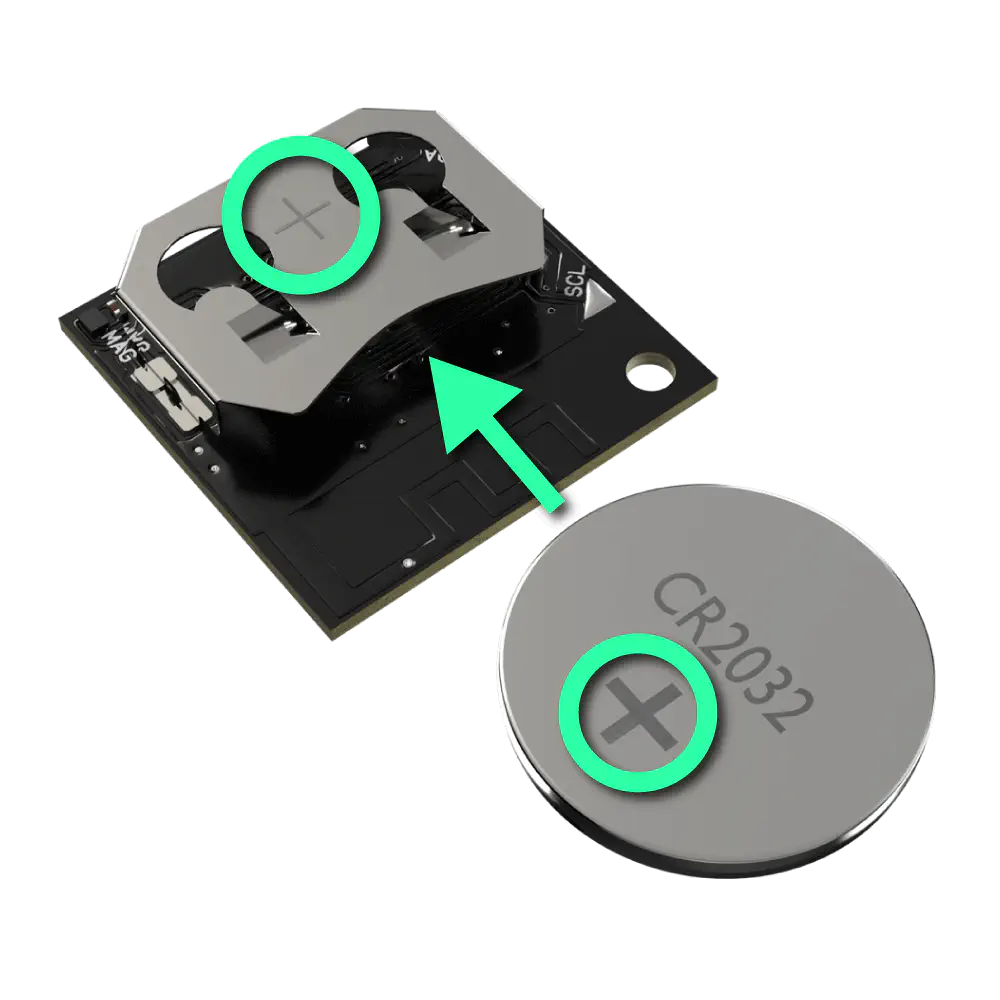
Inserting the coin battery
When TWELITE SPOT successfully receives packets from TWELITE ARIA and adds the data rows, you will see the following output.
Got a new packet from ARIA.
Got a new packet from ARIA.
Requesting to add data...
Got a new packet from ARIA.
Succeeded.
Incidentally, in the example above, packets are being received during a request — this indicates successful multitasking (see Task Registration).
Accessing Google
Access Shared with me on Google Drive and open the spreadsheet named SPOT Sheet (xxx).
You should see a screen similar to the one below.
Example of the spreadsheet screen
Scroll down to find the data received from TWELITE ARIA.
Ctrl (⌘) + ↓.Sketch Explanation
This section explains the Arduino sketch spot-google-sheets.ino.
Including Libraries
Official Arduino and ESP32 Libraries
Lines 4-7 include the official Arduino and ESP32 libraries.
#include <Arduino.h>
#include <NTPClient.h>
#include <WiFi.h>
#include <WiFiUdp.h>
| Header File | Description | Remarks |
|---|---|---|
Arduino.h | Basic Arduino library | |
NTPClient.h | Use NTP | Used for file name and receive time |
WiFi.h | Use ESP32 WiFi | |
WiFiUdp.h | Use UDP | Required for NTPClient |
Third-Party Libraries
Lines 10-11 include third-party libraries.
#include <ESP_Google_Sheet_Client.h>
#include <TimeLib.h>
| Header File | Description | Remarks |
|---|---|---|
ESP_Google_Sheet_Client.h | Access Google | |
TimeLib.h | Format UNIX time |
MWings Library
Line 14 includes the MWings library.
#include <MWings.h>
User Configuration Definitions
Line 17 includes config.h.
#include "config.h"
config.h defines user settings. Modify these settings at runtime.Wi-Fi Configuration Definition
Lines 4-5 of config.h define the Wi-Fi settings applied to the ESP32 on TWELITE SPOT.
const char* WIFI_SSID = "YOUR SSID";            // Modify it
const char* WIFI_PASSWORD = "YOUR PASSWORD";    // Modify it
| Name | Description |
|---|---|
WIFI_SSID | SSID of the network to connect to |
WIFI_PASSWORD | Password of the network to connect to |
API Configuration Definition
Lines 8-11 of config.h define the API settings.
const char* PROJECT_ID = "YOUR-PROJECT-ID";                                                                         // Modify it
const char* SERVICE_ACCOUNT_EMAIL = "YOUR-SERVICE-ACCOUNT@YOUR-PROJECT-ID.iam.gserviceaccount.com";                 // Modify it
const char PRIVATE_KEY[] PROGMEM = "-----BEGIN PRIVATE KEY-----\nYOUR-PRIVATE-KEY\n-----END PRIVATE KEY-----\n";    // Modify it
const char* USER_ACCOUNT_EMAIL = "YOUR-ACCOUNT@EMAIL";                                                              // Modify it
| Name | Description |
|---|---|
PROJECT_ID | Project ID |
SERVICE_ACCOUNT_EMAIL | Email address of the service account |
PRIVATE_KEY | Content of the private key |
USER_ACCOUNT_EMAIL | Email address of the user account to share the spreadsheet with |
Definition of Pin Numbers
Lines 20-24 define the pin numbers.
const uint8_t TWE_RST = 5;
const uint8_t TWE_PRG = 4;
const uint8_t LED = 18;
const uint8_t ESP_RXD1 = 16;
const uint8_t ESP_TXD1 = 17;
| Name | Description |
|---|---|
TWE_RST | Pin number connected to the RST pin of TWELITE |
TWE_PRG | Pin number connected to the PRG pin of TWELITE |
LED | Pin number connected to the ESP32 LED on the board |
ESP_RXD1 | Pin number connected to the TX pin of TWELITE |
ESP_TXD1 | Pin number connected to the RX pin of TWELITE |
Definition of TWELITE Settings
Lines 27-30 define the settings applied to the TWELITE parent device mounted on TWELITE SPOT.
const uint8_t TWE_CH = 18;
const uint32_t TWE_APPID = 0x67720102;
const uint8_t TWE_RETRY = 2;
const uint8_t TWE_POWER = 3;
| Name | Description |
|---|---|
TWE_CH | TWELITE frequency channel |
TWE_APPID | TWELITE application ID |
TWE_RETRY | TWELITE retransmission count (when transmitting) |
TWE_POWER | TWELITE transmission output |
Sheet-Related Definitions
Lines 32-43 define information related to the sheet.
const char* SPREADSHEET_TITLE_PREFIX = "SPOT Sheet";
const char* SPREADSHEET_LOCALE = "ja_JP";
const char* SPREADSHEET_TIME_ZONE = "Asia/Tokyo";

const int MIN_REQUEST_INTERVAL = 1000;    // 60 requests per minute

const int SHEETS_DEFAULT_ROWS = 1000;            // Default length is 1000 rows
const int SHEETS_ROWS = 100000;                  // Max 1,000,000 rows at 10 columns

const int ARIA_SHEET_ID = 1;
const char* ARIA_SHEET_TITLE = "ARIA";
constexpr int ARIA_BUFFER_PACKETS = 32;    // Maximum number of rows per addition request
| Name | Description |
|---|---|
SPREADSHEET_TITLE_PREFIX | Fixed part of the spreadsheet file name |
SPREADSHEET_LOCALE | Spreadsheet locale |
SPREADSHEET_TIME_ZONE | Spreadsheet time zone |
MIN_REQUEST_INTERVAL | Minimum interval between requests |
SHEETS_DEFAULT_ROWS | Default number of rows per sheet |
SHEETS_ROWS | Number of rows per sheet |
ARIA_SHEET_ID | Sheet ID for ARIA |
ARIA_SHEET_TITLE | Sheet name for ARIA |
ARIA_BUFFER_PACKETS | Queue length for storing packets from ARIA |
When supporting child devices other than TWELITE ARIA, it is recommended to create additional sheets within the same spreadsheet (workbook).
Therefore, you will need to add three items: ID, title, and queue length.
Type Declarations
Lines 46-50 declare types.
struct ParsedAppAriaPacketWithTime {
    ParsedAppAriaPacket packet;
    uint32_t elapsedMillis;
    uint32_t unixTime;
};
| Name | Description |
|---|---|
ParsedAppAriaPacketWithTime | Type for storing received packet data together with the reception time in the queue |
elapsedMillis: Elapsed time since startup at the time the packet was received (milliseconds)unixTime: UNIX time (seconds) when the packet was received
When supporting child devices other than TWELITE ARIA, you will need to create a new queue.
Accordingly, you will also need to add queue storage types like ParsedAppAriaPacketWithTime.
Declaration of Global Objects
Lines 53-61 declare global objects.
WiFiUDP ntpUDP;
NTPClient timeClient(ntpUDP, "ntp.nict.jp", 32400);

String spreadsheetIdString;    // Identifier of newly created file
bool readyForNewRequests = false;
uint32_t lastTimeRequestWasSent = UINT32_MAX;

QueueHandle_t ariaPacketQueue;       // Store received data from ARIA
uint32_t rowToAddNewAriaData = 2;    // Starting with the Row 2
| Name | Description |
|---|---|
ntpUDP | UDP interface for NTP |
timeClient | NTP interface |
spreadsheetIdString | ID of the created spreadsheet |
readyForNewRequests | Becomes true when ready to send new requests |
lastTimeRequestWasSent | Time when the last request was sent |
ariaPacketQueue | Queue to store packets and reception times received from ARIA |
rowToAddNewAriaData | Row number to add the next data received from ARIA |
ariaPacketQueue uses the Queue feature of FreeRTOS, which is the basis of Arduino core for the ESP32.Function Prototype Declarations
Lines 64-71 declare function prototypes.
void anotherLoop();

void waitUntilNewRequestsReady();
String createSpreadsheet();
bool formatSheet(const String spreadsheetId, const int sheetId);
bool extendSheet(const String spreadsheetId, const int sheetId, const int rows);
bool addSheetAriaHeaderRow(const String spreadsheetId, const char* const sheetTitle);
bool addSheetsDataRow(const String spreadsheetId);
| Name | Description |
|---|---|
anotherLoop() | Another loop() for asynchronously processing TWELITE |
waitUntilNewRequestsReady() | Wait until the next request can be sent |
createSpreadsheet() | Create a new spreadsheet |
formatSheet() | Format the specified sheet |
extendSheet() | Increase the number of rows in the specified sheet and format it |
addSheetAriaHeaderRow() | Add a header row for ARIA to the specified sheet |
addSheetsDataRow() | Add a data row to the sheet |
anotherLoop(), which executes Twelite.update() inside.When supporting child devices other than TWELITE ARIA, for example, you can add request contents as follows:
createSpreadsheet(): Modify to create additional spreadsheetsformatSheet(): Modify to format new sheets as wellextendSheet(): Call for new sheets as well, keeping the contents the sameaddSheet**HeaderRow(): Add a function for each header rowaddSheetsDataRow(): Add processing to add data to the new sheets
Queue Initialization
Lines 82-83 initialize the queue for storing received packet data along with the reception time.
ariaPacketQueue = xQueueCreate(ARIA_BUFFER_PACKETS, sizeof(ParsedAppAriaPacketWithTime));
if (ariaPacketQueue == 0) { Serial.println("Failed to init a queue."); }
xQueueCreate() is a FreeRTOS function running inside the ESP32. It allows you to easily create queues that support multitasking.
TWELITE Configuration
Lines 88-92 call Twelite.begin() to configure and start the TWELITE parent device mounted on TWELITE SPOT.
Serial2.begin(115200, SERIAL_8N1, ESP_RXD1, ESP_TXD1);
    if (Twelite.begin(Serial2,
                      LED, TWE_RST, TWE_PRG,
                      TWE_CH, TWE_APPID, TWE_RETRY, TWE_POWER)) {
        Serial.println("Started TWELITE.");
    }
| Argument | Type | Description |
|---|---|---|
Serial2 | HardwareSerial& | Serial port used for communication with TWELITE |
LED | int | Pin number connected to the status LED |
TWE_RST | int | Pin number connected to the RST pin of TWELITE |
TWE_PRG | int | Pin number connected to the PRG pin of TWELITE |
TWE_CHANNEL | uint8_t | TWELITE frequency channel |
TWE_APP_ID | uint32_t | TWELITE application ID |
TWE_RETRY | uint8_t | TWELITE retransmission count (when transmitting) |
TWE_POWER | uint8_t | TWELITE transmission output |
Event Handler Registration
Lines 94-103 register the process to be executed when a packet is received from TWELITE ARIA.
Twelite.on([](const ParsedAppAriaPacket& packet) {
    Serial.println("Got a new packet from ARIA.");
    ParsedAppAriaPacketWithTime packetWithTime;
    packetWithTime.elapsedMillis = millis();
    packetWithTime.unixTime = timeClient.getEpochTime();
    packetWithTime.packet = packet;
    if (not(xQueueSend(ariaPacketQueue, &packetWithTime, 0) == pdPASS)) {
        Serial.println("Failed to add packet data to the queue.");
    }
});
Here, xQueueSend() is used to store the received packet data along with the reception time at the end of the queue.
Wi-Fi Settings
Lines 106-120 perform the Wi-Fi settings.
WiFi.mode(WIFI_STA);
WiFi.setAutoReconnect(true);
WiFi.begin(WIFI_SSID, WIFI_PASSWORD);
Serial.print("Connecting to WiFi ..");
while (WiFi.status() != WL_CONNECTED) {
    static int count = 0;
    Serial.print('.');
    delay(500);
    // Retry every 5 seconds
    if (count++ % 10 == 0) {
        WiFi.disconnect();
        WiFi.reconnect();
        Serial.print('!');
    }
}
Here, it is set as a Wi-Fi station and connects to the specified network.
The while loop will not exit until a connection to the network is established.
In the above implementation, a reconnection is attempted once every 5 seconds.
NTP Settings
Lines 126-127 perform the NTP settings.
timeClient.begin();
timeClient.update();
Google Spreadsheet Settings
Lines 132-145 configure the Google Spreadsheet.
GSheet.setTokenCallback([](TokenInfo info) {
    // Print token initialization states
    if (info.status == esp_signer_token_status_error) {
        Serial.print("Token error ");
        Serial.println(GSheet.getTokenError(info));
    }
    Serial.print(GSheet.getTokenType(info));
    Serial.print(" ");
    Serial.println(GSheet.getTokenStatus(info));
});
GSheet.setPrerefreshSeconds(60);    // Set refresh rate for auth token

Serial.println("Initializing sheets...");
GSheet.begin(SERVICE_ACCOUNT_EMAIL, PROJECT_ID, PRIVATE_KEY);
In lines 132-141, it registers processing to display the status when obtaining a service account token, sets the token refresh interval in line 142, and initializes the service account in line 145.
Additionally, lines 147-173 create the spreadsheet, add the header row for ARIA, format the cells, and extend the number of rows.
Serial.println("Creating sheets...");
waitUntilNewRequestsReady();    // Wait for token
spreadsheetIdString = createSpreadsheet();
if (not(spreadsheetIdString.length() > 0)) {
    Serial.println("Failed to create sheets.");
}

Serial.println("Adding headers for ARIA...");
delay(MIN_REQUEST_INTERVAL);
waitUntilNewRequestsReady();
if (not addSheetAriaHeaderRow(spreadsheetIdString, ARIA_SHEET_TITLE)) {
    Serial.println("Failed to add headers.");
}

Serial.println("Formatting the sheet for ARIA...");
delay(MIN_REQUEST_INTERVAL);
waitUntilNewRequestsReady();
if (not formatSheet(spreadsheetIdString, ARIA_SHEET_ID)) {
    Serial.println("Failed to format.");
}

Serial.println("Extending the sheet for ARIA...");
delay(MIN_REQUEST_INTERVAL);
waitUntilNewRequestsReady();
if (not extendSheet(spreadsheetIdString, ARIA_SHEET_ID, SHEETS_ROWS - SHEETS_DEFAULT_ROWS)) {
    Serial.println("Failed to extend.");
}
By default, there are 1,000 rows for columns A-Z. Here, the columns are limited to A-J (10 columns), and the number of rows is increased 100 times to 100,000 rows.
If this is still not enough, you need to increase the number of rows further. However, the maximum number of cells is 10,000,000, so with 10 columns (A-J), the maximum is limited to 1,000,000 rows. Beyond that, you cannot add more cells, and you will need to create a new spreadsheet (workbook).
Task Registration
Lines 179-186 register a task to update TWELITE data asynchronously.
xTaskCreatePinnedToCore(
    [](void* params) {
        while (true) {
            anotherLoop();
            vTaskDelay(1);
        }
    },
    "Task for anotherLoop()", 8192, nullptr, 18, nullptr, 0);
xTaskCreatePinnedToCore() is a function provided by the FreeRTOS multitasking framework.
Here, a lambda function (lines 180–185) is passed to create a task that calls anotherLoop() repeatedly.
[](void* params) {
    while (true) {
        anotherLoop();
        vTaskDelay(1);    // IMPORTANT for Watchdog
    }
},
vTaskDelay(1); or similar to allow the watchdog timer to operate.The task is named Task for anotherLoop(), its stack size is 8192, it takes no parameters, its priority is 18 (the higher the number, the higher the priority; Wi-Fi-related processing is at 19), there is no interface to manipulate the task, and it runs on the same CPU core as Wi-Fi and other RF processing, Core 0 (loop() runs on Core 1).
"Task for anotherLoop()", 8192, nullptr, 18, nullptr, 0); // Priority is 18 (lower than WiFi)
Updating TWELITE Data
At line 203, Twelite.update() is called within anotherLoop().
Twelite.update();
Twelite.update() reads out the packet data (ModBus ASCII format) sent from the TWELITE parent device, one byte at a time.
Twelite.update() in the loop(), interpretation of packet data sent from the TWELITE parent device progresses. When the interpretation of packet data is complete, an event like the one described above is triggered.delay(), reading the packet data string may not be fast enough. However, in this sketch, anotherLoop() is separated using FreeRTOS features, so even if there is synchronous processing in loop(), it is not a problem.Updating the Spreadsheet
Lines 192–195 call the spreadsheet update process.
if (millis() - lastTimeRequestWasSent > MIN_REQUEST_INTERVAL) {
    // Add any available data
    addSheetsDataRow(spreadsheetIdString);
}
The if statement on line 192 ensures that at least 1 second has passed since the last request was sent, in order to comply with the API limit of 60 requests per minute (similar to “throttle” in JavaScript’s Throttle/Debounce).
Line 194 adds a new data row to the spreadsheet as needed.
addSheetsDataRow(spreadsheetIdString);
Updating the API Library
Line 196 updates the Google API library and checks whether new requests can be sent.
readyForNewRequests = GSheet.ready();
Updating the NTP Library
Line 197 updates the NTP library.
timeClient.update();
Spreadsheet Operations
Starting from line 217, operations on the spreadsheet are performed using the Sheets API.
For details, see the API reference for the library or Sheets API REST resources.
Related Information
- Google Cloud Console: Welcome – SPOT-DEV – Google Cloud Console
- Sheets REST API Reference: Google Sheets API | Google for Developers
- Create Spreadsheet: Method: spreadsheets.create | Google Sheets | Google for Developers
- Batch Update Spreadsheet: Method: spreadsheets.batchUpdate | Google Sheets | Google for Developers
- Update Spreadsheet Values: Method: spreadsheets.values.batchUpdate | Google Sheets | Google for Developers
- Sheets REST API Samples: Samples | Google Sheets | Google for Developers
- Row and Column Operations: Row and Column Operations | Google Sheets | Google for Developers
Arduino
- Official Site: Arduino - Home
- API Reference: Arduino Reference - Arduino Reference
- Coding Style Guide: Arduino Style Guide for Creating Libraries | Arduino Documentation
- Official NTP Library: arduino-libraries/NTPClient: Connect to a NTP server
ESP32
- Product Information: ESP32 Wi-Fi & Bluetooth MCU I Espressif Systems
- Datasheet: esp32_datasheet_en.pdf
- Arduino Toolchain: espressif/arduino-esp32: Arduino core for the ESP32
- Getting Started Guide: Getting Started — Arduino-ESP32 documentation
- Installation Guide: Installing — Arduino-ESP32 documentation
- API Reference: Libraries — Arduino-ESP32 documentation
- Wi-Fi API: Wi-Fi API — Arduino-ESP32 documentation
- Tutorials: Tutorials — Arduino-ESP32 documentation
- Troubleshooting: Troubleshooting — Arduino-ESP32 documentation
- ESP-IDF: espressif/esp-idf: Espressif IoT Development Framework
- Documentation: ESP-IDF Programming Guide - ESP32
- API Reference: FreeRTOS (ESP-IDF) - ESP32
- Documentation: ESP-IDF Programming Guide - ESP32
Community
Libraries
- Google Sheets / Drive API: mobizt/ESP-Google-Sheet-Client: Arduino Google Sheet REST client library for ESP8266, ESP32 and Raspberry Pi Pico RP2040
- Date and Time: PaulStoffregen/Time: Time library for Arduino
Plugins
- Stack Trace Decoder: me-no-dev/EspExceptionDecoder: Exception Stack Trace Decoder for ESP8266 and ESP32