spot-server is pre-installed on TWELITE SPOT at the time of shipment.
This is an explanation of the sample sketch spot-server, which acts as a wireless LAN access point and displays data from end devices on a web page.
1 - Pre-installed Sketch
Latest Edition (ESP32 Arduino Core v3.x.x)
This is an overview of the sample sketch spot-server, which operates as a wireless LAN access point and displays data from child devices on a web page.
spot-server comes pre-installed on the TWELITE SPOT at the time of shipment.
This guide uses third-party open-source software.
We cannot provide detailed support regarding third-party software. In addition, we accept no liability for any damages resulting from the use of third-party software.
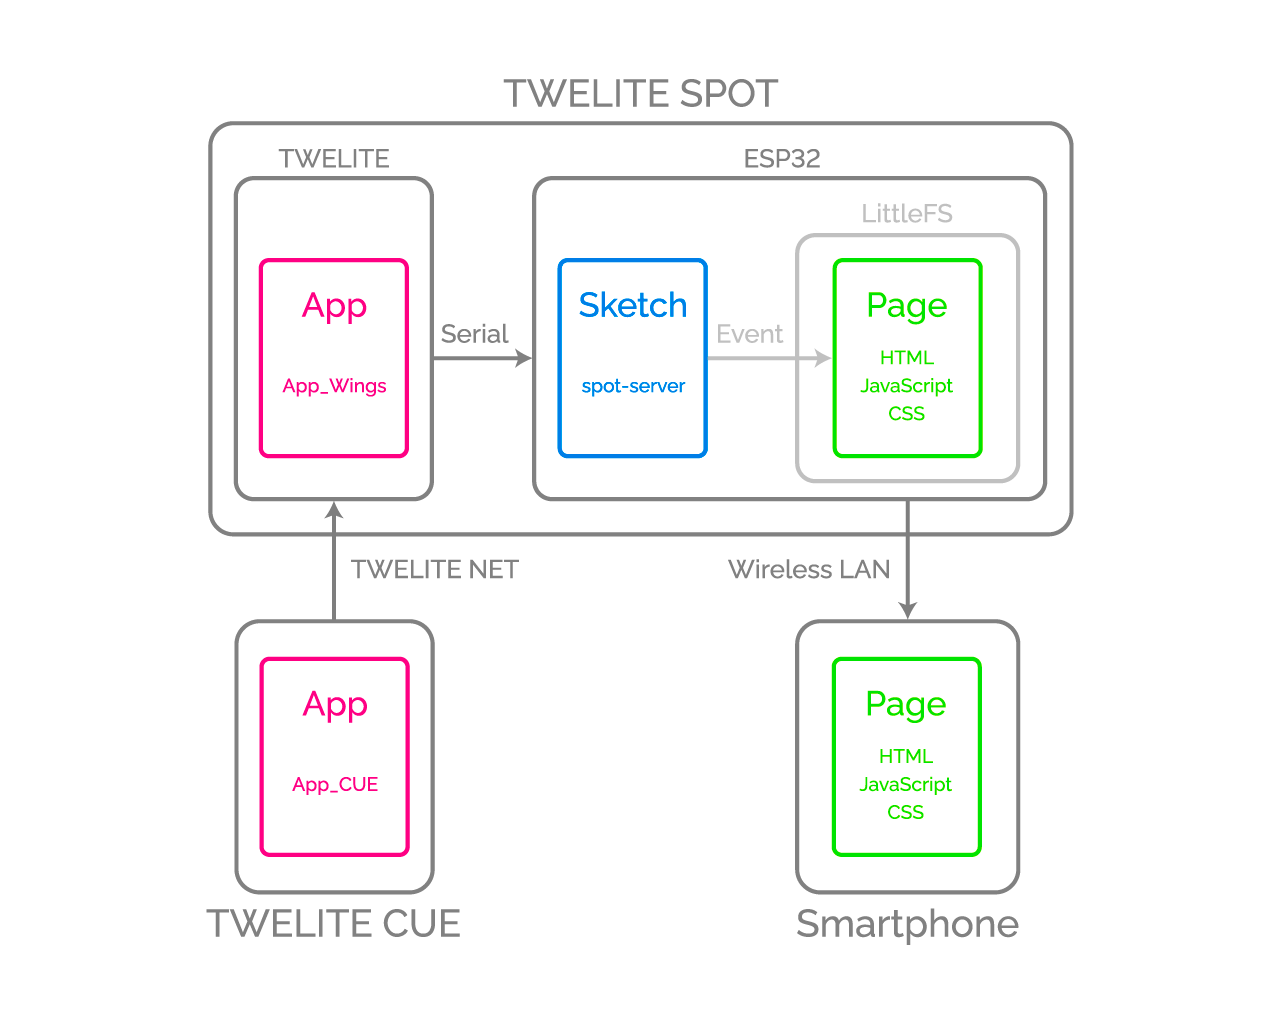
spot-server consists of an Arduino sketch (.ino) for receiving and forwarding data from TWELITE, and a web page (.html / .css / .js) delivered to smartphones.
Diagram
Data transmitted from TWELITE nodes is received by the Arduino sketch, which triggers events on the published web page. The published web page dynamically updates its HTML content in response to these events.
Developing the web page requires knowledge of web technologies such as HTML, CSS, and ECMAScript (JavaScript).
First, if there is no libraries folder in the Arduino sketchbook location (as specified in the Arduino IDE preferences, e.g., C:\Users\foo\Documents\Arduino), please create it.
Asynchronous TCP Communication Library
1. Download the Zip file from GitHub (me-no-dev/AsyncTCP) 2. Extract the Zip file and rename the folder from AsyncTCP-master to AsyncTCP 3. Place the AsyncTCP folder into the libraries folder
With this change, it appears that it can now be installed from the Library Manager.
Asynchronous Web Server Library
1. Download the Zip file from GitHub (me-no-dev/ESPAsyncWebServer) 2. Extract the Zip file and rename the folder from AsyncWebServer-master to AsyncWebServer 3. Place the AsyncWebServer folder into the libraries folder
Open the Library Manager and install ESP Async WebServer.
In lines 73-80, Twelite.on() <ParsedAppTwelitePacket> is called to register the process to be executed when a packet is received from a child device running the super-easy standard app.
Twelite.on([](const ParsedAppTwelitePacket& packet) {
Serial.println("Received a packet from App_Twelite");
String jsonStr = createJsonFrom(packet);
if (not(jsonStr.length() <=0)) {
events.send(jsonStr.c_str(), "data_app_twelite", millis());
}
events.send("parsed_app_twelite", "data_parsing_result", millis());
});
Creating a JSON String
In line 75, a JSON string is generated from the received data.
String jsonStr = createJsonFrom(packet);
To display received data on the web page, it is necessary to send the data to the client-side JavaScript. Since string data is easier to handle in this case, a JSON string is used.
Sending Events to the Web Page
In lines 76-78, the generated JSON string is sent to the “Signal Viewer” page.
if (not(jsonStr.length() <=0)) {
events.send(jsonStr.c_str(), "data_app_twelite", millis());
}
The event name is data_app_twelite.
The ID assigned to each event uses the current time obtained by millis().
In line 79, notification that a packet has been received from App_Twelite is sent to the “Serial Viewer” page.
In lines 82-92, Twelite.on() <ParsedAppAriaPacket> is called to register the process to be executed when a packet is received from a child device running the ARIA app (TWELITE ARIA mode).
Twelite.on([](const ParsedAppAriaPacket& packet) {
Serial.println("Received a packet from App_ARIA");
staticuint32_t firstSourceSerialId = packet.u32SourceSerialId;
if (packet.u32SourceSerialId == firstSourceSerialId) {
String jsonStr = createJsonFrom(packet);
if (not(jsonStr.length() <=0)) {
events.send(jsonStr.c_str(), "data_app_aria_twelite_aria_mode", millis());
}
}
events.send("parsed_app_aria_twelite_aria_mode", "data_parsing_result", millis());
});
Target Filtering
In lines 84-85, the processing is limited to the first child device received.
staticuint32_t firstSourceSerialId = packet.u32SourceSerialId;
if (packet.u32SourceSerialId == firstSourceSerialId) {
This is done to maintain graph consistency when there are multiple child devices.
Creating a JSON String
In line 86, a JSON string is generated from the received data.
String jsonStr = createJsonFrom(packet);
Sending Events to the Web Page
In lines 87-89, the generated JSON string is sent to the “ARIA Viewer” page.
if (not(jsonStr.length() <=0)) {
events.send(jsonStr.c_str(), "data_app_aria_twelite_aria_mode", millis());
}
The event name is data_app_aria_twelite_aria_mode.
In line 91, notification that a packet has been received from App_Twelite is sent to the “Serial Viewer” page.
In lines 94-104, Twelite.on() <ParsedAppCuePacket> is called to register the process to be executed when a packet is received from a child device running the CUE app (TWELITE CUE mode).
Twelite.on([](const ParsedAppCuePacket& packet) {
Serial.println("Received a packet from App_CUE");
staticuint32_t firstSourceSerialId = packet.u32SourceSerialId;
if (packet.u32SourceSerialId == firstSourceSerialId) {
String jsonStr = createJsonFrom(packet);
if (not(jsonStr.length() <=0)) {
events.send(jsonStr.c_str(), "data_app_cue_twelite_cue_mode", millis());
}
}
events.send("parsed_app_cue_twelite_cue_mode", "data_parsing_result", millis());
});
The contents of the processing are the same as in App_ARIA.
Others: Registering Event Handlers
In lines 106-134, the processes to be executed when packets are received from child devices running other apps are registered.
As with the ARIA app, events are sent to the “Serial Viewer.”
All: Registering Event Handler
In lines 136-142, the process to be executed when packets are received from all apps’ child devices is registered.
Twelite.update() is a function that sequentially reads out packet data (in ModBus ASCII format) sent from the TWELITE parent module, one byte at a time.
By repeatedly calling Twelite.update() inside the loop(), packet data sent from the TWELITE parent module is interpreted. When the interpretation of a packet is complete, an event such as above is triggered.
If you block the call to this function with processing such as delay(), it may not be possible to read packet data strings in time. Always implement time-consuming processes asynchronously and make the loop() function run as quickly as possible.
Web Page
We will not provide a detailed explanation of the web page here. Instead, we will focus on the important points.
Here, the element centered on the logo has a width of 6/12, and the element centered on the text also has a width of 6/12; that is, both are placed side by side with equal width in one row. Also, the elements centered on the text TWELITE SPOT and CUE Viewer both have a width of 12/12, so they are arranged as two separate rows.
xs- and sm- and similar classes specify the screen width. These are useful for responsive design.
HTML: Data Display Section
Elements that display data received from TWELITE child devices are assigned unique IDs.
Below is an excerpt of the section that displays the X-axis acceleration received from TWELITE CUE.
The function processDataAppCueTweliteCueMode() in lines 136-235 updates the page content when a data_app_cue_twelite_cue_mode event is received from the sketch.
For example, in lines 184-208, the voltage value and emoji are updated according to the power supply voltage of TWELITE CUE.
Here, when the power supply voltage drops below 2700mV, the emoji changes from 🔋 to 🪫, and as the voltage decreases from 3000mV → 2700mV → 2400mV, the CSS class applied to the voltage value text color is changed accordingly.
Registering Event Listeners
In lines 254-257, the process for handling events received from the sketch is registered.
Here, the event message received from the sketch is parsed from a JSON string and the parsed data is passed to the function processDataAppCueTweliteCueMode().
This is an explanation of the sample sketch spot-server, which acts as a wireless LAN access point and displays data from child devices on a web page.
spot-server is pre-installed on TWELITE SPOT at the time of factory shipment.
This article requires Arduino IDE 1.x. As of May 2023, Arduino IDE 2.x is not supported due to technical limitations.
The plugin used in this article is written in Java, so unlike Arduino IDE 1.x, it does not work with Arduino IDE 2.x, which is not Java-based. For more details on this issue, please refer to the Arduino IDE GitHub Issue (Missing support for external tools / plugins · Issue #58 · arduino/arduino-ide) (in English).
Note added October 2024: Although unverified, you may be able to use the plugin earlephilhower/arduino-littlefs-upload as an alternative on Arduino IDE 2.x.
This article uses third-party open-source software.
We are unable to provide detailed instructions on how to use third-party software. Also, we are not responsible for any damage or loss resulting from the use of third-party software.
spot-server consists of an Arduino sketch (.ino) that receives and relays data from TWELITE, and a web page (.html / .css / .js) delivered to smartphones.
Image diagram
The data sent by TWELITE child devices is received by the Arduino sketch, which then fires events to the published web page. The published web page dynamically rewrites its HTML content in response to these events.
Developing the web page requires knowledge of web technologies such as HTML, CSS, and ECMAScript (JavaScript).
First, if there is no libraries folder in your Arduino sketchbook location (as specified in Arduino IDE preferences, e.g., C:\Users\foo\Documents\Arduino), create it.
Lines 65-72 call Twelite.on() <ParsedAppTwelitePacket> to register the process to execute when a packet is received from a child device using the super-easy standard app.
Twelite.on([](const ParsedAppTwelitePacket& packet) {
Serial.println("Received a packet from App_Twelite");
String jsonStr = createJsonFrom(packet);
if (not(jsonStr.length() <=0)) {
events.send(jsonStr.c_str(), "data_app_twelite", millis());
}
events.send("parsed_app_twelite", "data_parsing_result", millis());
});
Creating JSON String
Line 67 generates a JSON string from the received data.
String jsonStr = createJsonFrom(packet);
To display the received data on the web page, it is necessary to send the data to client-side JavaScript, and string data is easier to handle, so it is converted to a JSON string.
Sending Events to the Web Page
Lines 68-70 send the generated JSON string to the “Signal Viewer” page.
if (not(jsonStr.length() <=0)) {
events.send(jsonStr.c_str(), "data_app_twelite", millis());
}
The event name is data_app_twelite.
The ID assigned to each event uses the current time obtained by millis().
Line 71 sends a notification to the “Serial Viewer” page that a packet has been received from App_Twelite.
Lines 74-84 call Twelite.on() <ParsedAppAriaPacket> to register the process to execute when a packet is received from a child device in ARIA app (TWELITE ARIA mode).
Twelite.on([](const ParsedAppAriaPacket& packet) {
Serial.println("Received a packet from App_ARIA");
staticuint32_t firstSourceSerialId = packet.u32SourceSerialId;
if (packet.u32SourceSerialId == firstSourceSerialId) {
String jsonStr = createJsonFrom(packet);
if (not(jsonStr.length() <=0)) {
events.send(jsonStr.c_str(), "data_app_aria_twelite_aria_mode", millis());
}
}
events.send("parsed_app_aria_twelite_aria_mode", "data_parsing_result", millis());
});
Filtering the Target
Lines 76-77 limit the processing to the first child device received.
staticuint32_t firstSourceSerialId = packet.u32SourceSerialId;
if (packet.u32SourceSerialId == firstSourceSerialId) {
This is done to maintain consistency in the graph when there are multiple child devices.
Creating JSON String
Line 78 generates a JSON string from the received data.
String jsonStr = createJsonFrom(packet);
Sending Events to the Web Page
Lines 79-81 send the generated JSON string to the “ARIA Viewer” page.
if (not(jsonStr.length() <=0)) {
events.send(jsonStr.c_str(), "data_app_aria_twelite_aria_mode", millis());
}
The event name is data_app_aria_twelite_aria_mode.
Line 83 sends a notification to the “Serial Viewer” page that a packet has been received from App_Twelite.
Lines 86-96 call Twelite.on() <ParsedAppCuePacket> to register the process to execute when a packet is received from a child device in CUE app (TWELITE CUE mode).
Twelite.on([](const ParsedAppCuePacket& packet) {
Serial.println("Received a packet from App_CUE");
staticuint32_t firstSourceSerialId = packet.u32SourceSerialId;
if (packet.u32SourceSerialId == firstSourceSerialId) {
String jsonStr = createJsonFrom(packet);
if (not(jsonStr.length() <=0)) {
events.send(jsonStr.c_str(), "data_app_cue_twelite_cue_mode", millis());
}
}
events.send("parsed_app_cue_twelite_cue_mode", "data_parsing_result", millis());
});
Twelite.update() is a function that sequentially reads packet data (in ModBus ASCII format) sent from the TWELITE parent device, one byte at a time.
By repeatedly calling Twelite.update() in the loop(), the interpretation of packet data sent from the TWELITE parent progresses. When the interpretation of the packet data is completed, an event like above is triggered.
If the call to this function is blocked by processing such as delay(), reading the packet data string may not be fast enough. Always implement time-consuming processes asynchronously, and make the loop() function run as fast as possible.
Web Page
This section does not provide a detailed explanation of the web page. Only important points are explained.
Here, the element centered on the logo is set to 6/12 width, and the element centered on the text is also 6/12 width, so both are arranged in a row with equal width. The elements centered on the text TWELITE SPOT and CUE Viewer are both 12/12 width, meaning they are arranged in two rows, each occupying one full row.
Classes like xs- and sm- specify screen widths and can be used for responsive design.
HTML: Data Display Section
Elements displaying data received from TWELITE child devices are given unique IDs.
Below is an excerpt showing the part that displays the X-axis acceleration received from TWELITE CUE.
The function processDataAppCueTweliteCueMode() on lines 136-235 updates the page content when the data_app_cue_twelite_cue_mode event is received from the sketch.
For example, lines 184-208 update the voltage value and emoji according to the power supply voltage of TWELITE CUE.
Here, when the power supply voltage drops below 2700mV, the emoji changes from 🔋 to 🪫, and as the voltage drops from 3000mV → 2700mV → 2400mV, the CSS class applied to the voltage value text color is switched accordingly.
Registering Event Listeners
Lines 254-257 register the process to execute when events are received from the sketch.
Here, the event message received from the sketch is parsed as a JSON string, and the resulting data is passed to the function processDataAppCueTweliteCueMode().