Pre-installed Sketch
spot-server, which operates as a wireless LAN access point and displays data from child devices on a web page.This guide uses third-party open-source software.
We cannot provide detailed support regarding third-party software. In addition, we accept no liability for any damages resulting from the use of third-party software.
Obtaining the Source Code
Available from GitHub (monowireless/spot-server).
System Overview
spot-server consists of an Arduino sketch (.ino) for receiving and forwarding data from TWELITE, and a web page (.html / .css / .js) delivered to smartphones.
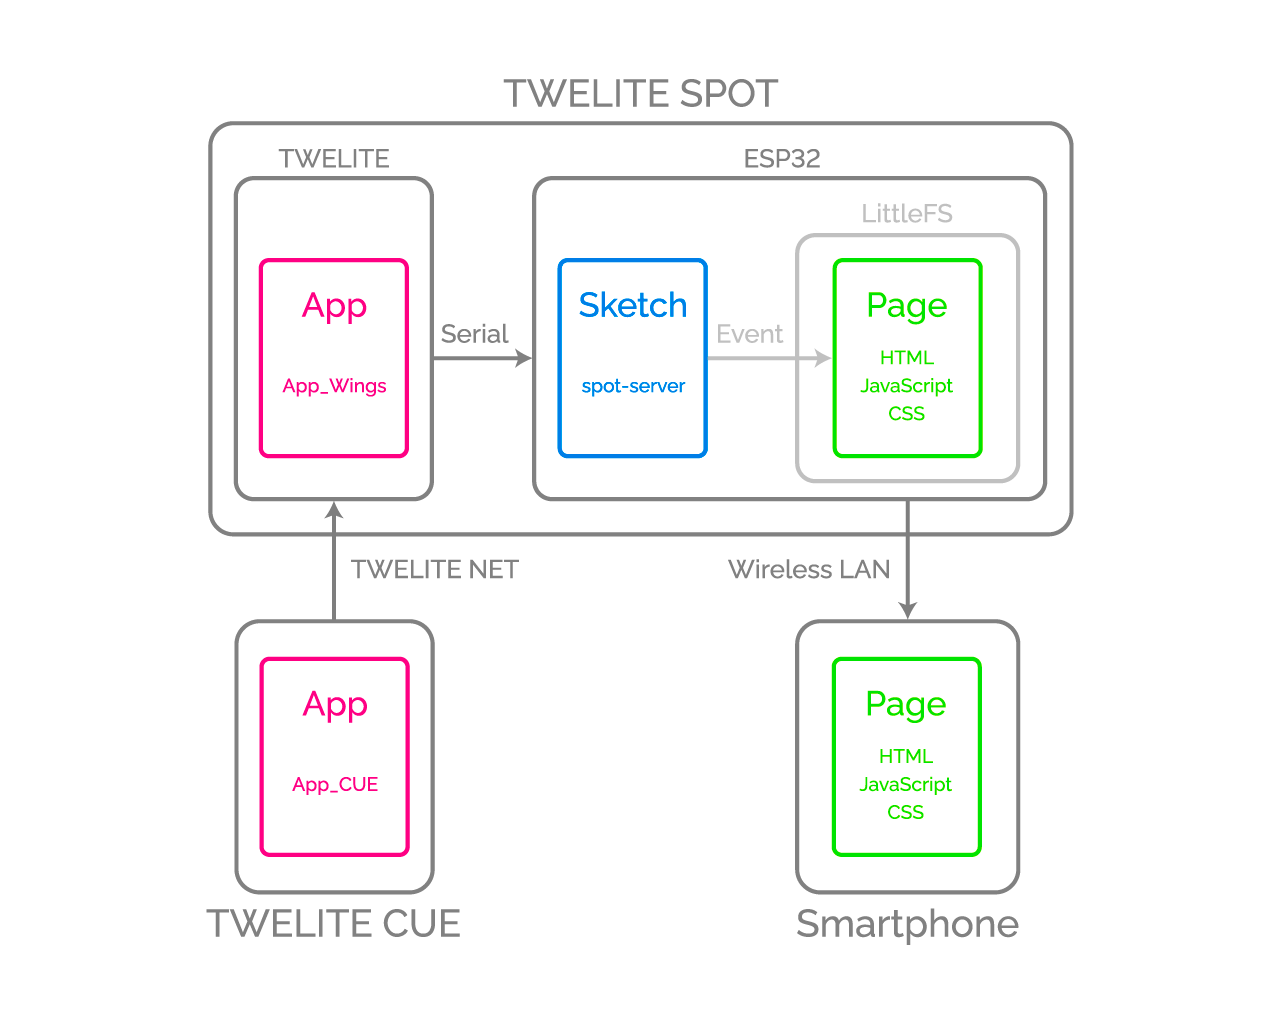
Diagram
Data transmitted from TWELITE nodes is received by the Arduino sketch, which triggers events on the published web page. The published web page dynamically updates its HTML content in response to these events.
What You Need for Development
-
Wireless LAN Gateway TWELITE SPOT
- USB-C cable for power
- USB AC adapter (capable of supplying 1A or more)
-
Wireless Tag with Accelerometer TWELITE CUE or other child device (If you do not have one, please purchase 👉 List of retailers)
- CR2032 coin battery or equivalent power supply
-
USB Adapter TWELITE R3 (If you do not have one, please purchase 👉 List of retailers)
- USB-C cable for communication
- Grove - OLED Display 1.12 (The sketch works even without this.)
- Grove cable
- 💻 Computer
Setting Up Your Environment
Installing the IDE and Toolchain
Please refer to How to set up the development environment using Arduino IDE 1.x.
Or
Please refer to How to set up the development environment using Arduino IDE 2.x.
Installing Libraries
First, if there is no libraries folder in the Arduino sketchbook location (as specified in the Arduino IDE preferences, e.g., C:\Users\foo\Documents\Arduino), please create it.
Asynchronous TCP Communication Library
1. Download the Zip file from GitHub (me-no-dev/AsyncTCP)2. Extract the Zip file and rename the folder from AsyncTCP-master to AsyncTCP3. Place the AsyncTCP folder into the libraries folder
Open the Library Manager and install Async TCP.
me-no-dev/AsyncTCP has been transferred to ESP32Async/AsyncTCP.
With this change, it appears that it can now be installed from the Library Manager.
Asynchronous Web Server Library
1. Download the Zip file from GitHub (me-no-dev/ESPAsyncWebServer)2. Extract the Zip file and rename the folder from AsyncWebServer-master to AsyncWebServer3. Place the AsyncWebServer folder into the libraries folder
Open the Library Manager and install ESP Async WebServer.
me-no-dev/ESPAsyncWebServer has been transferred to ESP32Async/ESPAsyncWebServer.
With this change, it appears that it can now be installed from the Library Manager.
OLED Display Library
- Download the Zip file from GitHub (Seeed-Studio/OLED_Display_96X96)
- Extract the Zip file and rename the folder from
OLED_Display_96X96-mastertoOLED_Display_96X96 - Place the
OLED_Display_96X96folder into thelibrariesfolder
JSON Library
Open the Library Manager and install Arduino_JSON.
Arduino_JSON instead of the third-party ArduinoJson.Installing Plugins
To write HTML and other files to the ESP32 flash area, an Arduino plugin is required.
For Arduino IDE 1.x
For Arduino IDE 1.x (Legacy version), use lorol/arduino-esp32fs-plugin: Arduino plugin for uploading files to ESP32 file system (compatible with LittleFS).
For installation instructions, see TWELITE SPOT Manual: How to write files to ESP32 (Arduino IDE 1.x).
For Arduino IDE 2.x
For Arduino IDE 2.x, use earlephilhower/arduino-littlefs-upload: Build and uploads LittleFS filesystems for the Arduino-Pico RP2040, RP2350, ESP8266, and ESP32 cores under Arduino IDE 2.2.1 or higher.
For installation instructions, see TWELITE SPOT Manual: How to write files to ESP32 (Arduino IDE 2.x).
Obtaining Project Files
- Download the Zip file from GitHub (monowireless/spot-server)
- Extract the Zip file and rename the folder from
spot-server-maintospot-server - Place the
spot-serverfolder into the Arduino sketchbook location (as specified in the Arduino IDE preferences, e.g.,C:\Users\foo\Documents\Arduino)
Writing Project Files
Sketch
See How to write sketches to ESP32.
Web Page
See How to write files to ESP32 (Arduino IDE 1.x).
Or
See How to write files to ESP32 (Arduino IDE 2.x).
Sketch
This section explains the Arduino sketch spot-server.ino.
Including Libraries
Official Arduino and ESP32 Libraries
Lines 4-9 include the official Arduino and ESP32 libraries.
#include <Arduino.h>
#include <Arduino_JSON.h>
#include <ESPmDNS.h>
#include <LittleFS.h>
#include <WiFi.h>
#include "esp_wifi.h"
#include <Wire.h>
| Header File | Description | Remarks |
|---|---|---|
Arduino.h | Basic Arduino library | Can sometimes be omitted, but included just in case |
Arduino_JSON.h | Handles JSON strings | Different from ArduinoJson |
ESPmDNS.h | Uses mDNS | Required to use hostnames |
LittleFS.h | Handles LittleFS file system | Needed for page publishing |
WiFi.h | Uses ESP32 WiFi | |
esp_wifi.h | Advanced WiFi settings | Needed for locale settings |
Wire.h | Uses I2C | For OLED display |
Third-Party Libraries
Lines 13-15 include third-party libraries.
#include <AsyncTCP.h>
#include <ESPAsyncWebServer.h>
#include <SeeedGrayOLED.h>
| Header File | Description | Remarks |
|---|---|---|
AsyncTCP.h | Performs asynchronous TCP communication | |
ESPAsyncWebServer.h | Runs asynchronous web server | Depends on AsyncTCP |
SeeedGrayOLED.h | Uses OLED display |
MWings Library
Line 18 includes the MWings library.
#include <MWings.h>
Pin Number Definitions
Lines 21-25 define pin numbers.
const uint8_t TWE_RST = 5;
const uint8_t TWE_PRG = 4;
const uint8_t LED = 18;
const uint8_t ESP_RXD1 = 16;
const uint8_t ESP_TXD1 = 17;
| Name | Description |
|---|---|
TWE_RST | Pin number connected to the RST pin of TWELITE |
TWE_PRG | Pin number connected to the PRG pin of TWELITE |
LED | Pin number connected to the ESP32 onboard LED |
ESP_RXD1 | Pin number connected to the TX pin of TWELITE |
ESP_TXD1 | Pin number connected to the RX pin of TWELITE |
TWELITE Configuration Definitions
Lines 28-31 define the settings applied to the TWELITE parent module mounted on TWELITE SPOT.
const uint8_t TWE_CH = 18;
const uint32_t TWE_APPID = 0x67720102;
const uint8_t TWE_RETRY = 2;
const uint8_t TWE_POWER = 3;
| Name | Description |
|---|---|
TWE_CH | TWELITE frequency channel |
TWE_APPID | TWELITE Application ID |
TWE_RETRY | TWELITE retransmission count (on transmit) |
TWE_POWER | TWELITE transmit power |
Wireless LAN Configuration Definitions
Lines 34-46 define the wireless LAN settings applied to the ESP32 mounted on TWELITE SPOT.
wifi_country_t WIFI_COUNTRY_JP = {
  cc: "JP",         // Contry code
  schan: 1,         // Starting channel
  nchan: 14,        // Number of channels
  max_tx_power: 20, // Maximum power in dBm
  policy: WIFI_COUNTRY_POLICY_MANUAL
};
const char* WIFI_SSID_BASE = "TWELITE SPOT";
const char* WIFI_PASSWORD = "twelitespot";
const uint8_t WIFI_CH = 13;
const IPAddress WIFI_IP = IPAddress(192, 168, 1, 1);
const IPAddress WIFI_MASK = IPAddress(255, 255, 255, 0);
const char* HOSTNAME = "spot";    // spot.local
| Name | Description |
|---|---|
WIFI_COUNTRY_JP | Locale setting (Japan) |
WIFI_SSID_BASE | Common part of SSID string |
WIFI_PASSWORD | Password |
WIFI_CH | ESP32 frequency channel |
WIFI_IP | IP address |
WIFI_MASK | Subnet mask |
HOSTNAME | Host name |
With ESP32 Arduino Core v3.x.x, if you do not set the locale, features such as channel 13 may not be available.
Declaration of Global Objects
Lines 49-50 declare global objects.
AsyncWebServer server(80);
AsyncEventSource events("/events");
| Name | Description |
|---|---|
server | Interface for asynchronous web server opened on port 80 |
events | Interface for server-sent events opened at /events ? |
Declaration of Function Prototypes
Lines 53-57 declare function prototypes.
uint16_t createUidFromMac();
String createJsonFrom(const ParsedAppTwelitePacket& packet);
String createJsonFrom(const ParsedAppAriaPacket& packet);
String createJsonFrom(const ParsedAppCuePacket& packet);
String createJsonFrom(const BarePacket& packet);
| Name | Description |
|---|---|
createUidFromMac() | Creates an identifier for SSID from MAC address |
createJsonFrom()<ParsedAppTwelitePacket&> | Creates a JSON string from App_Twelite packet data |
createJsonFrom()<ParsedAppAriaPacket&> | Creates a JSON string from App_ARIA packet data |
createJsonFrom()<ParsedAppCuePacket&> | Creates a JSON string from App_CUE packet data |
createJsonFrom()<BarePacket&> | Creates a JSON string from all packet data |
TWELITE Configuration
In lines 66-71, Twelite.begin() is called to configure and start the TWELITE parent module mounted on the TWELITE SPOT.
    Serial2.begin(115200, SERIAL_8N1, ESP_RXD1, ESP_TXD1);
    if (Twelite.begin(Serial2,
                      LED, TWE_RST, TWE_PRG,
                      TWE_CH, TWE_APPID, TWE_RETRY, TWE_POWER)) {
        Serial.println("Started TWELITE.");
    }
| Argument | Type | Description |
|---|---|---|
Serial2 | HardwareSerial& | Serial port used for communication with TWELITE |
LED | int | Pin number connected to the status LED |
TWE_RST | int | Pin number connected to the RST pin of TWELITE |
TWE_PRG | int | Pin number connected to the PRG pin of TWELITE |
TWE_CHANNEL | uint8_t | TWELITE frequency channel |
TWE_APP_ID | uint32_t | TWELITE Application ID |
TWE_RETRY | uint8_t | TWELITE retransmission count (on transmit) |
TWE_POWER | uint8_t | TWELITE transmit power |
App_Twelite: Registering Event Handler
In lines 73-80, Twelite.on() <ParsedAppTwelitePacket> is called to register the process to be executed when a packet is received from a child device running the super-easy standard app.
Twelite.on([](const ParsedAppTwelitePacket& packet) {
    Serial.println("Received a packet from App_Twelite");
    String jsonStr = createJsonFrom(packet);
    if (not(jsonStr.length() <= 0)) {
        events.send(jsonStr.c_str(), "data_app_twelite", millis());
    }
    events.send("parsed_app_twelite", "data_parsing_result", millis());
});
Creating a JSON String
In line 75, a JSON string is generated from the received data.
String jsonStr = createJsonFrom(packet);
To display received data on the web page, it is necessary to send the data to the client-side JavaScript. Since string data is easier to handle in this case, a JSON string is used.
Sending Events to the Web Page
In lines 76-78, the generated JSON string is sent to the “Signal Viewer” page.
if (not(jsonStr.length() <= 0)) {
    events.send(jsonStr.c_str(), "data_app_twelite", millis());
}
The event name is data_app_twelite.
millis().In line 79, notification that a packet has been received from App_Twelite is sent to the “Serial Viewer” page.
events.send("parsed_app_twelite", "data_parsing_result", millis());
App_ARIA: Registering Event Handler
In lines 82-92, Twelite.on() <ParsedAppAriaPacket> is called to register the process to be executed when a packet is received from a child device running the ARIA app (TWELITE ARIA mode).
Twelite.on([](const ParsedAppAriaPacket& packet) {
        Serial.println("Received a packet from App_ARIA");
        static uint32_t firstSourceSerialId = packet.u32SourceSerialId;
        if (packet.u32SourceSerialId == firstSourceSerialId) {
            String jsonStr = createJsonFrom(packet);
            if (not(jsonStr.length() <= 0)) {
                events.send(jsonStr.c_str(), "data_app_aria_twelite_aria_mode", millis());
            }
        }
        events.send("parsed_app_aria_twelite_aria_mode", "data_parsing_result", millis());
    });
Target Filtering
In lines 84-85, the processing is limited to the first child device received.
static uint32_t firstSourceSerialId = packet.u32SourceSerialId;
if (packet.u32SourceSerialId == firstSourceSerialId) {
This is done to maintain graph consistency when there are multiple child devices.
Creating a JSON String
In line 86, a JSON string is generated from the received data.
String jsonStr = createJsonFrom(packet);
Sending Events to the Web Page
In lines 87-89, the generated JSON string is sent to the “ARIA Viewer” page.
if (not(jsonStr.length() <= 0)) {
    events.send(jsonStr.c_str(), "data_app_aria_twelite_aria_mode", millis());
}
The event name is data_app_aria_twelite_aria_mode.
In line 91, notification that a packet has been received from App_Twelite is sent to the “Serial Viewer” page.
events.send("parsed_app_aria_twelite_aria_mode", "data_parsing_result", millis());
App_CUE: Registering Event Handler
In lines 94-104, Twelite.on() <ParsedAppCuePacket> is called to register the process to be executed when a packet is received from a child device running the CUE app (TWELITE CUE mode).
Twelite.on([](const ParsedAppCuePacket& packet) {
    Serial.println("Received a packet from App_CUE");
    static uint32_t firstSourceSerialId = packet.u32SourceSerialId;
    if (packet.u32SourceSerialId == firstSourceSerialId) {
        String jsonStr = createJsonFrom(packet);
        if (not(jsonStr.length() <= 0)) {
            events.send(jsonStr.c_str(), "data_app_cue_twelite_cue_mode", millis());
        }
    }
    events.send("parsed_app_cue_twelite_cue_mode", "data_parsing_result", millis());
});
Others: Registering Event Handlers
In lines 106-134, the processes to be executed when packets are received from child devices running other apps are registered.
As with the ARIA app, events are sent to the “Serial Viewer.”
All: Registering Event Handler
In lines 136-142, the process to be executed when packets are received from all apps’ child devices is registered.
Twelite.on([](const BarePacket& packet) {
    String jsonStr = createJsonFrom(packet);
    if (not(jsonStr.length() <= 0)) {
        events.send(jsonStr.c_str(), "data_bare_packet", millis());
    }
    events.send("unparsed_bare_packet", "data_parsing_result", millis());
});
Here too, the packet data string is sent to the “Serial Viewer.”
OLED Display Configuration
In lines 145-151, the OLED display is configured.
    esp_log_level_set("i2c.master", ESP_LOG_NONE);
    Wire.begin();
    SeeedGrayOled.init(SSD1327);
    SeeedGrayOled.setNormalDisplay();
    SeeedGrayOled.setVerticalMode();
    SeeedGrayOled.setGrayLevel(0x0F);
    SeeedGrayOled.clearDisplay();
Wireless LAN Configuration
In lines 155-166, the wireless LAN is configured.
    WiFi.mode(WIFI_AP);
    esp_wifi_set_country(&WIFI_COUNTRY_JP);
    char uidCString[8];
    sprintf(uidCString, " (%02X)", createUidFromMac());
    char ssidCString[20];
    sprintf(ssidCString, "%s%s", WIFI_SSID_BASE, uidCString);
    if (not WiFi.softAP(ssidCString, WIFI_PASSWORD, WIFI_CH, false, 10)) {
      Serial.println("Failed to start AP");
    }
    delay(100);    // IMPORTANT: Waiting for SYSTEM_EVENT_AP_START
    WiFi.softAPConfig(WIFI_IP, WIFI_IP, WIFI_MASK);
    MDNS.begin(HOSTNAME);
delay(100), initialization may fail.Configuring the File System
In line 199, the LittleFS file system is configured.
if (LittleFS.begin()) { Serial.println("Mounted file system."); }
This allows files such as HTML written in the flash area to be retrieved as web pages.
Web Server Configuration
In lines 202-229, the web server is configured.
Handling GET Requests
For example, in lines 207-211, a GET request to /signal-viewer returns /signal-viewer.html from the LittleFS file system.
server.on("/signal-viewer", HTTP_GET,
          [](AsyncWebServerRequest* request) {
              Serial.println("HTTP_GET: signal-viewer.html");
              request->send(LittleFS, "/signal-viewer.html", "text/html");
          });
Server Initialization
In lines 227-229, the root of the file system is set as the server root, the event source is registered, and the server is started.
server.serveStatic("/", LittleFS, "/");
server.addHandler(&events);
server.begin();
Updating TWELITE Data
In line 235, Twelite.update() is called.
Twelite.update();
Twelite.update() is a function that sequentially reads out packet data (in ModBus ASCII format) sent from the TWELITE parent module, one byte at a time.
Twelite.update() inside the loop(), packet data sent from the TWELITE parent module is interpreted. When the interpretation of a packet is complete, an event such as above is triggered.delay(), it may not be possible to read packet data strings in time. Always implement time-consuming processes asynchronously and make the loop() function run as quickly as possible.Web Page
We will not provide a detailed explanation of the web page here. Instead, we will focus on the important points.
HTML: Grid System
This sample’s HTML uses Flexbox Grid (the source file is data/css/flexboxgrid.min.css).
A 12-column grid system similar to Bootstrap is used as shown below.
      <div class="col-xs-6 col-sm-6 col-md-5 col-lg-4">
        <div class="neumorphic inset dense row center-xs middle-xs">
          <div class="col-xs-12 col-sm-12 col-md-12 col-lg-12 npr npl">
            <img src="./images/logo-lands.svg" class="logo" />
          </div>
        </div>
      </div>

      <div class="col-xs-6 col-sm-6 col-md-7 col-lg-8">
        <div class="neumorphic inset dense row center-xs middle-xs">
          <div class="col-xs-12 col-sm-12 col-md-12 col-lg-12 nwp npr npl">
            <span class="medium bold">TWELITE SPOT</span>
          </div>
          <div class="col-xs-12 col-sm-12 col-md-12 col-lg-12 nwp npr npl">
            <span class="small bold">CUE Viewer</span>
          </div>
        </div>
      </div>
Here, the element centered on the logo has a width of 6/12, and the element centered on the text also has a width of 6/12; that is, both are placed side by side with equal width in one row. Also, the elements centered on the text TWELITE SPOT and CUE Viewer both have a width of 12/12, so they are arranged as two separate rows.
xs- and sm- and similar classes specify the screen width. These are useful for responsive design.HTML: Data Display Section
Elements that display data received from TWELITE child devices are assigned unique IDs.
Below is an excerpt of the section that displays the X-axis acceleration received from TWELITE CUE.
<div class="col-xs-4 nwp npr npl">
  <code class="medium"
        id="latest-accel-x">±--.--</code>
  <code class="small">G</code>
</div>
Here, the ID latest-accel-x is assigned. Using this ID, the value is updated from the script.
JS: Global Variables
From here, we will explain the scripts corresponding to each HTML file.
As an example, we will look at data/js/cue-viewer.js.
In lines 4-8, global variables are declared to store the latest acceleration values.
let latest_accel = {
    x: 0.0,
    y: 0.0,
    z: 0.0
};
These values are also used by the graph, so global variables are used to simplify the implementation.
JS: Graph Settings
In lines 11-133, configuration is done for the graph drawing library Chart.js | Chart.js and its plugin chartjs-plugin-streaming.
JS: Updating Page Content
The function processDataAppCueTweliteCueMode() in lines 136-235 updates the page content when a data_app_cue_twelite_cue_mode event is received from the sketch.
For example, in lines 184-208, the voltage value and emoji are updated according to the power supply voltage of TWELITE CUE.
if (data.vcc >= 3000) {
    document.getElementById("latest-vcc-icon").innerHTML = "🔋";
    document.getElementById("latest-vcc-data").innerHTML = `${(data.vcc / 1000.0).toFixed(2).toString().padStart(4)}`;
    document.getElementById("latest-vcc-data").classList.remove("red");
    document.getElementById("latest-vcc-data").classList.remove("yellow");
    document.getElementById("latest-vcc-data").classList.add("green");
} else if (data.vcc >= 2700) {
    document.getElementById("latest-vcc-icon").innerHTML = "🔋";
    document.getElementById("latest-vcc-data").innerHTML = `${(data.vcc / 1000.0).toFixed(2).toString().padStart(4)}`;
    document.getElementById("latest-vcc-data").classList.remove("red");
    document.getElementById("latest-vcc-data").classList.remove("yellow");
    document.getElementById("latest-vcc-data").classList.remove("green");
} else if (data.vcc >= 2400) {
    document.getElementById("latest-vcc-icon").innerHTML = "🪫";
    document.getElementById("latest-vcc-data").innerHTML = `${(data.vcc / 1000.0).toFixed(2).toString().padStart(4)}`;
    document.getElementById("latest-vcc-data").classList.remove("red");
    document.getElementById("latest-vcc-data").classList.add("yellow");
    document.getElementById("latest-vcc-data").classList.remove("green");
} else {
    document.getElementById("latest-vcc-icon").innerHTML = "🪫";
    document.getElementById("latest-vcc-data").innerHTML = `${(data.vcc / 1000.0).toFixed(2).toString().padStart(4)}`;
    document.getElementById("latest-vcc-data").classList.add("red");
    document.getElementById("latest-vcc-data").classList.remove("yellow");
    document.getElementById("latest-vcc-data").classList.remove("green");
}
Here, when the power supply voltage drops below 2700mV, the emoji changes from 🔋 to 🪫, and as the voltage decreases from 3000mV → 2700mV → 2400mV, the CSS class applied to the voltage value text color is changed accordingly.
Registering Event Listeners
In lines 254-257, the process for handling events received from the sketch is registered.
source.addEventListener("data_app_cue_twelite_cue_mode", (e) => {
    console.log("data_app_cue_twelite_cue_mode", e.data);
    processDataAppCueTweliteCueMode(JSON.parse(e.data));
}, false);
Here, the event message received from the sketch is parsed from a JSON string and the parsed data is passed to the function processDataAppCueTweliteCueMode().
Related Information
Arduino
- Official site: Arduino - Home
- API Reference: Arduino Reference - Arduino Reference
- Coding Style Guide: Arduino Style Guide for Creating Libraries | Arduino Documentation
- Official JSON Library: arduino-libraries/Arduino_JSON: Official JSON Library for Arduino
ESP32
- Product Information: ESP32 Wi-Fi & Bluetooth MCU I Espressif Systems
- Datasheet: esp32_datasheet_en.pdf
- Arduino Toolchain: espressif/arduino-esp32: Arduino core for the ESP32
- Getting Started: Getting Started — Arduino-ESP32 documentation
- Installation: Installing — Arduino-ESP32 documentation
- API Reference: Libraries — Arduino-ESP32 documentation
- Wi-Fi API: Wi-Fi API — Arduino-ESP32 documentation
- Tutorials: Tutorials — Arduino-ESP32 documentation
- Troubleshooting: Troubleshooting — Arduino-ESP32 documentation
Community
Libraries
- Async TCP:
me-no-dev/AsyncTCP: Async TCP Library for ESP32ESP32Async/AsyncTCP: Async TCP Library for ESP32 - Async Web Server:
me-no-dev/ESPAsyncWebServer: Async Web Server for ESP8266 and ESP32ESP32Async/ESPAsyncWebServer: Async Web Server for ESP32 - Seeed 96x96 / 128x128 OLED: Seeed-Studio/OLED_Display_96X96: Seeed OLED Display 96*96 library
Plugins
- File Writing IDE 1.x: me-no-dev/arduino-esp32fs-plugin: Arduino plugin for uploading files to ESP32 file system
- File Writing IDE 2.x: earlephilhower/arduino-littlefs-upload: Build and uploads LittleFS filesystems for the Arduino-Pico RP2040, RP2350, ESP8266, and ESP32 cores under Arduino IDE 2.2.1 or higher
- Stack Trace Decoder IDE 1.x: me-no-dev/EspExceptionDecoder: Exception Stack Trace Decoder for ESP8266 and ESP32
Web-related
ECMAScript (JavaScript)
- API Reference: Web technology for developers | MDN
- ECMAScript 2016+ compatibility table: ECMAScript 2016+ compatibility table
Community
- CSS
- Web colors and examples: Traditional Colors of World
- Grid system like Bootstrap: Flexbox Grid
- Neumorphism CSS generator: Neumorphism/Soft UI CSS shadow generator
- ECMAScript
- Graph drawing: Chart.js | Chart.js
- Real-time streaming plugin: Getting Started | chartjs-plugin-streaming
- Clock and time: Luxon Home
- Graph drawing: Chart.js | Chart.js