Please refer to Handling of Documents.
If you notice anything, please contact our support desk.
For the explanation of the TWELITE ARIA main unit (names of parts and usage precautions), please see the TWELITE ARIA Datasheet.
This is the multi-page printable view of this section. Click here to print...
Please refer to Handling of Documents.
If you notice anything, please contact our support desk.
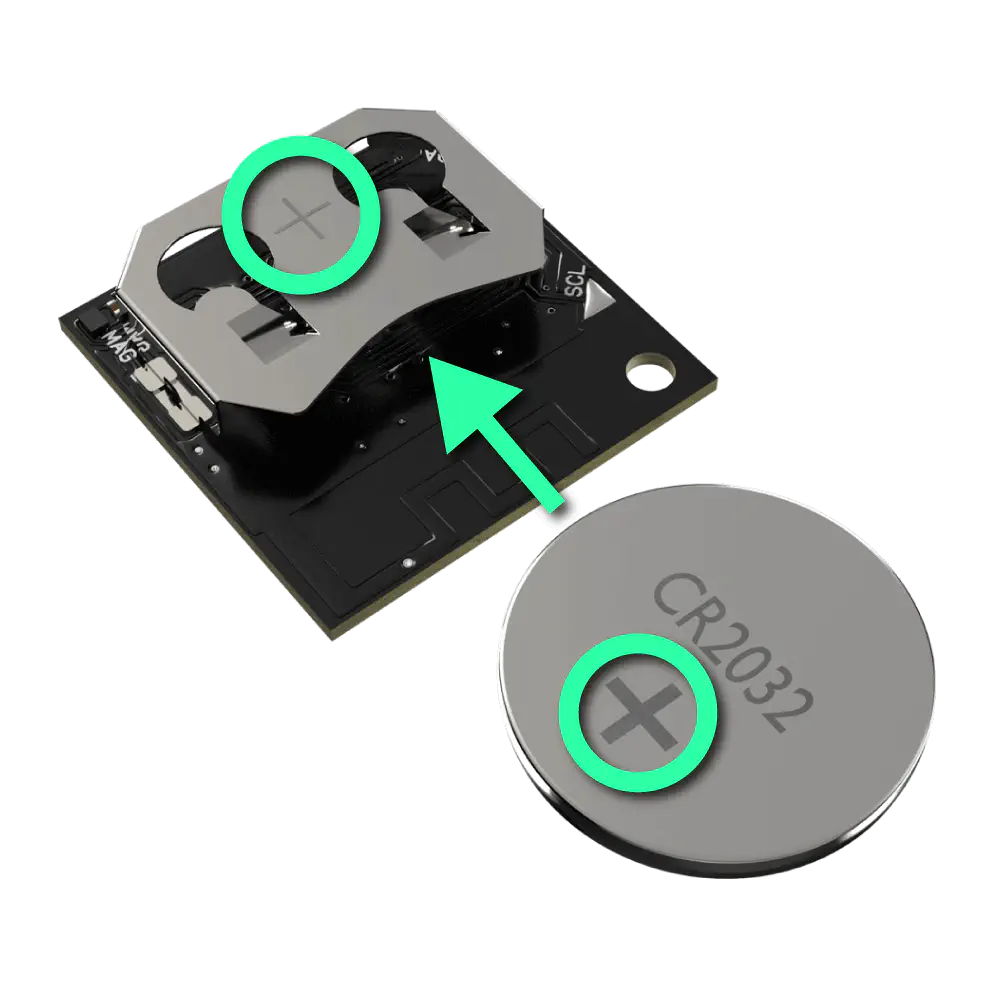
Insert the CR2032 battery with the + side aligned with the + side of the battery holder. If the LED on the TWELITE CUE blinks 3 times, it is normal.
After startup, it transmits every 5 seconds, and the LED blinks once during transmission.
Battery Installation
Also, because the battery holder of TWELITE ARIA is structurally prone to solder joint detachment, please be careful when inserting the battery as follows:
By attaching a magnet to the recess at the position shown in the figure, you can stick TWELITE ARIA to a metal surface. Use as needed.
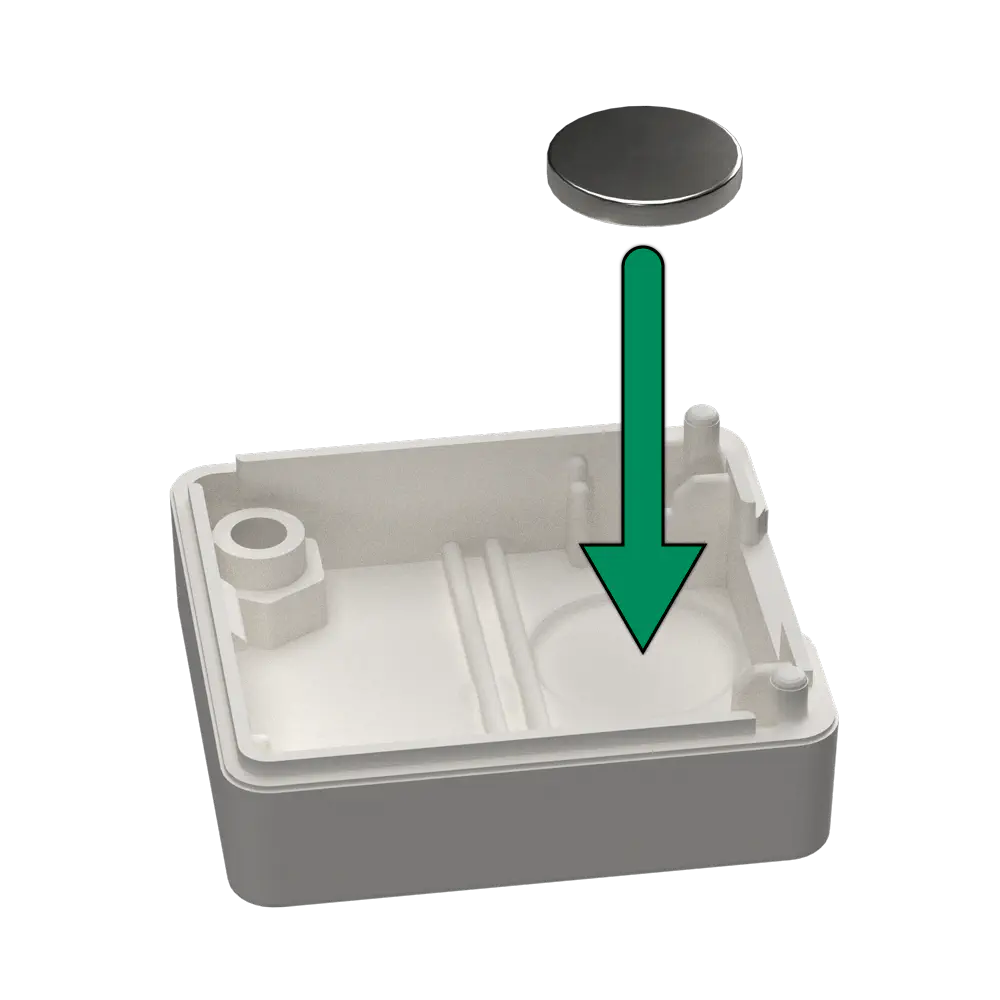
Magnet Installation Location
Hook the board on the claws on the edge of the case as indicated by the circle marks.
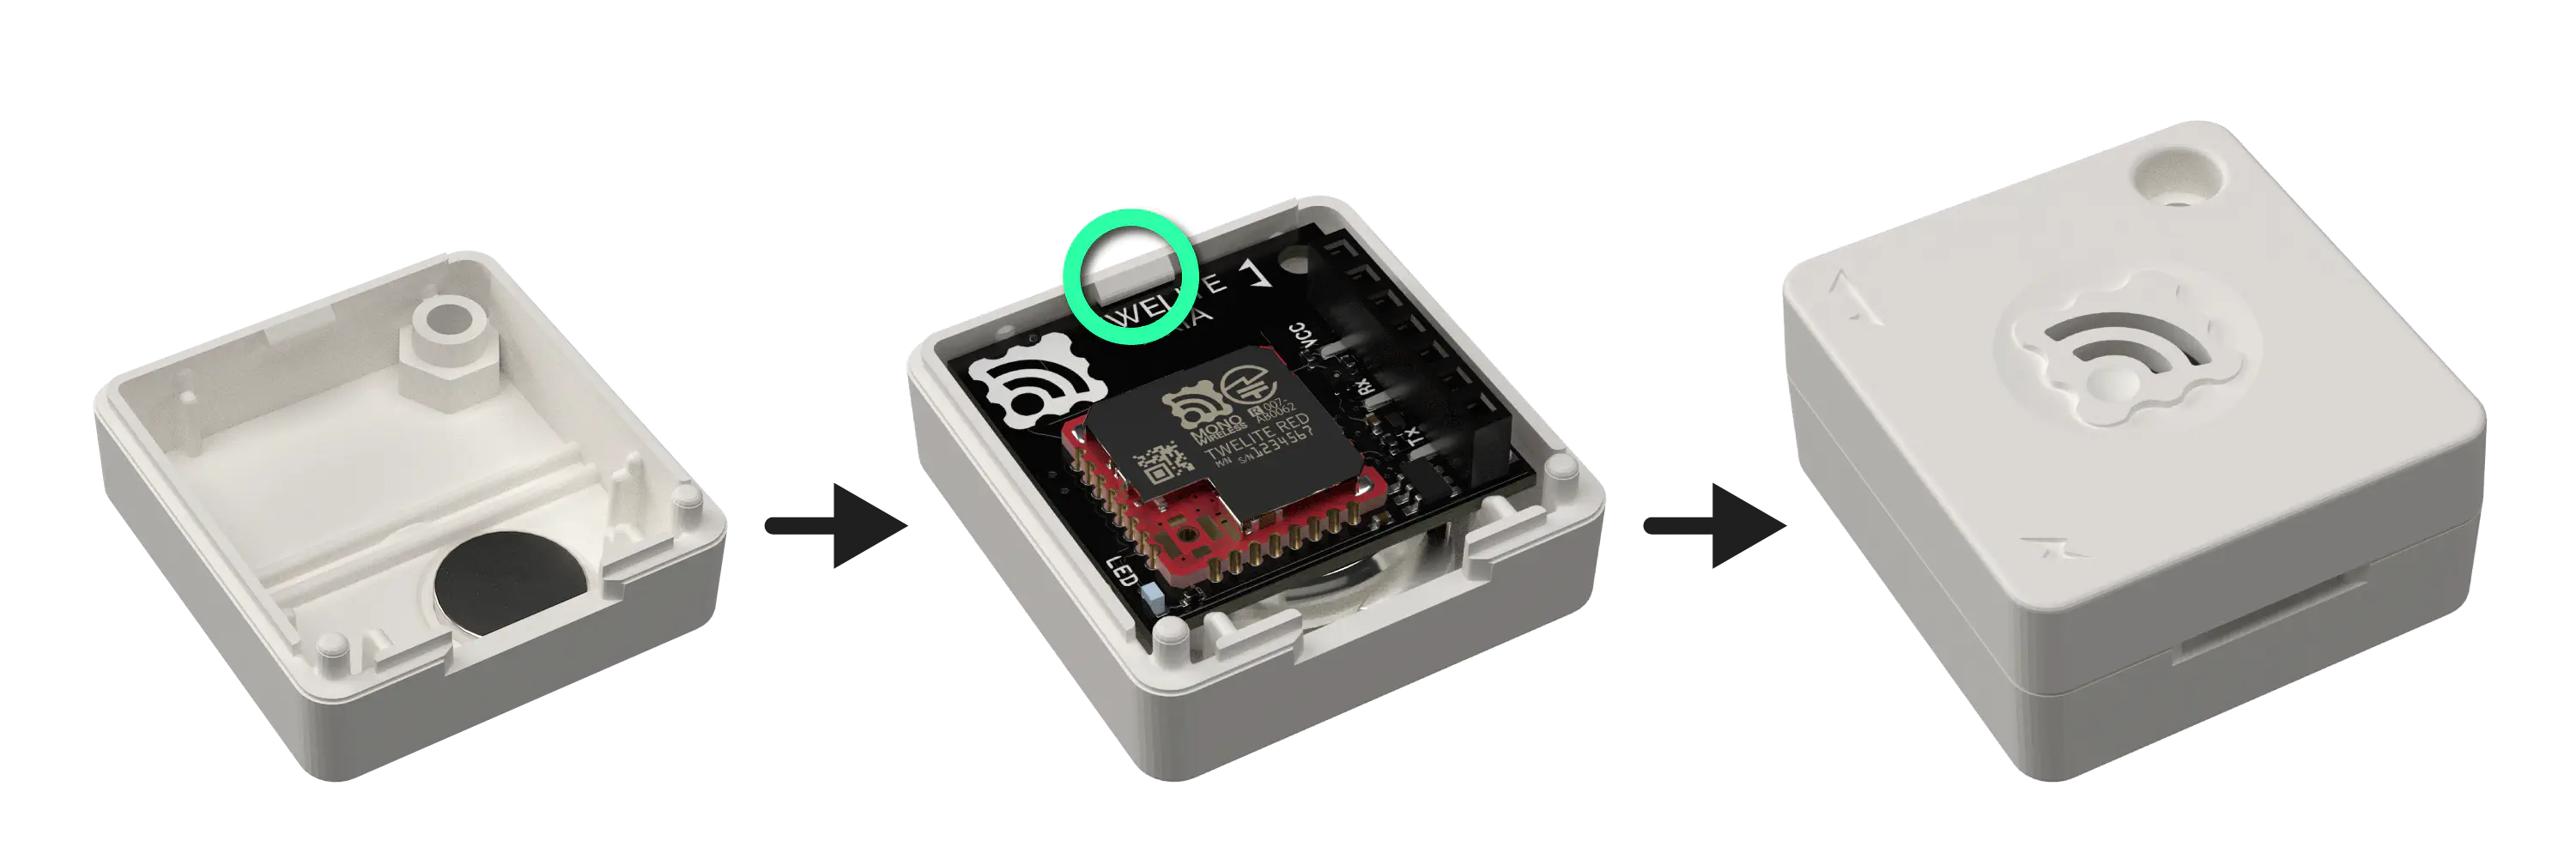
Inserting the Board
Insert a coin into the notch on the case and pry it open.
Where to Insert the Coin
A parent device is required as a communication partner. If you want to extend communication distance, a repeater can be used. You can use MONOSTICK - MonoStick as the parent and repeater devices.
Please write the app version v1-01-4 or later of the Parent/Repeater App Wings to MONOSTICK - MonoStick.
Try moving the TWELITE ARIA or bringing a magnet close, and check the data received by the MONOSTICK connected to the PC.
First, install the latest version of TWELITE STAGE SDK on your PC.
A parent device is required as a communication partner. You can use MONOSTICK - MonoStick as the parent device.
Please write the Parent/Repeater App Wings to MONOSTICK - MonoStick following the steps below.
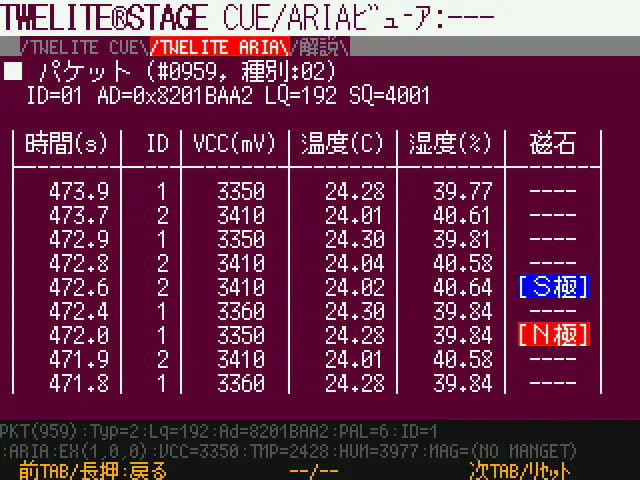
TWELITE ARIA Viewer
Temperature and humidity values are updated every 5 seconds.
You can change the behavior of TWELITE ARIA by changing the mode.
Please refer to the following page for details.
You can set grouping and transmission frequency changes in interactive mode.
Please refer to the following page for how to enter interactive mode.
Also, please refer to the following page for the items that can be set.
You can output data such as temperature and humidity in CSV format to a log using pulse scripts.
Please refer to the following page for details.
You can view temperature, humidity, and magnetic sensor values as graphs using the PalViewer.
Please refer to the following page for details.
Initial mode of TWELITE ARIA.
An all-in-one mode that can measure temperature and humidity and detect door opening and closing simultaneously.
Mode that operates as an open/close sensor pal.
Use this mode to measure door opening/closing or factory equipment operation status.
This mode is set as the factory default.
If you use this mode, please set the following items.
| Setting Command | Setting Item | Setting Value | Remarks |
|---|---|---|---|
| p | Sensor-specific parameter setting | 00000000 |
When using this mode, set the following items.
| Setting Command | Setting Item | Setting Value | Remarks |
|---|---|---|---|
| p | Sensor-specific parameter setting | 04000000 |
Approximately 4 years if 200 open/close operations per day (including 1-minute periodic transmissions).
Approximately 4.5 years if 0 open/close operations per day (including 1-minute periodic transmissions).
There are two ways to configure the Aria app.
For details on configurable items, please check Interactive Mode.
OTA stands for Over the Air, meaning wireless communication. OTA configuration is a feature to configure settings without cable connection using Interactive Mode.
Executing OTA requires MONOSTICK.
It is also possible to connect TWELITE R2/R3 to the 7P interface of TWELITE CUE and configure settings via Interactive Mode.
OTA settings is a function to perform interactive mode settings via wireless communication.
Perform OTA settings following the steps below.
Install the TWELITE STAGE SDK on your PC, then launch TWELITE_Stage in the MWSTAGE folder.
Open 2: Rewrite App > 1: Select from BIN and select App_ARIA_OTA_....
Select 3: Interactive Mode, then edit and save the values.
Place the TWELITE ARIA within about 20 cm from MONOSTICK. Turn on the power of the device or bring a magnet close to the magnetic sensor more than 5 times, and confirm that the LED of TWELITE ARIA blinks.
Confirm the output of messages like the following.
If no output is shown, see here.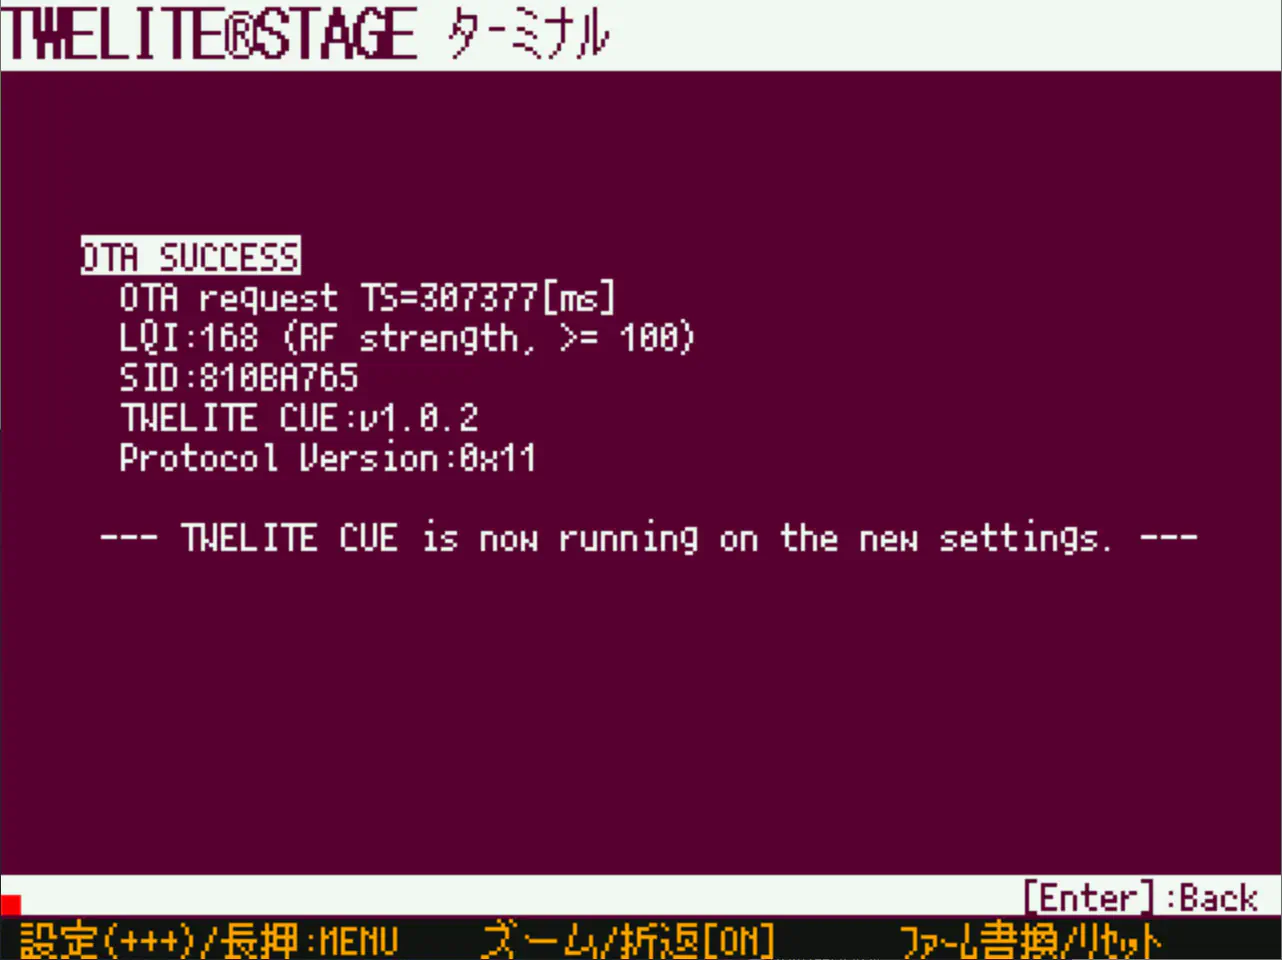
Open 2: Rewrite App > 1: Select from BIN and select App_Wings_MONOSTICK_....
Messages like the following indicate that the distance is too far.
OTA FAILURE
  OTA request TS=20515[ms]
  LQI:63 (RF strength, >= 100)
  SID:810BA765
  TWELITE ARIA:v1.1.1
  Protocol Version:0x13

--— LQI is small. Please make TWELITE ARIA closer. —--
In this case, bring MONOSTICK and TWELITE ARIA closer.
Messages like the following indicate that the firmware of TWELITE ARIA is different or that TWELITE CUE was mistakenly brought close.
OTA FAILURE
  OTA request TS=20515[ms]
  LQI:180 (RF strength, >= 100)
  SID:810BA765
  TWELITE ARIA:v1.1.1
  Protocol Version:0x11

--— Different protocol version. Please update TWELITE ARIA. —--
In this case, check if you mistakenly brought TWELITE CUE close.
Also, if you rewrote the firmware of TWELITE ARIA, please use TWELITE R2/R3 to write back to App_ARIA.
Settings can be made by connecting TWELITE R2/R3 to the 7P interface of TWELITE ARIA.
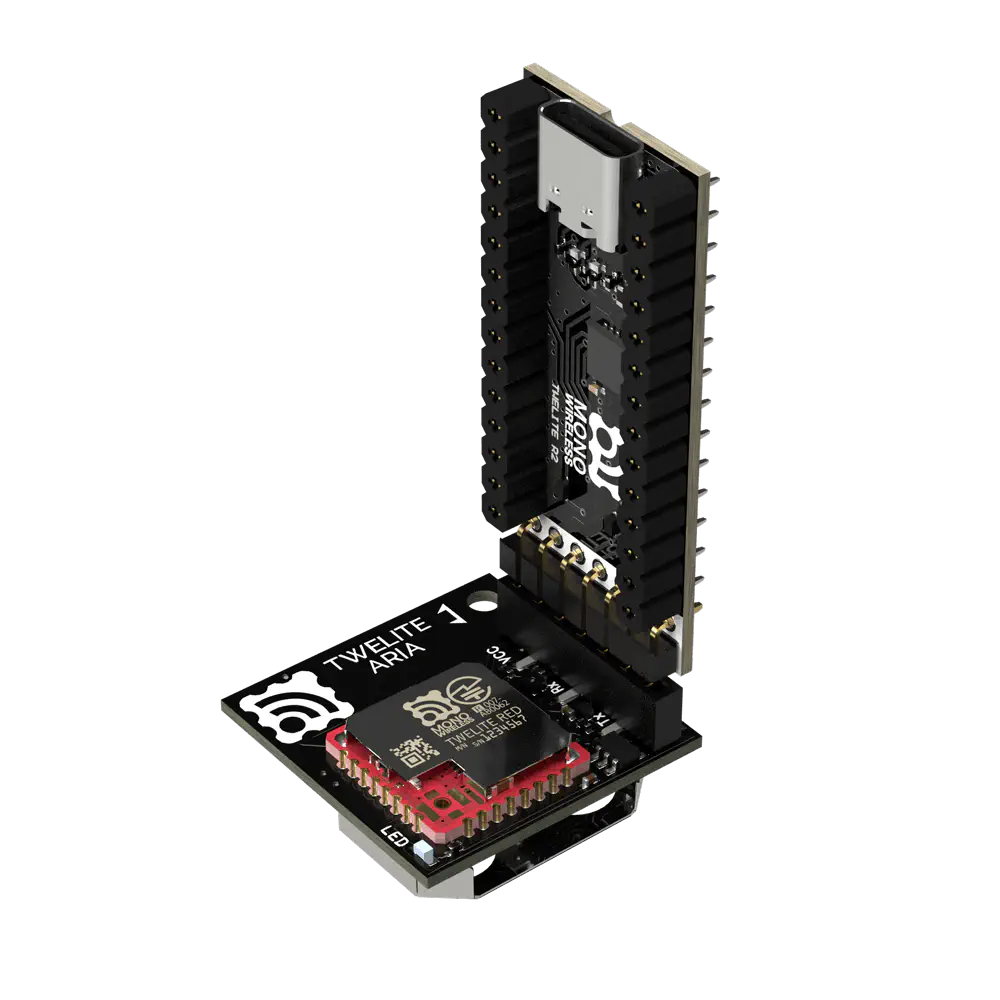
Example connection with TWELITE R2
When using TWELITE R2/R3 to configure, please follow the steps below.
Install the TWELITE STAGE SDK on your PC and launch TWELITE_Stage in the MWSTAGE folder.
Select 3: Interactive Mode, then edit and save values.
This section explains features specific to the ARIA app (App_ARIA). For common features, please refer to the TWELITE APPS Manual Top Page.
Interactive mode cannot be used while TWELITE is in sleep mode.
Please start up with the SET pin connected to GND. The TWELITE STAGE app and TWELITE R2/R3 automatically perform this operation.
The screen will display as follows:
 --- CONFIG/App_ARIA V1-01-0/SID=0x810a7817/LID=0x01 ---
 a: set Application ID (0x67720102)
 i: set Device ID (--)
 c: set Channels (18)
 x: set Tx Power (13)
 b: set UART baud (38400)
 B: set UART option (8N1)
 k: set Enc Key (0xA5A5A5A5)
 o: set Option Bits (0x00000001)
 t: set Transmission Interval (5)
 p: set Senser Parameter (0x00000000)
 d: set Temperature Coefficient (0)
 D: set Temperature Offset (0)
 f: set Humidity Coefficient (0)
 F: set Humidity Offset (0)
---
 S: save Configuration
 R: reset to Defaults
| Setting Item | Default Value | Remarks | |
|---|---|---|---|
a | Application ID | 0x67720102 | 32bit |
i | Logical Device ID | - | Child device 1-100 |
c | Frequency Channel | 18 | 11-26 |
x | Retransmission Count and Transmission Power | 13 | |
| Retransmission Count | 1 | 1-9 times, 0 means none | |
| Transmission Power | 3 | 0-3 | |
b | 38400 | Not applicable | |
B | 8N1 | Not applicable | |
k | Encryption Key | 0xA5A5A5A5 | 32bit |
o | Option Bits | 0x00000001 | Other detailed settings |
t | Transmission Interval | 5 | 1-4095 seconds |
p | Sensor Specific Parameter | 0 | |
d | Temperature Coefficient | 0 | 0-60000 |
D | Temperature Offset | 0 | -2000-2000 |
f | Humidity Coefficient | 0 | 0-60000 |
F | Humidity Offset | 0 | -2000-2000 |
Details of each command are shown below.
a: Application IDAll devices communicating must have the same value. This logically separates the network.
i: Logical Device IDSet this when it is necessary to identify multiple child devices.
You can set any value from 1 to 100.
c: Frequency ChannelAll devices communicating must have the same value. This physically separates the network.
x: Transmission Power and Retransmission CountSpecify the radio transmission power and the number of times to retransmit packets additionally in transparent mode and header-attached transparent mode.
b: Not applicable. Unlike products such as TWELITE DIP, there is no BPS pin.
B: Not applicable. Unlike products such as TWELITE DIP, there is no BPS pin.
k: Encryption KeySpecify the encryption key as a 32bit hexadecimal number when enabling encryption communication with the option bit Enable Encryption Communication.
o: Option BitsSpecify a 32bit number. You can enable settings associated with each bit.
| Target Bit | Setting Item | Default |
|---|---|---|
0x00000001 | Enable Transmission to Relay Devices | 1️⃣ |
0x00000040 | Disable OTA Setting Function | 0️⃣ |
0x00001000 | Enable Encryption Communication | 0️⃣ |
0x00010000 | Enable UART Output on Child Device | 0️⃣ |
t: Transmission IntervalSpecify the data transmission interval.
p: Sensor Specific ParameterUsed to switch the Operating Mode.
p | Mode |
|---|---|
0x00000000 | TWELITE ARIA Mode |
0x04000000 | Open/Close Sensor PAL Mode |
d: Temperature CoefficientSpecify the coefficient \(d\) of temperature data in the range 0-60000.
If 0, it is disabled. Otherwise, the final temperature is multiplied by \(\frac{d}{1024}\).
D: Temperature OffsetSpecify the temperature data offset \(D\) in the range -2000 to 2000.
Add \(D\) to the temperature multiplied by 100. The final temperature changes by \(\frac{D}{100}\) °C.
f: Humidity CoefficientSpecify the coefficient \(f\) of humidity data in the range 0-60000.
If 0, it is disabled. Otherwise, the final humidity is multiplied by \(\frac{f}{1024}\).
F: Humidity OffsetSpecify the humidity data offset \(F\) in the range -2000 to 2000.
Add \(F\) to the humidity multiplied by 100. The final humidity changes by \(\frac{F}{100}\) %.
Explanation of settings associated with each bit of the option bit value.
00000001: Enable Transmission to Relay DevicesEnable transmission not only to the parent device but also to relay devices.
You can use relay devices even if this option is not set, but the parent device will eliminate duplicate packets received. At this time, there is no way to know through which relay device the packet was transmitted or if it was not relayed.
If this option is set, the parent device can output a single packet received from multiple devices separately. By analyzing the output connected to the parent device, you can determine near which device the child device was located.
00000040: Disable OTA Setting FunctionDisables the OTA setting function.
00001000: Enable Encryption CommunicationEnables encrypted communication. The other party must also enable encrypted communication.
00010000: Enable UART Output on Child DeviceEnables message output on the child device.