I will describe specific topics for using TWELITE GOLD. Even without referencing the following information, it is possible to develop by building Act using the TWELITE STAGE app.
(The descriptions on this page are based on the NXP company’s website as of July 2023, and the procedures and other details may differ from the current site.)
About TWELITE GOLD Build
This document explains the development environment for building applications for TWELITE GOLD.
There are two types of development environments for the TWELITE series. This document primarily explains the development method using MCUXpresso.
The build method is the same as for TWELITE BLUE/RED.
A debugger cannot be used.
The provided project definitions include build definitions for VSCode.
NXP’s MCU Expresso
This is NXP’s official development environment.
It supports writing firmware and debugging (does not support sleep) using a debugger (MUCLink).
Cautions
The links in this document are current as of July 2023.
This document assumes that the reader is familiar with the construction and operation of a general development environment (e.g., capable of operating from a command prompt, setting system PATH, and performing standard operations within the Eclipse integrated development environment).
The materials obtained from NXP are in English. We do not provide translations of these English materials. Please use translation tools as needed.
When using ARM Cortex-M4, please refer to ARM’s documentation as well.
Our support is, in principle, limited to the scope used in our provided sample programs (e.g., sending and receiving wireless packets within the range supported by our libraries, and using peripherals within the range supported by our libraries). For features not covered in the samples, such as firmware encryption, using the ZigBee PRO stack, using the Thread stack, or general use of the libraries included with MCUXpresso, please refer to NXP’s official documentation.
1 - About Building and Libraries for TWELITE BLUE/RED
About Building and Libraries for TWELITE BLUE/RED
We will provide an explanation of building and libraries for TWELITE BLUE/RED.
About Building and Libraries for TWELITE BLUE/RED
Handling by library folder
TWENETcore
Target
Handling
Others
Source file
Not disclosed
Header file
Refer to TWENETcore/source. <br />*This header file is not referred to when building the library.
Library file
Place the separately built file under TWENET/current/lib
TWENEText
Target
Handling
Others
Source file
Not disclosed
Header file
Refer to TWENETcore/source.<br />*This header file is not referred to when building the library.
Library file
Place the separately built file under TWENET/current/lib
TWENETutils
Target
Handling
Others
Source file
Refer to TWENETutils/source_BLUE_RED (contains a ZIP file including the build directory)
Header file
Refer to TWENETutils/source <br />*This header file is not referred to when building the library.
Library file
Place the separately built file under TWENET/current/lib.
TWENETstgs (twesettings)
Target
Handling
Others
Source file
Refer to TWENETstgs/source.
Header file
Refer to TWENETstgs/source.
Library file
Build under TWENETstgs/source and place the built file under TWENET/current/lib.
TWENETmwx (mwx)
Target
Handling
Others
Source file
Refer to TWENETmwx/source.
Header file
Refer to TWENETmwx/source.
Library file
Build under TWENETmwx/source and place the built file under TWENET/current/lib.
TWENETeastl
Target
Handling
Others
Source file
Refer to TWENETeastl/source.
Header file
Refer to TWENETeastl/source.
Library file
Place the separately built file under TWENET/current/lib (no updates planned from the MWSDK2022_08 version).
2 - About Building for TWELITE GOLD
About Building for TWELITE GOLD
We will explain about building for TWELITE GOLD.
Writing and Executing Binaries (.bin)
This section explains how to write and verify the execution of a .bin file after a project build has been successful.
There are two methods for writing the binary:
Via LinkServer (using a debugger)
Via a serial port (such as TWELITE-R)
* Using the TWELITE STAGE app
* Using DK6Programmer
Writing and Executing with LinkServer
The following explanation assumes the standard screen layout (C/C++ Perspective). (Reference: About the Screen Layout)
LinkServer is the standard tool used for writing and debugging NXP’s ARM products. While third-party products with similar functions exist (PEMicro probe, SEGGER J-link probe), we will use LinkServer here.
Since writing does not use the serial port, you can experiment with UART0 connected to a terminal. (However, PIO12-13 cannot be used for debugging.)
LinkServer connection sometimes fails, and it’s often necessary to explicitly set ISP=LO or reconnect the USB port.
Operations are, in principle, performed from within MCUXpresso.
MCULink and connection board
*The module and conversion board in the photo are under development. They may differ slightly from the final product.
Connect the 10-pin headers with 1.27mm pitch on both boards using the flat cable that comes with the MCU-Link.
TWELITE GOLD requires power supply (3.3V).
- Supply power to the VCC of MW-STA-MCULink (the EXT pin on VCC SOURCE is also an option).
- The voltage should be 3.3V (the MCU-Link internal voltage is 3.3V).
- Note: Do not forget to connect GND.
- Reference: This is not a use case intended by the MCL-Link developer, but it is possible to draw 3.3V from pin 1 of the J2 connector on the back of the MCU-Link board.
Please proceed with caution after checking the MCU-Link circuit diagram, component data, voltage during power-up, and the supply capacity of the regulator. Please note that after such modifications, you will not receive any support, warranty, or compensation for damages from the developer or distributor.
If you want to use the MCU-Link serial port, make the following connections:
After completing the wiring, check without a TWELITE DIP (TWELITE GOLD) mounted.
Apply external power first (unnecessary if supplied from MCU-Link).
Connect MCU-Link to the USB port.
Check the voltage between GND (DIP #1) and VCC (DIP #28) on the MW-STA-MCULink.
→ Should be 3.3V.
Disconnect MCU-Link from the USB connector and cut the external power (if used).
Check 2
Next, check with the TWELITE DIP (TWELITE GOLD) mounted.
Mount the TWELITE DIP on the MW-STA-MCULink.
Apply external power (if used).
Connect MCU-Link to the USB port.
Check the voltage between VCC and GND on the TWELITE DIP.
→ Should be 3.3V.
→ If the voltage is significantly low, it could be a wiring issue where power is not being supplied correctly, a short circuit is drawing too much current, or the TWELITE DIP is faulty. Immediately remove the USB connector and cut the power. Recheck the wiring.
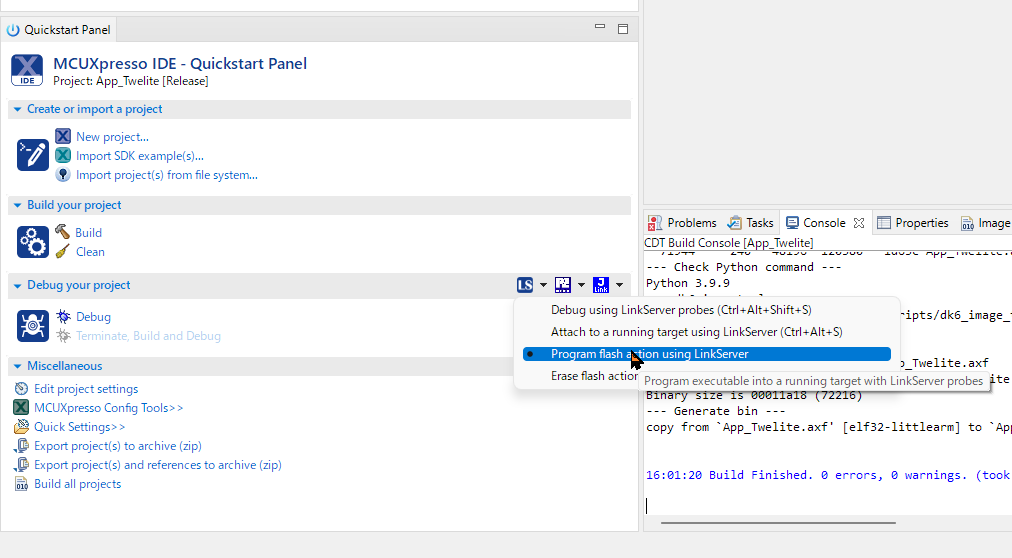
Writing with LinkServer (Simultaneous with Build)
Connection errors are relatively common, so please read the troubleshooting section below before you begin.
In the [QuickStart Panel] tab, pull down the [LS] icon and select [Program flash action using LinkServer].
LinkServer writing menu
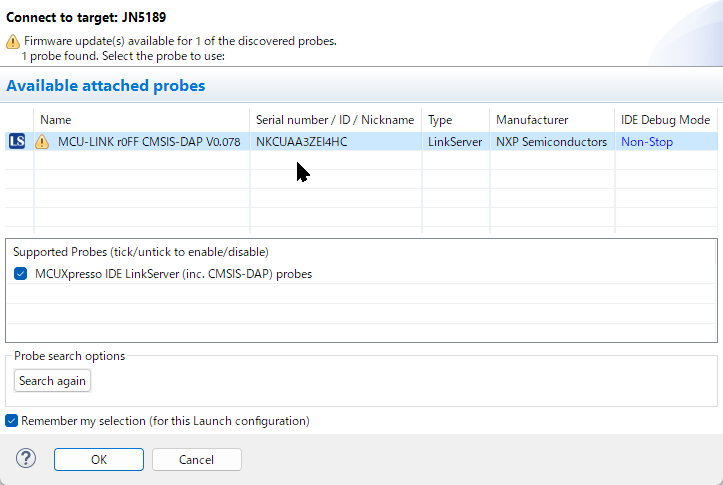
The first time, a list of LinkServer-compatible boards on the USB bus will be displayed. If you don’t have multiple units connected, only one will appear. Simply press the [OK] button. (The image below shows a warning ⚠ prompting for an MCU-Link firmware update. You can continue to use it as long as it can write, but please update the firmware as needed.)
LS board discovery
Next, the project will be built and the binary will be written.
Writing complete
As shown in the example screen above, the writing status will be displayed, and finally, “Finished writing Flash successfully.” will be shown. (If there are few changes, only the differences may be written.)
1 of 1 (  0) Writing sectors 0-141 at 0x00000000 with 72248 bytes
(  0) at 00000000: 0 bytes - 0/72248
(  7) at 00001600: 5632 bytes - 5632/72248
( 15) at 00002C00: 5632 bytes - 11264/72248
( 23) at 00004200: 5632 bytes - 16896/72248
...
( 85) at 0000DC00: 5632 bytes - 61952/72248
( 93) at 0000F200: 5632 bytes - 67584/72248
(100) at 00010800: 5120 bytes - 72704/72248
...
(100) Finished writing Flash successfully.
Immediately after writing, the microcontroller will reset and the program will run.
If you have a serial terminal started before writing, you can also see the startup messages like the following:
Writing with LinkServer (Pre-built .bin, .axf files)
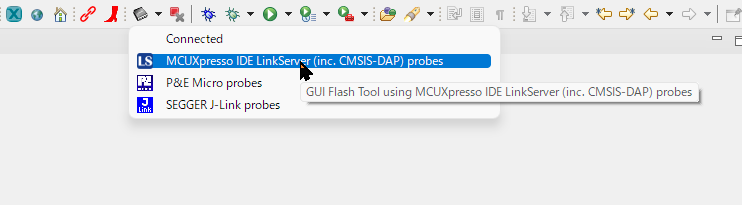
If you want to specify and write a pre-built .bin or .axf file, select [MCUXpresso IDE LinkServer probes] from the dropdown menu of the semiconductor package-shaped icon on the toolbar.
Calling from the toolbar
The following dialog will appear.
Writing dialog
In the [GUI Flash Tool] dialog, specify the following and press the [Run…] button.
[File to program]: The .bin or .axf file you want to write.
[Format to use for programming]: The format of the file.
Troubleshooting
LinkServer Not Found
Normally, when you perform a write operation, a LinkServer-compatible board will be found for the first time as shown below, but sometimes it is not found.
LS board discovery
Close MCUXpresso, unplug the MCU-Link USB cable, and try again.
Although usually not necessary, you can delete the .launch and .swd files in the top-level project folder to clear the previous connection state.
LinkServer Connection Error
Press [OK] on the error dialog to retry the error.
Example error dialog
Use a button to set PIO5=ISPENT (SMD#2, DIP#7) to a LOW (GND) level to explicitly set it to LOW when connecting to LinkServer.
If it still doesn’t work, close MCUXpresso, unplug the MCU-Link USB cable, and try again.
Writing with a Serial Port (such as TWELITE-R)
To write using a serial port, connect a TWELITE-R (also referred to as LITE-R in the text). The hardware connection is the same as for TWELITE BLUE/RED, mainly using UART0 TXD, RXD, PGM (ISP pin), and RESET. However, since the serial communication protocol for firmware writing is different, you need compatible software for writing.
The software compatible with writing is as follows:
TWELITE STAGE
DKProgrammer
Writing with TWELITE STAGE
You can use TWELITE STAGE as a build and write environment. For instructions, please refer to TWELITE STAGE App.
Writing with DK6Programmer
You can use a TWELITE-R to write the binary. This method is only supported on Windows.
Existing writing utilities like TWELITE STAGE and TWE Programmer cannot be used.
Installing the DK6Programmer Utility
The writing utility is a command-line tool, and the installer is included in the SDK downloaded from NXP.
Find the SDK directory \tools\JN-SW-4407-DK6-Flash-Programmer.
The directory contains a .pdf document and an .exe installer.
Run the .exe installer and follow the instructions.
Note the installation location and set the PATH if necessary.
The command name is DK6Programmer.exe. The following instructions assume this command works from the command prompt.
Writing Method
With the LITE-R disconnected from the USB port, connect the TWELITE GOLD with the TWELITE DIP shape. (If you frequently connect and disconnect, consider an attachment with a ZIF socket.)
Connect the LITE-R to the USB port. At this time, check the assigned COM port (see below for how to check).
Open a command prompt in the directory where the .bin file is located. (You can do this in MCUXpresso by right-clicking the folder you want to open and selecting [Show in Local Terminal] > [Terminal]).
If an error message appears, start over from the beginning. In most cases, it’s due to a USB recognition issue or a poor connection between the module and the LITE-R. Unplug the LITE-R from the USB connector, re-seat the LITE-R and TWELITE DIP (GOLD), and reconnect. If the COM port does not appear, restarting Windows may solve the problem.
Reference: How to Check the COM Port
This section explains how to check the COM port assigned to the LITE-R using DK6Programmer.exe.
Disconnect the TWELITE-R.
Run DK6Programmer.exe -l.
C:\> DK6Programmer.exe -l Available connections: COM18 <== Port is listed
Connect the TWELITE-R.
Run DK6Programmer.exe -l. The newly displayed COM port is the LITE-R.
C:\> DK6Programmer.exe -l Available connections: COM18 COM4 <== The newly added port is the LITE-R
Reference: Example of a Writing Script Using WSL
WSL (Windows Subsystem for Linux) has some operational and performance limitations, but it can be used to run Windows utilities, such as referencing files on the Windows file system from a Linux shell or calling Windows commands.
The following is an example of a bash script for writing. If defined in .bashrc, it can simplify the input, for example, jn5189_write [BIN_FILE] [COM_PORT].
Building on MCUXpresso IDE: Used when debugging with MCU-Link. As it is maintained by a semiconductor manufacturer, special functions can be used. However, since the implementation for TWELITE may differ from the standard assumptions of the semiconductor manufacturer, not all functions may be available.
Building with make: This is the traditional build method. make can be called from several tools. The MCU-Link debugger cannot be used.
TWELITE STAGE App: A utility that handles building, writing, and executing. It also has a function to open the target project in VSCode.
VSCode: Definitions for code interpretation and a Task for building (make) are provided. Some of the provided apps and samples do not have definitions for VSCode. You need to set environment variables in advance, and we provide batch files and scripts for Windows to set environment variables and launch VSCode.
Command Window on Windows (bash): We provide batch files to launch bash or cmd.exe with the necessary environment variables set.
From WSL on Windows: We provide batch files and scripts to call the Windows make utility from within WSL.
For MCUXpresso
This section explains the process assuming the standard screen layout (C/C++ Perspective). (Reference: About the Screen Layout)
Here, you will build the project and generate an executable binary (.bin) that runs on the microcontroller.
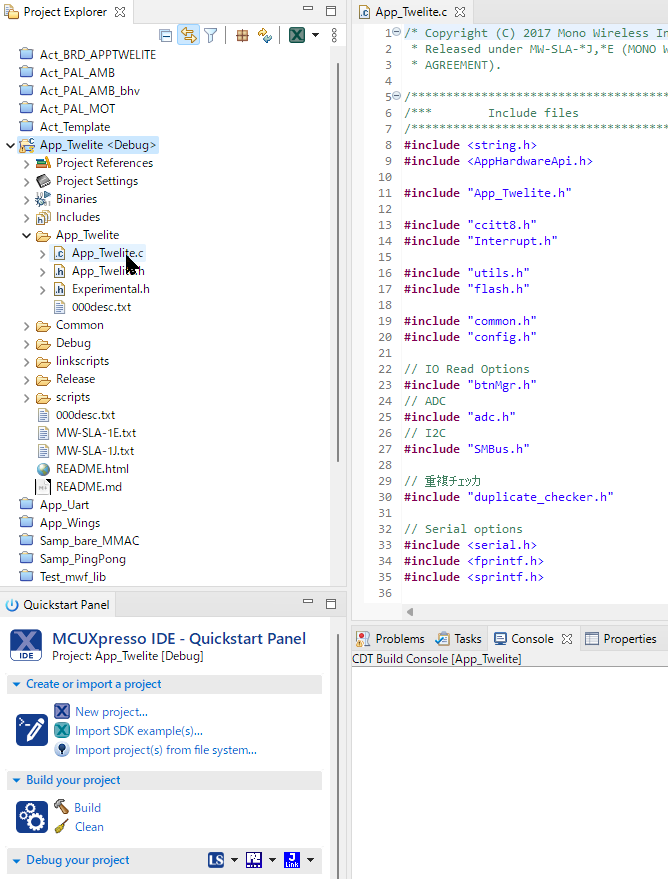
First, open the project you want to build in the [Project Explorer].
Opening a project
The behavior is different depending on whether the TWENET library is open or closed.
If the TWENET library is open, it will be rebuilt if necessary. It is recommended to keep it open, as you will often open the library code for debugging.
If the TWENET library is closed, the build process will be shorter because the library will not be rebuilt.
To build a project, with the target project open, select the build configuration from the hammer icon.
Hammer icon
There are multiple ways to perform build-related operations. Examples are listed below, but please refer to the Eclipse manual for details.
Building with the selected build configuration
Click the [Build] icon in the MCUXpresso QuickStart Panel.
Select [Project] > [Build Project] from the menu.
Right-click the top-level folder of the project in the [Project Explorer] and select [Build Project] from the menu.
Cleaning (deleting intermediate files) with the selected build configuration
Click the [Clean] icon in the MCUXpresso QuickStart Panel.
Select [Project] > [Clean…] from the menu.
Right-click the top-level folder of the project in the [Project Explorer] and select [Clean Project] from the menu.
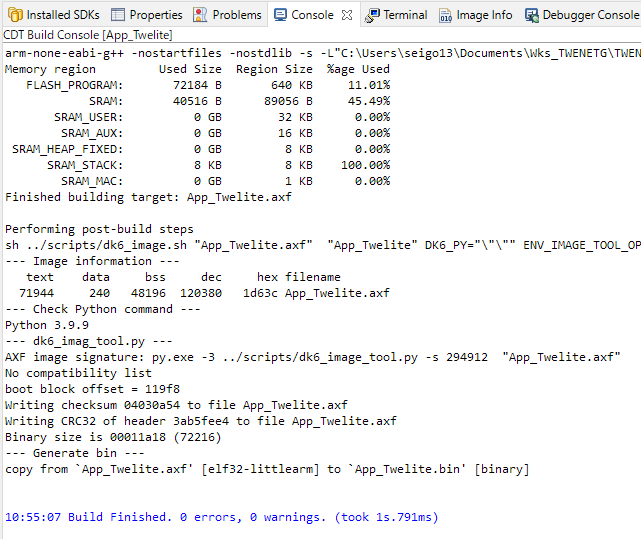
When you run the build, the build progress will be displayed in the [Console].
Console screen during build
You can confirm if the build was successful by checking for error messages and the generation of the .bin file.
arm-none-eabi-g++ -nostartfiles -nostdlib -s ...               <=== linker
Memory region         Used Size  Region Size  %age Used
   FLASH_PROGRAM:       72184 B       640 KB     11.01%
            SRAM:       40516 B      89056 B     45.49%
       SRAM_USER:          0 GB        32 KB      0.00%
        SRAM_AUX:          0 GB        16 KB      0.00%
 SRAM_HEAP_FIXED:          0 GB         8 KB      0.00%
      SRAM_STACK:          8 KB         8 KB    100.00%
        SRAM_MAC:          0 GB         1 KB      0.00%
Finished building target: App_Twelite.axf

Performing post-build steps
sh ../scripts/dk6_image.sh "App_Twelite.axf"  "App_Twelite" ...
--- Image information ---                                      <=== elf object
   text	   data	    bss	    dec	    hex	filename
  71944	    240	  48196	 120380	  1d63c	App_Twelite.axf
--- Check Python command ---                                   <=== check version of python interpreter
Python 3.9.9
--- dk6_imag_tool.py ---                                       <=== image signature
AXF image signature: py.exe -3 ../scripts/dk6_image_tool.py -s 294912  "App_Twelite.axf"
No compatibility list
boot block offset = 119f8
Writing checksum 04030a54 to file App_Twelite.axf
Writing CRC32 of header 3ab5fee4 to file App_Twelite.axf
Binary size is 00011a18 (72216)
--- Generate bin ---                                           <=== generate .bin
copy from `App_Twelite.axf' [elf32-littlearm] to `App_Twelite.bin' [binary]
For VSCode
The project directories for the apps and sample code included with MWSDK contain a .vscode directory, but some environment variables need to be set. (Some projects do not have a .vscode directory prepared.)
Here’s how to set environment variables and launch VSCode:
In the TWELITE STAGE settings, specify the option to open with VS Code, and open the corresponding project from TWELITE STAGE.
Windows: Launch from MWSDK/scripts/WIN_CODE.cmd. (You need to have completed the installation so that the code command launches VSCode beforehand. The command prompt window will remain open after execution.)
Windows: Display the command prompt from MWSDK/scripts/WIN_CODE.cmd and run the code command. (You need to have completed the installation so that the code command launches VSCode beforehand.)
Windows: Display the WSL prompt from MWSDK/scripts/WIN_WSL.cmd and run the mwcode.sh command. (WSL needs to be pre-installed. This is a method outside the scope of support inquiries. Please refer to mwcode.sh directly for its content.)
Environment Variable
Content
Example
MWSDK_ROOT
MWSDK’s root directory
C:/Work/MWSTAGE/MWSDK/
MWSDK_ROOT_WINNAME
Above, Windows name
C:\Work\MWSTAGE\MWSDK
MWSDK_TWENET_LIBSRC
Directory to the library
C:/Work/MWSTAGE/MWSDK/TWENET/current/
MWSDK_MAKE_JOBS
Number of parallel jobs
-j8
MWSDK_MAKE_DISABLE_LTO
LTO enabled/disabled
DISABLE_LTO=1 or DISABLE_LTO=0
Recommended Plugins on VSCode
C/C++
C/C++ Extension Pack
Operations on VSCode
C/C++ Configuration (displayed as TWELITE ??? in the bottom right of the status bar) ⇒ Select the target for code interpretation. (TWELITE BLUE/RED/GOLD)
The code interpretation in the editor is solely for the purpose of improving workability. It usually does not match errors that occur during compilation, so please only use the editor’s code interpretation errors as a reference.
When interpreting code in GOLD, many interpretation errors may appear. If workability is poor, changing the settings to BLUE/RED is an option.
From the Terminal menu, select Run Task… ⇒ Build or clean.
Command Line
or this batch file sets the environment variables required for execution.
For bash
Run MWSDK/scripts/WIN_BASH.cmd (msys bash).
A screen like the following will be displayed. The line starting with MyName@MyPC will vary depending on your installation.
MyName@MyPC /c/Work/MWSTAGE/MWSDK
MWSDK$
To build Act_samples/BRD_APPTWELITE, you would perform the following operations:
MyName@MyPC /c/Work/MWSTAGE/MWSDK
MWSDK$ cd Act_samples/BRD_APPTWELITE/build

MyName@MyPC /c/Work/MWSTAGE/MWSDK/Act_samples/BRD_APPTWELITE/build
MWSDK$ make TWELITE=GOLD
...
!!!TARGET=BRD_APPTWELITE_GOLD_L1305_V0-2-1.bin

MyName@MyPC /c/Work/MWSTAGE/MWSDK/Act_samples/BRD_APPTWELITE/build
MWSDK$
For cmd.exe
Run MWSDK/scripts/WIN_CMD.cmd (Windows’ cmd.exe).
Microsoft Windows [Version 10.0.22621.1848]
(c) Microsoft Corporation. All rights reserved.

C:\Work\MWSTAGE\MWSDK>
To build Act_samples/BRD_APPTWELITE, you would perform the following operations:
This section explains how to download MCUXpresso SDK.
Downloading the MCUXpresso SDK
This explanation uses the design of the NXP website as of the time of this writing (2022/01). The language of the site is English.
Account Registration
Access https://www.nxp.com and select SIGN IN from the navigation on the webpage. If you have not yet registered an account, select Register and fill in the required information.
Downloading MCUExpresso IDE
While logged in, download the MCUExpresso IDE from the link below.
While logged in, go to the following link. Download the complete set of SDK files from this link. https://mcuxpresso.nxp.com/
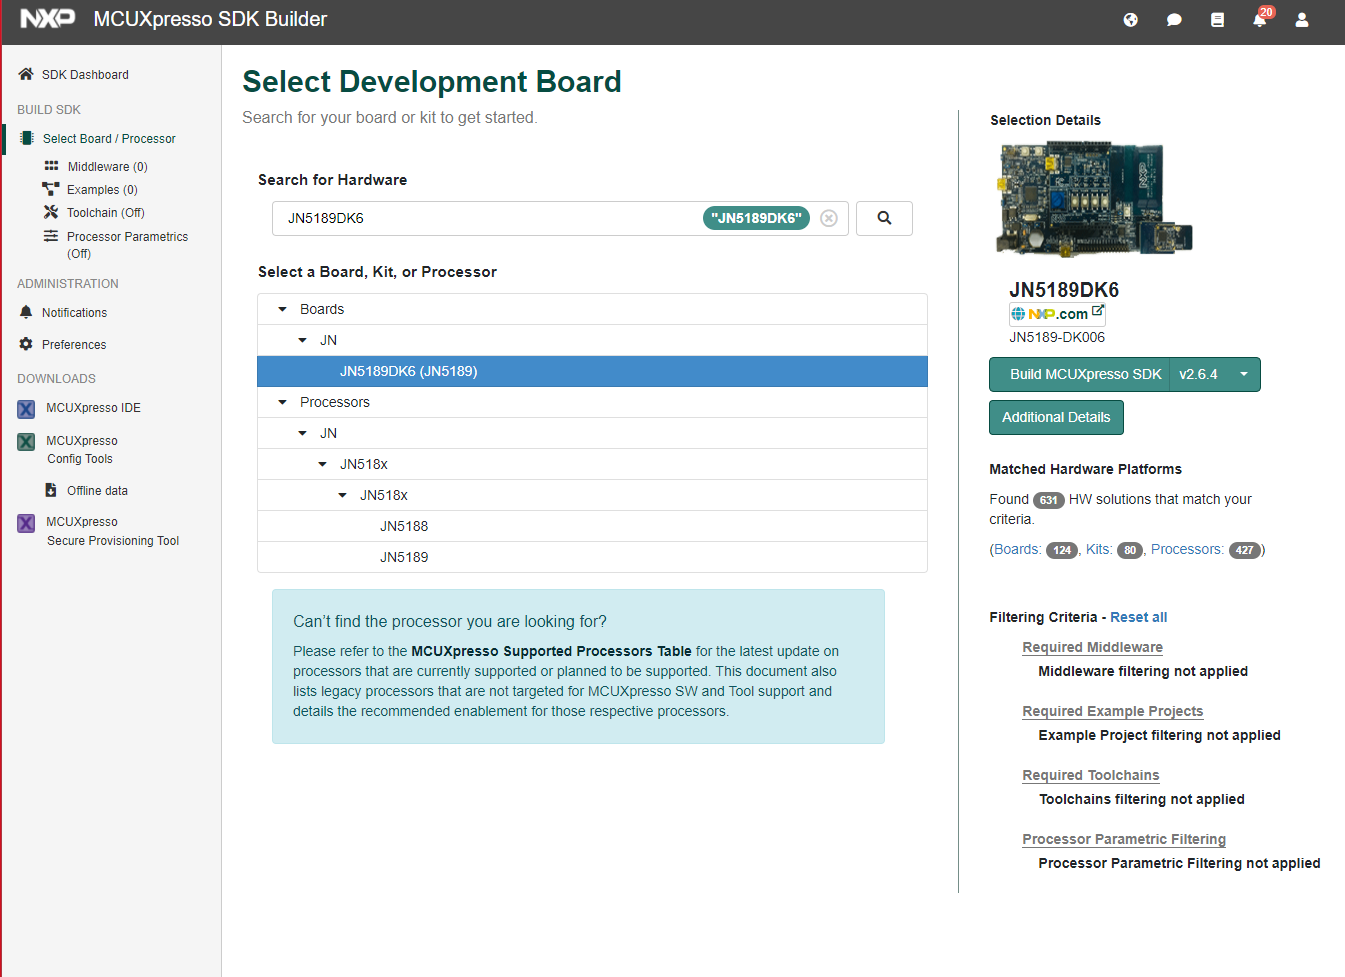
Select Development Board
Select [Select Development Board].
mcuexpresso_nxp_com
Supported SDK Search
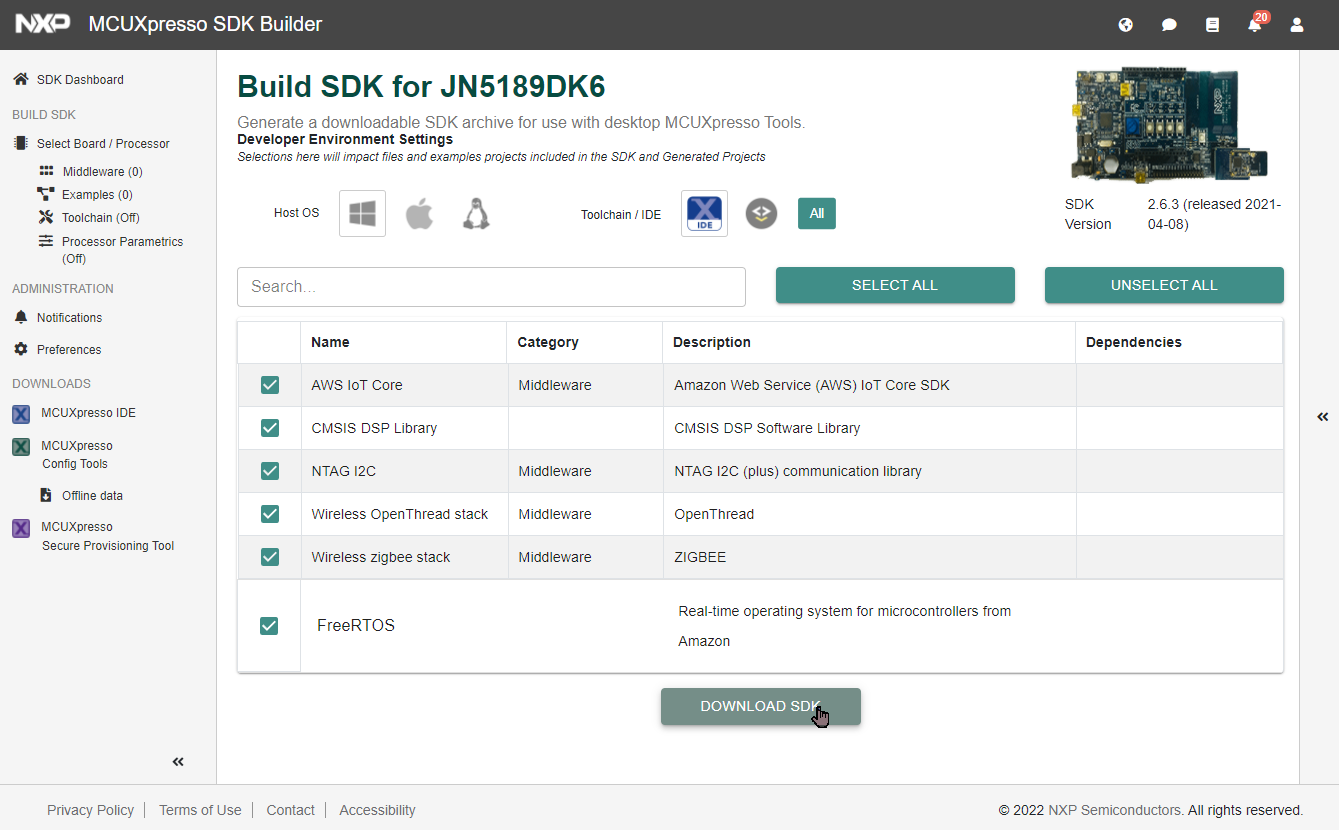
Search for the supported SDK using JN5189DK6 as the keyword.
after searching
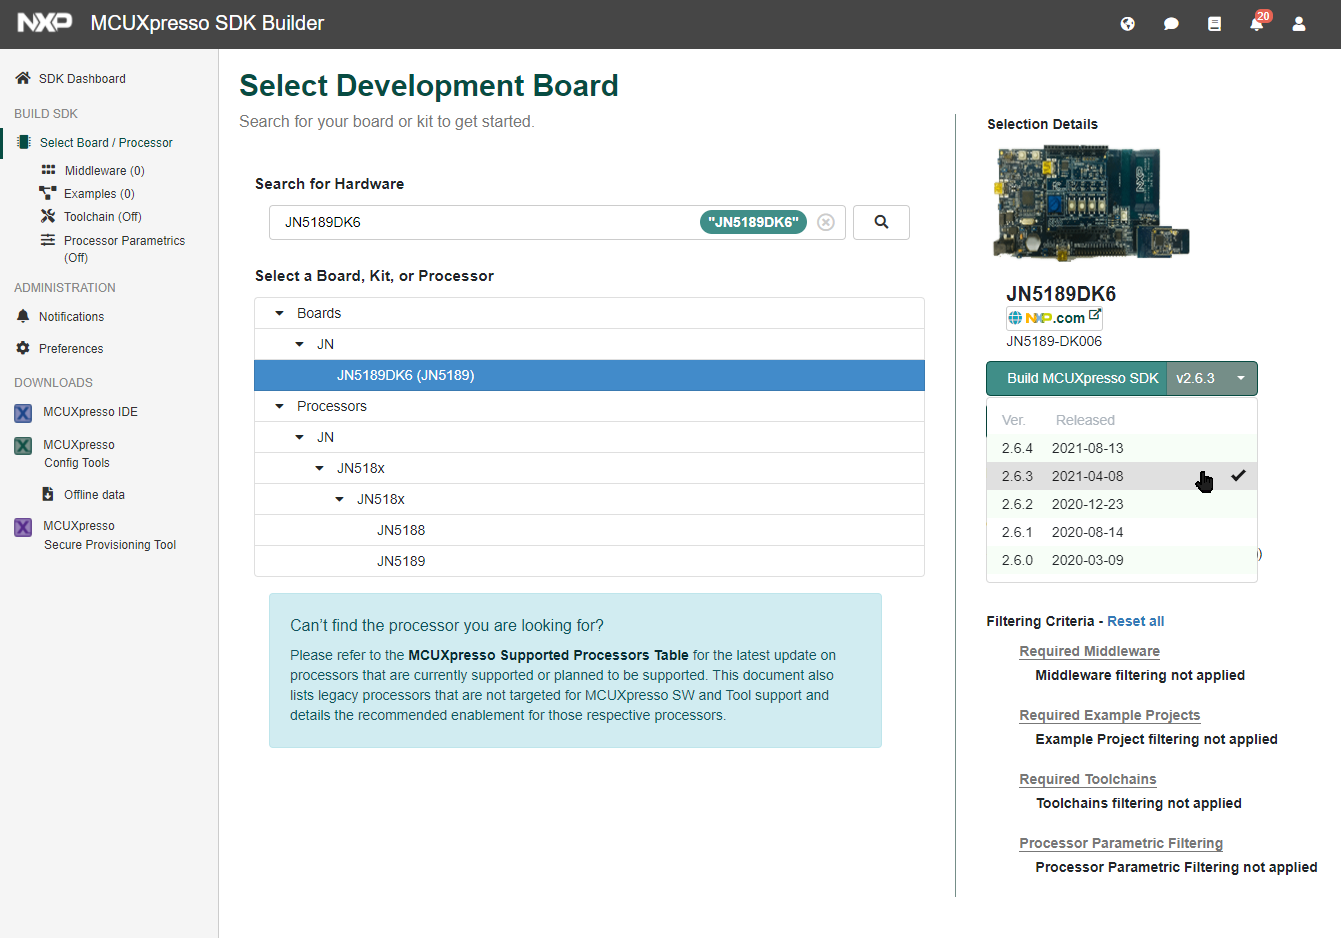
Build MCUXpresso SDK
Select JN5189DK6 (JN5189) and set the version of [Build MCUXpresso SDK] on the right side to [v2.6.X]. Click [Build MCUXpresso SDK].
Specify SDK version
Selecting Additional Components
Select the components to include in the download.
Download screen 1
Although we use very few of the components in the list, please select all of them.
For Host OS, specify your OS (Windows/Mac/Linux).
For Toolchain / IDE, specify MCUXpresso IDE.
After all settings are complete, click [DOWNLOAD SDK]. After clicking, you will be asked to confirm the EULA (End-User License Agreement) and other terms, so please follow the on-screen instructions.
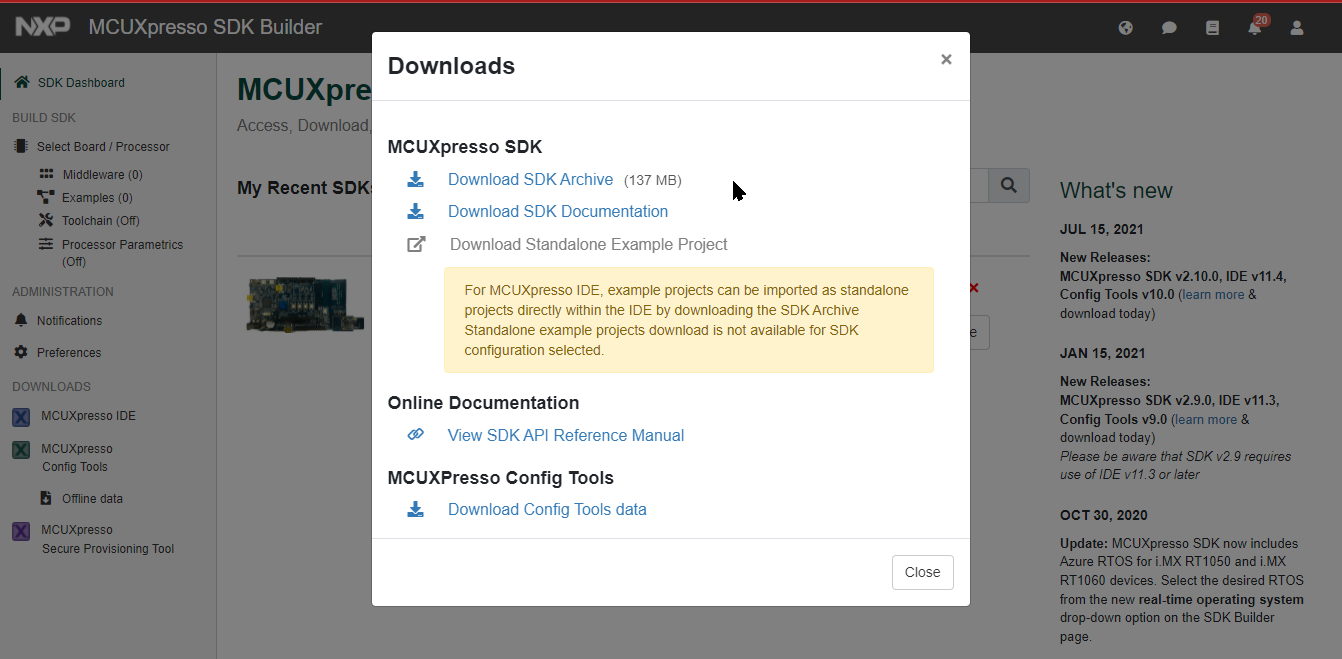
Downloads
The Downloads screen appears. Download everything.
Download screen 2
Download the SDK Archive, SDK Documentation, and Config Tools data. (Some may require EULA confirmation.)
Check the link for the SDK API Reference Manual and save it as a bookmark.
5 - Libraries, Apps, etc.
Explanation of TWENET Libraries and Apps
We will provide an explanation of TWENET libraries and apps, focusing on the topic of TWELITE GOLD.
Libraries, Apps, etc.
In TWELITE GOLD, we have prepared libraries that behave relatively similarly to the development code of TWELITE BLUE/RED.
In TWELITE BLUE/RED, the utils and TWENET C API, as well as the MWX library, are built on the AHI API and AppAPI supplied by the semiconductor manufacturer.
[TWENET C++ API/MWX           ] setup(), loop() style API on C++
[utils][TWENET C API          ] lagacy C library
[AHI API          ][AppAPI    ]
--------------------------------
[MCU PERIPHERAL   ][MAC LAYER] HARDWARE
In TWELITE GOLD, the library provided by the semiconductor manufacturer is the FSL library, and its compatibility with TWELITE BLUE/RED is very limited. In order to run the code already implemented by our company with relatively minor modifications, we have created the TWENETcmpt library. TWENETcmpt minimizes direct calls to the FSL library and is implemented using the TWENETmwf library, which abstracts peripheral procedures.
[TWENET C++ API/MWX                         ]
[TWENET C API                               ]
[TWENETutils]
     [TWENETcmpt - AHI          ]
     [TWENETmwf C++ LIB         ]
                              [App API  ]
[FSL LIBRARY                   ][MiniMac  ]
---------------------------------------------
[MCU PERIPHERAL                ][MAC LAYER]
TWENETmwf - A C++ library that aggregates FSL library procedures.
TWENETcmpt - A group of AHI-compatible functions implemented using the TWENETmwf library.
TWENETutils - Equivalent to utils in BLUE/RED. Some parts, such as UART, are implemented directly by the FSL library.
MiniMac and AppAPI - Libraries provided by the semiconductor manufacturer with undisclosed source code. The direct API for handling the MCU semiconductor’s MAC layer is a library named MiniMac, and an AppAPI-compatible API is provided using MiniMac.
FSL Library - A library provided by the semiconductor manufacturer with disclosed source code. It mainly contains procedures for handling peripherals.
Contains main() and microcontroller/peripheral library functions, etc.
TWELITE Apps, Samples
We are building projects for TWELITE Apps. If there are any restrictions on the behavior specific to TWELITE GOLD, they will be listed in the LIMITATIONS section of the README.md file located directly under the project directory. The LIMITATIONS include hardware limitations and those that we do not plan to address.
If there are any restrictions on the operation specific to TWELITE GOLD for sample code using Act, they will be listed in the LIMITATIONS section of the README.md file located directly under the project directory. The LIMITATIONS include hardware limitations and those that we do not plan to address.
The build definitions for EASTL are included in Act_Unit_EASTL and Act_Template. Other samples do not have include paths or library specifications.
Regarding the MCUXpresso Workspace
The libraries mentioned above are stored directly under the current folder in the MWSDK installation directory (.../MWSTAGE/MWSDK).
In MCUXpresso, select File > Import..., then in the dialog box that appears, select General > Existing Projects into Workspace and press the Next button. In the next dialog, specify the current folder, and all the TWENET??? libraries listed above will be displayed, so add all of them.
Creating a new project
A new project is created by importing an existing project in MCUXpresso and then changing its name.
Project
Copy source
Remarks
C language and using AHI-compatible library<br />App_Twelite, App_Wings, etc.
App_Twelite
C++ source code can also be added, but may require changes to definitions, etc.
Act
Act_MYPROJ_template.zip
setup() and loop() style code. C++ is assumed. A project archive is available. <br />The archive can also be imported from General > Existing Projects into Workspace.
Here is an example of the steps to create a new project based on an already imported project:
Back up the existing project or create an archive from the Export menu.
Rename the existing project.
Re-import the project you backed up in step 1.
6 - MCUXpresso Environment Setup
This section explains how to set up the environment using MCUXpresso IDE.
This section explains how to set up the environment using MCUXpresso IDE.
Developing with MCUXpresso is not mandatory. You can usually build with the TWELITE STAGE app or a Makefile, but please note the following:
If you want to use a debugger, etc., you need to build and run with MCUXpresso.
There is no compatibility with NXP’s template source code or library source code.
Some of the features provided by MCUXpresso (e.g., memory layout settings, pin definitions) may not work.
The build definitions may differ from the Makefile provided by the TWELITE STAGE app.
MCUXpresso Environment Setup
This explanation assumes you are performing a new IDE installation.
We cannot provide verification or guidance on setting up the tool if you are already using the same IDE from NXP, but due to the nature of the tool, it should be possible by adding the SDK package.
We cannot provide detailed instructions on how to use this tool through our support. Please refer to the MCUXpresso User Guide and the documentation for the underlying Eclipse integrated development environment.
The screens shown here may appear differently depending on your environment and settings.
Run the downloaded MCUXpressoIDE_xx.y.z_nnnn.exe (for Windows, where xx,y,z,nnnn are version identifiers) and follow the on-screen instructions.
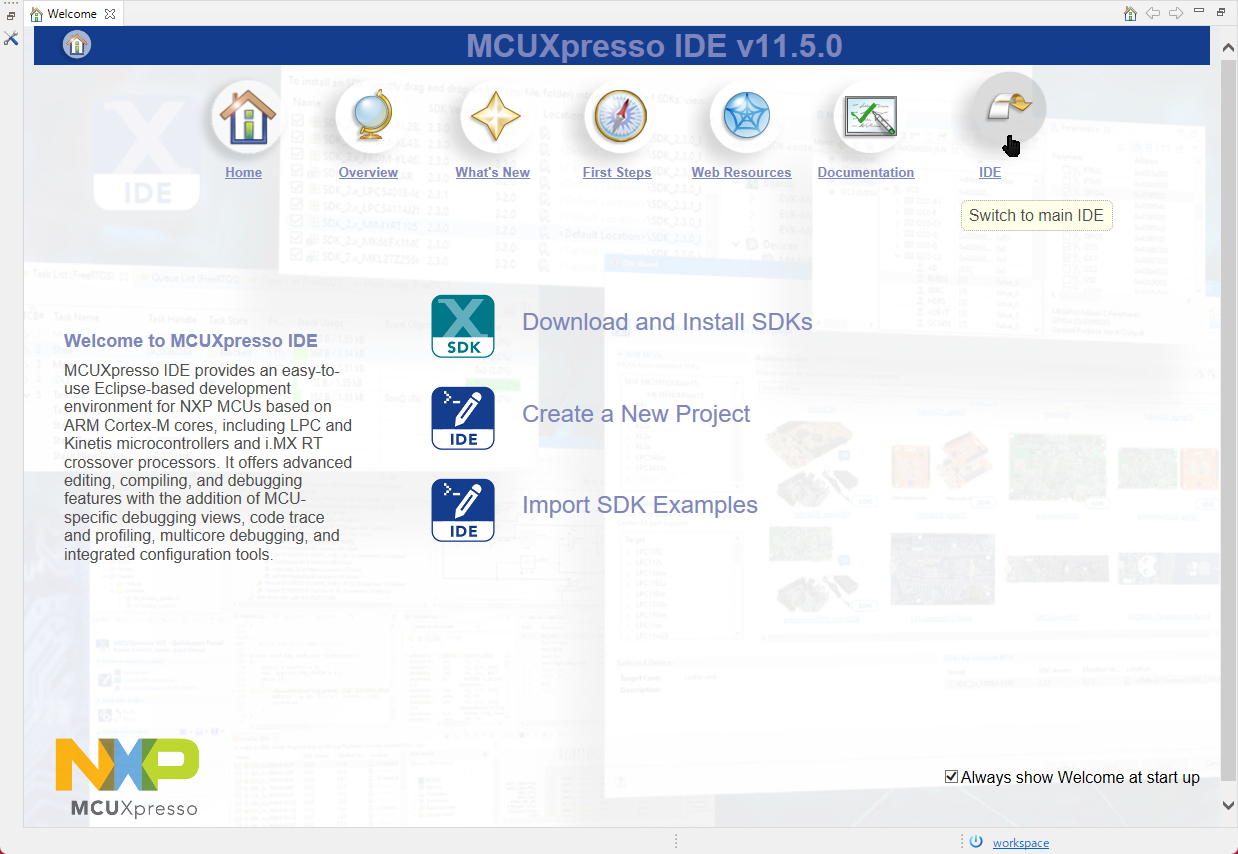
After the installation is complete, launch MCUXpresso IDE.
Startup screen
The Welcome screen will be displayed. Although this screen has a menu for SDK installers, please select the IDE.
To display this screen again, select [Help] > [Welcome] from the menu.
The next step shows how to install a downloaded SDK package (the one with the xml file rewritten by the above procedure).
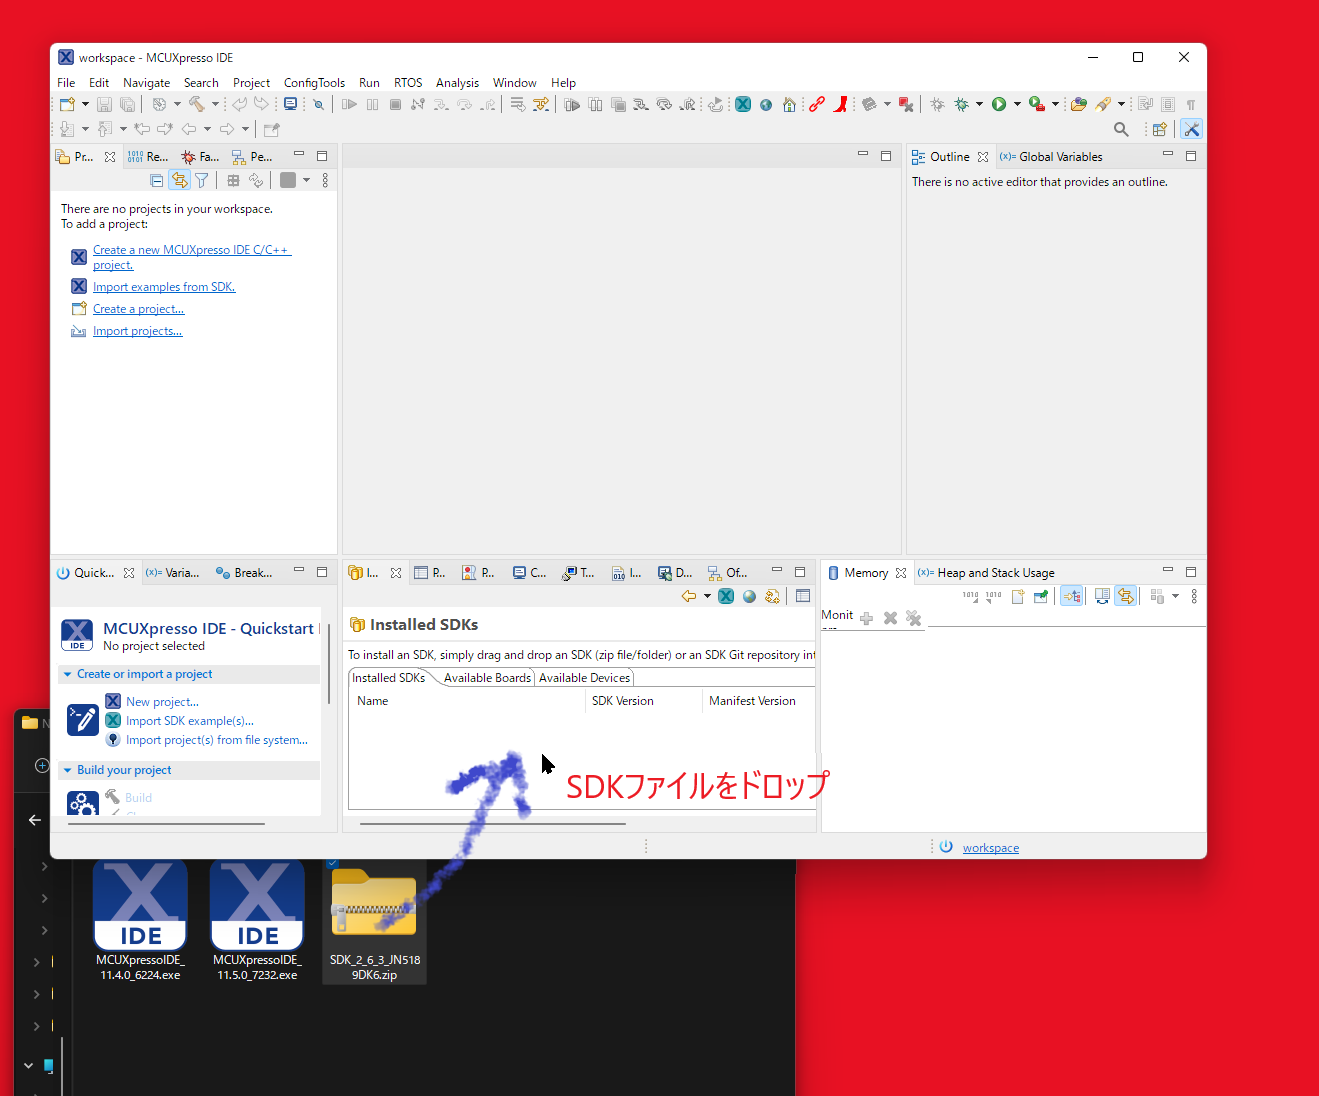
MCUXpresso IDE - SDK Package Installation
If you do not install the SDK package, you will be unable to perform most operations, such as writing TWELITE GOLD firmware from MCUXpresso.
If you selected IDE from the Welcome screen in the previous step, the screen will change to the normal IDE screen. You will perform the SDK package installation on this screen.
Open the Installed SDK tab (if you can’t find it on the screen, select [Window] > [Show View] > [Installed SDK] from the menu), and drag and drop the downloaded SDK file (in ZIP format) (for Windows). A confirmation dialog will appear, so press the [OK] button.
Drag and drop the SDK ZIP file.
If you want to create a new project or run a sample using the SDK, please select the unzipped folder.
SDK Installation
This is the screen after the SDK is installed.
Startup screen
It is usually registered in the list with the name SDK_2.x_JN5189DK6 (in the example above, it is SDK_2.6.3_JN5189DK6).
The SDK file is copied to a directory managed by MCUXpresso. You can delete the directory or zip file that was expanded during registration.
If you want to use SDK samples, etc., right-click SDK_2.x_JN5189DK6 in the [Installed SDKs] tab and select [Unzip Archive]. This will expand the registered ZIP file.
To view the expanded SDK directory, right-click SDK_2.x_JN5189DK6 in the [Installed SDKs] tab and select [Open Location].
MCUXpresso IDE - Creating a Workspace
A workspace can contain multiple development projects (often a development unit for building a single program, including source code and build intermediates). You can also set dependencies between projects within a workspace and reference projects from each other.
When you first launch MUCXpresso IDE, a workspace is automatically created, but we will prepare a new workspace to store our libraries, etc.
Create a development directory with no Japanese characters or spaces in the name. Leave the contents empty. Here, we will use C:\Work\Wks_TWENET (Windows) as an example.
Select [File] > [Switch Workspace] > [Other…] from the menu.
Enter the workspace directory you created and press the [Launch] button.
MCUXpresso IDE - Copying Libraries and Samples
Copy the archive provided by our company to the workspace directory.
MCUXpresso IDE - Importing Libraries and Samples
To develop applications for TWELITE GOLD, you need to import the necessary libraries and sample code into MCUXpresso.
From the menu, select [File] > [Import…].
→ The Import dialog will open.
Select [General] > [Existing Projects into Workspace] from the list and press the [Next >] button.
→ The Import dialog (Import Projects) will open.
Press the [Browse…] button next to [Select root directory:] and select the workspace directory.
→ The projects that can be added will be displayed in the [Projects:] list.
Press the [Finish] button.
→ The projects will be added to the workspace. A list will be displayed in the [Project Explorer] tab.
In the [Project Explorer] tab, select all projects and choose [Close Projects] from the right-click menu to close all projects except for TWENETxxx for the time being (this is not mandatory, but it improves workability by making the screen less cluttered).
Python Installation
On Windows, you can skip the Python installation. The Python runtime environment is included under MWSTAGE/Tools, and it is normally called from the ...TWENETmcu/linker/scripts/dk6_image.sh script. If you encounter an error related to Python during the build, you can try installing it separately if needed.
For Mac and Linux, python3 is usually installed by default, so you only need to check for the pycryptodome library and install it if necessary.
Overview
Each project includes a script to embed binary image signature data as a post-build process, which rewrites the binary image after compilation. This rewriting uses a Python script and the pycryptodome library, which must be installed separately.
To successfully build the projects included in the sample, you need the following:
You must be able to run a Python script from the command prompt with the command name py -3 or python3.
There are two methods for installing Python on a Windows environment: downloading the installer from python.org or installing from the Microsoft Store. Install Python using either method.
If you install from python.org, follow the instructions of the installer. Also, be sure to keep track of the installation directory in case you need to set the PATH.
If you install from the Microsoft Store, it seems to be installed in %USERPROFILE%\AppData\Local\Microsoft\WindowsApps\. Please use this as a reference.
If you cannot run python3 from the command prompt after installation, check your PATH environment variable. (If the py.exe command can be executed, running py -0p will display the respective installation directories).
For macOS and Linux environments, please refer to general information to install python3.
After installing Python, open the command prompt and type python3 --version to get the version number.
C:\XXX\> python3 --version                <=== Check version after installation
Python 3.10.2
How to Run a Specific Version of Python on Windows
If you have issues with the installed Python version, want to keep it untouched, or want to install a different version (e.g., 3.7 if 3.8 is already installed), consider installing another version.
Note: When you install a different version, the installer may update the PATH, and the python3 command will point to the newly installed version. When installing a new version, it is better not to let the installer set the PATH. Also, the command launched by py.exe may change to the newly installed version.
You can use the py.exe command (which is installed with Python) to switch between Python versions.
C:\XXX\> py -0                          <=== List of installed Pythons
Installed Pythons found by py Launcher for Windows
 -3.8-64 *
 -3.7-64
 -3.10-64
 -2.7-64

<<< Now install Python 3.6 >>> (Note: 3.6 is end of life)
C:\XXX\> py -0
Installed Pythons found by py Launcher for Windows
 -3.8-64 *
 -3.7-64
 -3.6-64                            <=== 3.6 is added
 -3.10-64
 -2.7-64

C:\XXX\> py -3.6                     <=== Try to launch Python 3.6
Python 3.6.8 (tags/v3.6.8:3c6b436a57, Dec 24 2018, 00:16:47) [MSC v.1916 64 bit (AMD64)] on win32
Type "help", "copyright", "credits" or "license" for more information.
>>> ^Z                            <=== Exit with Ctrl+Z [Enter]

C:\XXX\> py -3.6 pip list          <=== Try to run pip for Python 3.6
Package    Version
---------- -------
pip        18.1                      <=== Installed modules are listed
setuptools 40.6.2
You are using pip version 18.1, however version 21.3.1 is available.
You should consider upgrading via the 'python -m pip install --upgrade pip' command.
As shown above, by using the py.exe command, you can run different versions of Python and pip. If you don’t want to touch the Python version in your current environment, you can install a different version from Python.
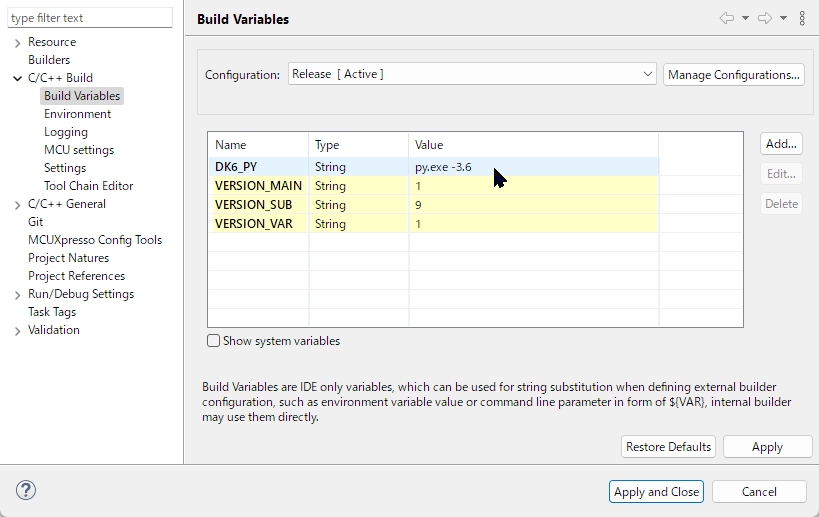
If you want to use a specific version, add DK6_PY to the project’s [Properties] > [C/C++ Build] > [Build Variables]. The example below sets py.exe -3.6. (Set this for both Release and Debug configurations).
Setting Python version
Installing pycryptodome
This is not required for building the samples and libraries we provide. We do not provide support for firmware-related encryption. Please obtain information from NXP’s official resources and support communities.
Running dk6_image_tool.py may require it for tasks such as signing encrypted firmware. Refer to the example below (Windows environment, using the py.exe command) to install pycryptodome.
C:\XXX\> py -0                          <=== List of installed Pythons
Installed Pythons found by py Launcher for Windows
 -3.8-64 *
 -3.7-64
 -3.10-64
 -2.7-64

<<< Now install Python 3.6 >>> (Note: 3.6 is end of life)
C:\XXX\> py -0
Installed Pythons found by py Launcher for Windows
 -3.8-64 *
 -3.7-64
 -3.6-64                             <=== 3.6 is added
 -3.10-64
 -2.7-64

C:\XXX\> py -3.6                      <=== Try to launch Python 3.6
Python 3.6.8 (tags/v3.6.8:3c6b436a57, Dec 24 2018, 00:16:47) [MSC v.1916 64 bit (AMD64)] on win32
Type "help", "copyright", "credits" or "license" for more information.
>>> ^Z                             <=== Exit with Ctrl+Z [Enter]

C:\XXX\> py -3.6 pip list           <=== Try to run pip for Python 3.7
Package    Version
---------- -------
pip        18.1                       <=== Installed modules are listed
setuptools 40.6.2
You are using pip version 18.1, however version 21.3.1 is available.
You should consider upgrading via the 'python -m pip install --upgrade pip' command.

C:\XXX\> py -3.6 -m pip install pycryptodome <=== Install pycryptodome with pip
Collecting pycryptodome
  Downloading https://files.pythonhosted.org/packages/7e/.../pycryptodome-3.14.0.tar.gz (3.4MB)
    100% |████████████████████████████████| 3.4MB 14.7MB/s
Installing collected packages: pycryptodome
  Running setup.py install for pycryptodome ... done
Successfully installed pycryptodome-3.14.0
You are using pip version 18.1, however version 21.3.1 is available.
You should consider upgrading via the 'python -m pip install --upgrade pip' command.
What to do if you encounter a problem installing pycryptodome
In some situations, if you try to install pycryptodome into an already installed Python environment, an error may occur and a simple solution may not be found.
Uninstall Python and install it again (if you are okay with destroying the existing installed Python environment).
Refer to “How to Run a Specific Version of Python on Windows” (described later) and prepare a Python environment separate from the current one.
Upgrading pip
When you run pip3 list, you might see a message suggesting you upgrade pip, as shown below.
C:\XXX\> py -3.X -m pip list        <=== Run pip list, specifying version 3.X
WARNING: You are using pip version 21.2.4; however, version 22.0.2 is available.
You should consider upgrading via the 'C:\Users\...\python.exe -m pip install --upgrade pip' command.
As one way to fix issues like pycryptodome not installing, you can upgrade pip by entering the following command:
C:\XXX\> py -3.X -m pip install --upgrade pip
Specifying the Default Version for the py.exe Command
Create configuration files (C:\Windows\py.ini, C:\Windows\pyc.ini: where C:\Windows is the Windows installation directory) with the following content (the same content for both files). The example below sets 3.8 as the default.
[defaults]
python=3.8
7 - MCUXpresso(Eclipse) Screen Layout
MCUXpresso(Eclipse) Screen Layout
Explanation of MCUXpresso(Eclipse) Screen Layout.
MCUXpresso(Eclipse) Screen Layout
In MCUXpresso (Eclipse), you can set various screen layouts depending on your purpose. If the screen layout becomes unintended, perform the following operations.
From the menu, select [Window] > [Perspective] > [Open Perspective] and open [C/C++], [Develop], [Debug], etc.
C/C++ : Assumed for coding (MCUXpresso standard, also displays special tabs)
Develop: Used for debugging (also displays special MCUXpresso tabs)
Debug: Used for debugging
If an expected item like a toolbar is not displayed:
Toolbar: Select [Window] > [Appearance] > [Show Toolbar] from the menu.
Other windows (Console, etc.): Look for them in the [Window] > [Show View] menu.
8 - Project Structure and Settings
Project Structure and Settings
We will provide an explanation of the project structure and settings.
Project Structure and Settings
First, we will explain the project structure and important settings using the standard TWELITE application App_Twelite as an example. Please select the App_Twelite project from the [Project Explorer] in MCUXpresso.
App_Twelite/   : Source code storage location
Common/        : Source code storage location
build/         : Stores all build-related files
  scripts/     : Script to embed signature data into the .bin file in the post-build process
  linkscripts/ : Linker definition
Release/       : Intermediate files and generated products are stored here after a Release build
Debug/         : Intermediate files and generated products are stored here after a Debug build
MCUXpresso Settings Screen
From the menu, select [Project] > [Properties] (or right-click the top-level project folder in the Project Explorer and select [Properties]) to bring up the settings screen shown below. The following sections will cover how to check and operate on this settings screen.
C/C++ Settings
Source Code for Building
Source code to be built can be added or removed by making definitions in MCUXpresso. Newly added directories are usually included in the build by default.
To exclude a resource from the build, right-click the target directory, select [Properties..] > [C/C++ Build], set [Configuration] to [All Configurations], and check [Exclude resource from build].
Build Configurations (Release/Debug)
Two types of build definitions are provided: Release and Debug.
Release: An executable build with optimization.
Debug: A build with debug symbols. Supports output via PRINTF macros.
Note: Since the directory for storing library files is specified using this definition name, if you create a new build definition, you will need to adjust the project definition. (In [Properties..] > [C/C++ Build] > [Settings] > [MCU C++ Linker/Libraries], the ${ConfigName} part of "${workspace_loc:/TWENETxxx}/${ConfigName}" is replaced with Release or Debug).
Build Variables
In [C/C++Build] > [Build Variables], you define the information required for compilation, such as the version number.
Definition
Value
Description
VERSION_MAIN
Required [0..255]
Version number (main)
VERSION_SUB
Required [0..255]
Version number (sub)
VERSION_VAR
Required [0..255]
Version number (variation)
DK6_PY
Usually not needed
Python command for script execution (e.g., py.exe -3.7) If not specified, py.exe -3 or python3 will be used.
MCU Settings…
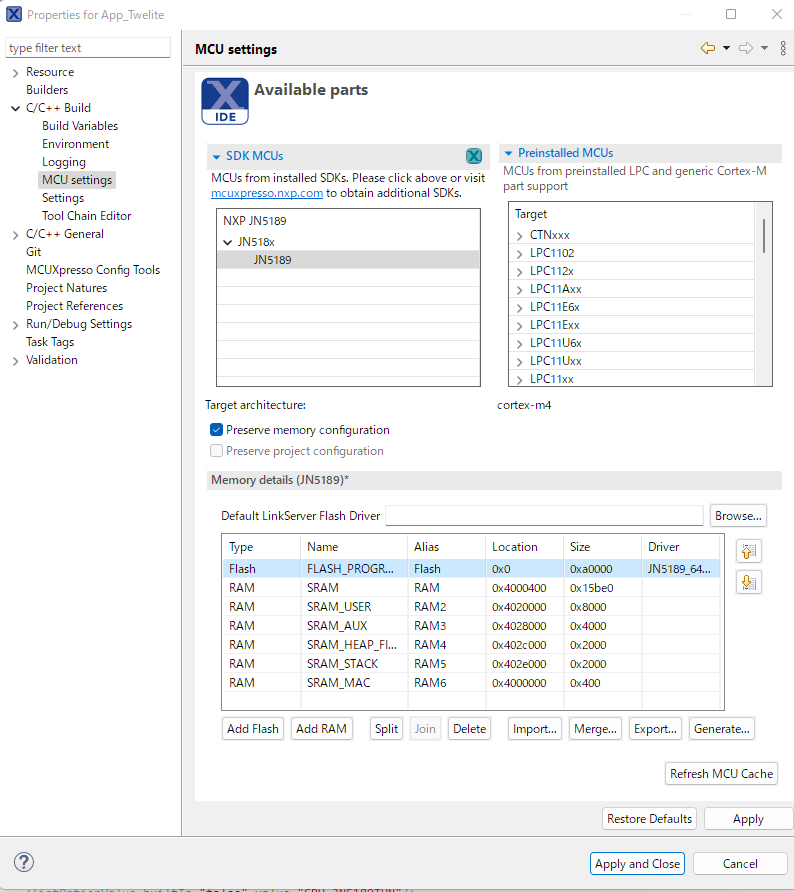
In the MCU settings, JN5189 is selected.
This page displays the memory map of the RAM area, but the settings in MCUXpresso are not reflected in the build. For details, please refer to RAM Allocation.
MCU Settings
Include Paths
The include paths for source files are configured here. Without this setting, building is not possible, even for the TWENETxxx (where xxx is the library name) libraries.
The project definitions contain redundant settings (e.g., a path is set for a project that does not use the mwx library).
The settings are defined relative to the workspace, such as "${workspace_loc:/TWENETxxx}". Even if a directory named TWENETxxx exists, it will not be searched unless it is registered as a project in the workspace. Make sure to add the libraries as projects to your workspace.
Include paths are configured as follows. Be aware that the settings are separate for each configuration (Release/Debug).
[Properties..] > [C/C++ Build] > [Settings] > [MCU C++ Compiler] > [Includes] (for C++ source files)
[Properties..] > [C/C++ Build] > [Settings] > [MCU C Compiler] > [Includes] (for C source files)
Most projects have the following directories added:
The first two, ${ProjName}, are the project directory names. For App_Twelite, App_Twelite/App_Twelite and App_Twelite/Common are specified. Edit this according to the directory layout of the libraries and source code referenced by your project.
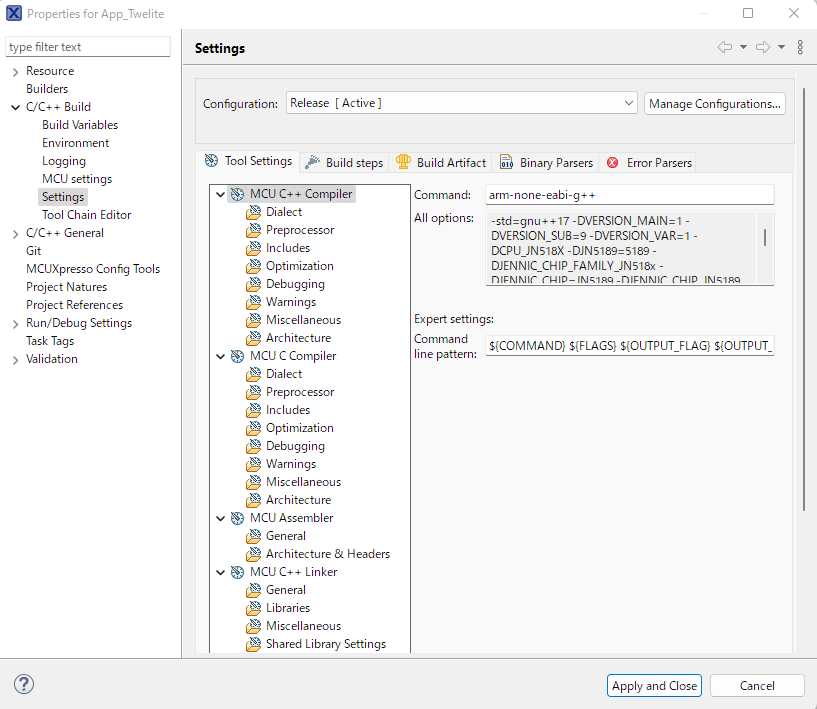
Preprocessor Definitions
Preprocessor definitions are set as follows. Be aware that the settings are separate for each configuration (Release/Debug).
[Properties..] > [C/C++ Build] > [Settings] > [MCU C++ Compiler] > [Preprocessors] (for C++ source files)
[Properties..] > [C/C++ Build] > [Settings] > [MCU C Compiler] > [Preprocessors] (for C source files)
Here is an explanation of some of the definitions:
Definition
Value
Description
VERSION_MAIN
${VERSION_MAIN}
Cites the setting value from [Build Variable]
VERSION_SUB
${VERSION_SUB}
Cites the setting value from [Build Variable]
VERSION_VAR
${VERSION_VAR}
Cites the setting value from [Build Variable]
CPU_JN518X
Set during a TWELITE GOLD (JN518x) build. Used for writing device-specific code.
TOCONET_DEBUG
0 or 1
Controls internal debug output of TWENET (enabled with 1). This setting must be the same for the application, TWENETcore, and TWENEText when building.
T_ENUM_INT
int16_t
The definition type for teEvent and teState used in TWENET (previously an enum with a 16-bit length compile option, but changed to int16_t to accommodate building on ARM and coexisting with C++).
In the build definitions written in TWENET, VERSION_MAIN, VERSION_SUB, and VERSION_VAR are defined in the Makefile and are used as preprocessor definitions with the same names in the code (e.g., -DVERSION_MAIN=1). If these definitions are not present in the code, the build will fail.
In MCUXpresso, these are defined in the Eclipse build macros under [Properties..] > [C/C++ Build] > [Build Variable] to pass the definitions to the compiler.
Because library dependencies are complex, repeated symbol search using the ld command’s --start-group and --end-group is enabled (this setting repeats the search until all dependencies are resolved, as they may remain unresolved due to the order of dependent symbols). Please refer to [Command line pattern:] under [Properties..] > [C/C++ Build] > [MCU C++ Linker] for the definition details.
Libraries to Link
The libraries to be linked are set in [Properties..] > [C/C++ Build] > [Settings] > [MCU C++ Linker] > [Libraries].
Note: The Library search path is described as "${workspace_loc:/TWENETxxx}/${ConfigName}" where ${ConfigName} is the build definition name (Release/Debug). You need to modify this if you create a new build definition.
You can also specify the placement of heap and stack regions. For memory maps, please refer to RAM Allocation (you write the definitions in build/App_User_Defs.ld in the user project folder).
Other Build Settings
[Properties..] > [C/C++ Build] has tabs for [Builder Settings], [Behavior], and [Refresh Policy], but they usually do not need to be edited.
In the [Behavior] tab, you can set the number of parallel builds. If an excessive number of CPU cores is allocated, try reducing it.
[Properties..] > [C/C++ Build] > [Settings] has [Build Steps], [Build Artifact], [Binary Parsers], and [Error Parser], but they usually do not need to be edited.
In [Build steps], the .bin binary file is generated after the linker runs.
The standard MCUXpresso definitions have been rewritten to call dk6_image.sh as shown below. No special processing has been added compared to the standard, but the purpose is to specify the Python script used in the process and to strengthen error handling.
sh '${workspace_loc:/TWENETmcu}/linker/scripts/dk6_image.sh'"${BuildArtifactFileName}""${BuildArtifactFileBaseName}" DK6_PY="\"${DK6_PY}\"" DK6_OPTS="\"${ENV_IMAGE_TOOL_OPTS}\""
9 - using debugger
using debugger
This section explains how to use debugger.
Using the Debugger
To use the debugger, you must build with MCUXpresso and connect the MCU-Link.
This section introduces how to start the debugger using MCU-Link and explains its typical operations.
For detailed information on how to use the debugger, please refer to the gdb and Eclipse manuals.
A debugger has inherent limitations on its operation and the scope of its execution. We cannot provide information on the scope or details of these limitations.
About the Debugger Screen
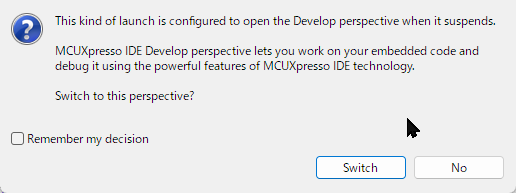
When you start the debugger, a dialog box may appear asking you to switch the MCUXpresso (Eclipse) screen layout to the Develop perspective. In this dialog box, press [Switch] to switch. If you do not want to switch, check [Remember my decision] and press the [No] button.
Dialog to change to Debug layout
Since there are efficient screen layouts depending on the work content, we recommend you get used to the operation of changing the layout. (Reference: About the Screen Layout)
The following are commonly used for screen layouts:
Breakpoints view : Located within the Debug Perspective. Alternatively, select [Window] > [Show View] > [Others…] > [Debug/Breakpoints] from the menu.
Project settings before debugging
Normally, when debugging, you select Debug in the project’s build settings. The Release build does not include debug symbols, so you cannot debug by referencing the source code.
Also, if you want to debug the code within the TWENET library, it’s smoother to debug with these projects open. (Select the TWENTExxx project from the [Project Explorer] and then right-click to select [Open Project].)
Pre-configured Breakpoints
For the first-time use, there should be no pre-configured breakpoints, so you don’t need to consider this, but we’ll mention it first as it’s a solution to a problem you might experience while using it.
If the debugger does not start as expected (it doesn’t stop at the beginning of main()), try deleting or disabling all pre-configured breakpoints before starting the debugger. The debugger may fail to start normally if there is a conflict between the current source code, the executable binary, and the breakpoints you set in the past.
Launching the debugger
The operation for rewriting the program file (.bin) and launching the debugger is not much different. For handling errors and other issues, please refer to “Writing and Running the Binary (.bin) file.”
First, build the project with the Debug configuration and ensure there are no errors.
Click the [Debug] button on the [MCUXpresso IDE - Quick Start Panel].
Debug icon
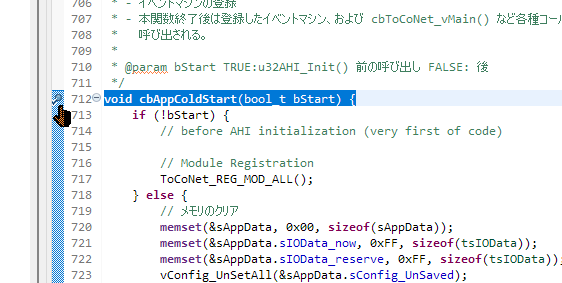
When the program writing for debugging is complete, it will break at the beginning of the main() function. (*If you have not changed the debugger settings)
Debug-main()
debugger operations
How to set a break point
Breakpoints can be set and unset in the source code editor.
Breakpoint
You can also set or unset them by selecting [Run] > [Toggle Breakpoint] from the menu in the source code editor.
In addition, you can check the list of set breakpoints in the [Breakpoints View].
Breakpoints View
Controlling Execution
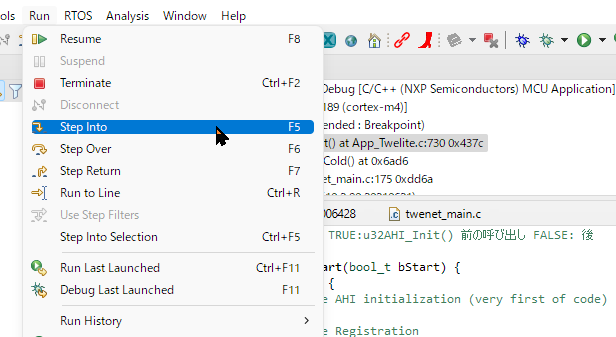
To control execution, such as stepping through the code, open the [Run] menu.
Run Menu
Execution is often controlled via keyboard shortcuts, so here is a list of frequently used keys:
Key
Action
Description
F5
Step Into
Executes step by step, including functions on that line.
F6
Step Over
Executes up to the next line.
F7
Step Return
Executes up to the return of the current function.
F8
Resume
Resumes execution (continues until the next breakpoint).
Ctrl+R
Run to Line
Executes up to the selected line.
Suspend/Terminate
To suspend the debugger, select [Run] > [Terminate] from the menu, or press Ctrl+F2.
Useful Features
You can open each View from the menu by selecting [Window] > [Show View] > [Other…].
Variables: To check local variables.
Breakpoints: List of breakpoints.
Expressions: To watch variables and check their values.
Global Variables: To watch global variables and check their values.
Heap and Stack Usage: Heap and stack status.
Memory: Dump of memory regions.
Peripherals: To check the values of peripheral registers.
Registers: To check CPU register information.
Troubleshootings
Does not respond after waking up from sleep
It is impossible in principle to debug the operation when waking up from sleep.
When debugging, it is necessary to handle it by not putting the application to sleep and instead using a running code that simulates sleep.
The debugger does not start even though it was working just before
Exit MCUXpresso and unplug and re-plug the debugger’s USB. If that doesn’t help, restart your PC and delete the .launch file.
the Debug icon is grayed out and cannot be clicked
If the Debug icon is grayed out and cannot be clicked, it’s likely because a file from the TWENETxxx library is open and that library itself is selected in the [Project Explorer]. The library itself is not a project that can be debugged directly. You should select the application’s project and then operate the [Debug] button.
nothing is displayed in the Peripherals tab
It is possible that nothing is displayed in the Peripherals tab depending on the state of MCUXpresso. This may improve by closing MCUXpresso once and restarting it.
To use SWO
This feature is not subject to support inquiries.
SWO is a mechanism for quickly retrieving information from a microcontroller and can be used to output low-cost debug messages and observe microcontroller function calls and interrupt states.
As far as we have evaluated, it is difficult to use on the JN5189 due to unstable debugger startup, so we do not actively recommend it. However, the document on About printf (Debugging, Serial Output) explains the information we are aware of, as well as the definitions and descriptions within the TWENET library.