About Building for TWELITE GOLD
Writing and Executing Binaries (.bin)
This section explains how to write and verify the execution of a .bin file after a project build has been successful.
There are two methods for writing the binary:
- Via LinkServer (using a debugger)
- Via a serial port (such as TWELITE-R) * Using the TWELITE STAGE app * Using DK6Programmer
Writing and Executing with LinkServer
The following explanation assumes the standard screen layout (C/C++ Perspective). (Reference: About the Screen Layout)
LinkServer is the standard tool used for writing and debugging NXP’s ARM products. While third-party products with similar functions exist (PEMicro probe, SEGGER J-link probe), we will use LinkServer here.
- Since writing does not use the serial port, you can experiment with UART0 connected to a terminal. (However, PIO12-13 cannot be used for debugging.)
- LinkServer connection sometimes fails, and it’s often necessary to explicitly set ISP=LO or reconnect the USB port.
- Operations are, in principle, performed from within MCUXpresso.

MCULink and connection board
*The module and conversion board in the photo are under development. They may differ slightly from the final product.
Obtaining the Boards
The following boards are required for flashing:
- MCU-Link Debug Probe (NXP)
- MW-STA-MCULink (MonoWireless)
Connecting the Boards
Connect the 10-pin headers with 1.27mm pitch on both boards using the flat cable that comes with the MCU-Link.
TWELITE GOLD requires power supply (3.3V).
- Supply power to the VCC of MW-STA-MCULink (the EXT pin on VCC SOURCE is also an option). - The voltage should be 3.3V (the MCU-Link internal voltage is 3.3V). - Note: Do not forget to connect GND. - Reference: This is not a use case intended by the MCL-Link developer, but it is possible to draw 3.3V from pin 1 of the J2 connector on the back of the MCU-Link board. Please proceed with caution after checking the MCU-Link circuit diagram, component data, voltage during power-up, and the supply capacity of the regulator. Please note that after such modifications, you will not receive any support, warranty, or compensation for damages from the developer or distributor.
- If you want to use the MCU-Link serial port, make the following connections:
- MCU-Link TX — MW-STA-MCULink’s TWELITE DIP #10 (TX) - MCU-Link RX — MW-STA-MCULink’s TWELITE DIP #3 (RX) - GND — MW-STA-MCULink’s GND pin
Check 1
After completing the wiring, check without a TWELITE DIP (TWELITE GOLD) mounted.
- Apply external power first (unnecessary if supplied from MCU-Link).
- Connect MCU-Link to the USB port.
- Check the voltage between GND (DIP #1) and VCC (DIP #28) on the MW-STA-MCULink. → Should be 3.3V.
- Disconnect MCU-Link from the USB connector and cut the external power (if used).
Check 2
Next, check with the TWELITE DIP (TWELITE GOLD) mounted.
- Mount the TWELITE DIP on the MW-STA-MCULink.
- Apply external power (if used).
- Connect MCU-Link to the USB port.
- Check the voltage between VCC and GND on the TWELITE DIP. → Should be 3.3V. → If the voltage is significantly low, it could be a wiring issue where power is not being supplied correctly, a short circuit is drawing too much current, or the TWELITE DIP is faulty. Immediately remove the USB connector and cut the power. Recheck the wiring.
Writing with LinkServer (Simultaneous with Build)
Connection errors are relatively common, so please read the troubleshooting section below before you begin.
In the [QuickStart Panel] tab, pull down the [LS] icon and select [Program flash action using LinkServer].
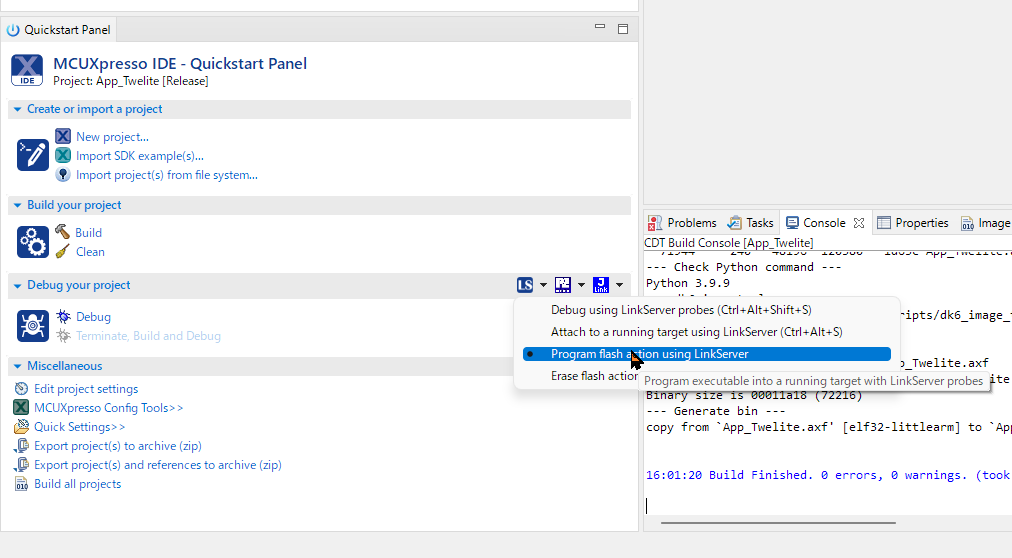
LinkServer writing menu
The first time, a list of LinkServer-compatible boards on the USB bus will be displayed. If you don’t have multiple units connected, only one will appear. Simply press the [OK] button. (The image below shows a warning ⚠ prompting for an MCU-Link firmware update. You can continue to use it as long as it can write, but please update the firmware as needed.)
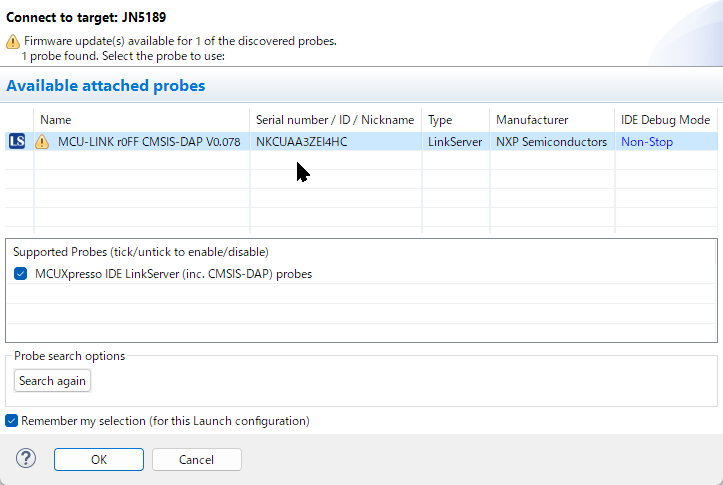
LS board discovery
Next, the project will be built and the binary will be written.

Writing complete
As shown in the example screen above, the writing status will be displayed, and finally, “Finished writing Flash successfully.” will be shown. (If there are few changes, only the differences may be written.)
1 of 1 (  0) Writing sectors 0-141 at 0x00000000 with 72248 bytes
(  0) at 00000000: 0 bytes - 0/72248
(  7) at 00001600: 5632 bytes - 5632/72248
( 15) at 00002C00: 5632 bytes - 11264/72248
( 23) at 00004200: 5632 bytes - 16896/72248
...
( 85) at 0000DC00: 5632 bytes - 61952/72248
( 93) at 0000F200: 5632 bytes - 67584/72248
(100) at 00010800: 5120 bytes - 72704/72248
...
(100) Finished writing Flash successfully.
Immediately after writing, the microcontroller will reset and the program will run.
If you have a serial terminal started before writing, you can also see the startup messages like the following:
!INF MONO WIRELESS TWELITE APP V1-09-1, SID=0x86300101, LID=0x78
!INF DIO --> 00001100000001000000
Writing with LinkServer (Pre-built .bin, .axf files)
If you want to specify and write a pre-built .bin or .axf file, select [MCUXpresso IDE LinkServer probes] from the dropdown menu of the semiconductor package-shaped icon on the toolbar.
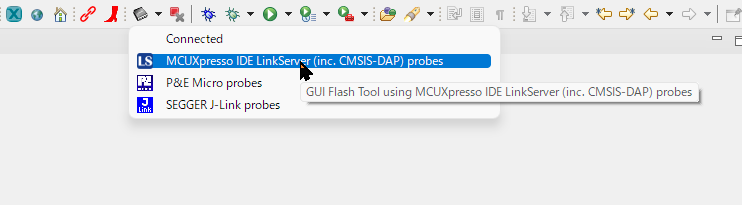
Calling from the toolbar
The following dialog will appear.

Writing dialog
In the [GUI Flash Tool] dialog, specify the following and press the [Run…] button.
- [File to program]: The
.binor.axffile you want to write. - [Format to use for programming]: The format of the file.
Troubleshooting
LinkServer Not Found
Normally, when you perform a write operation, a LinkServer-compatible board will be found for the first time as shown below, but sometimes it is not found.
LS board discovery
- Close MCUXpresso, unplug the MCU-Link USB cable, and try again.
- Although usually not necessary, you can delete the
.launchand.swdfiles in the top-level project folder to clear the previous connection state.
LinkServer Connection Error
- Press [OK] on the error dialog to retry the error.

Example error dialog
- Use a button to set PIO5=ISPENT (SMD#2, DIP#7) to a LOW (GND) level to explicitly set it to LOW when connecting to LinkServer.
- If it still doesn’t work, close MCUXpresso, unplug the MCU-Link USB cable, and try again.
Writing with a Serial Port (such as TWELITE-R)
To write using a serial port, connect a TWELITE-R (also referred to as LITE-R in the text). The hardware connection is the same as for TWELITE BLUE/RED, mainly using UART0 TXD, RXD, PGM (ISP pin), and RESET. However, since the serial communication protocol for firmware writing is different, you need compatible software for writing.
The software compatible with writing is as follows:
- TWELITE STAGE
- DKProgrammer
Writing with TWELITE STAGE
You can use TWELITE STAGE as a build and write environment. For instructions, please refer to TWELITE STAGE App.
Writing with DK6Programmer
You can use a TWELITE-R to write the binary. This method is only supported on Windows.
Existing writing utilities like TWELITE STAGE and TWE Programmer cannot be used.
Installing the DK6Programmer Utility
The writing utility is a command-line tool, and the installer is included in the SDK downloaded from NXP.
- Find the SDK directory
\tools\JN-SW-4407-DK6-Flash-Programmer. - The directory contains a
.pdfdocument and an.exeinstaller. - Run the
.exeinstaller and follow the instructions. - Note the installation location and set the PATH if necessary.
The command name is DK6Programmer.exe. The following instructions assume this command works from the command prompt.
Writing Method
With the LITE-R disconnected from the USB port, connect the TWELITE GOLD with the TWELITE DIP shape. (If you frequently connect and disconnect, consider an attachment with a ZIF socket.)
Connect the LITE-R to the USB port. At this time, check the assigned COM port (see below for how to check).
Open a command prompt in the directory where the
.binfile is located. (You can do this in MCUXpresso by right-clicking the folder you want to open and selecting[Show in Local Terminal] > [Terminal]).Run the following command:
DK6Programmer.exe -Y -V2 -P 1000000 -s COM4 -p App_Twelite.bin
- Example command execution:
   C:\Work\Wks_TWENET\App_Twelite\Release>DK6Programmer.exe -Y -V2 -P 1000000 -s COM4 -p App_Twelite.bin
     COM4: Connected at 115200
     COM4: Detected JN5189 with MAC address ...
   ...
     COM4: Programming FLASH
     COM4: 0
     COM4: Programming FLASH
     COM4: 1
   ...
     COM4: Programming FLASH
     COM4: 99
     COM4: Programming FLASH
     COM4: 100
     COM4: Memory programmed successfully
If an error message appears, start over from the beginning. In most cases, it’s due to a USB recognition issue or a poor connection between the module and the LITE-R. Unplug the LITE-R from the USB connector, re-seat the LITE-R and TWELITE DIP (GOLD), and reconnect. If the COM port does not appear, restarting Windows may solve the problem.
Reference: How to Check the COM Port
This section explains how to check the COM port assigned to the LITE-R using DK6Programmer.exe.
Disconnect the TWELITE-R.
Run
DK6Programmer.exe -l.
C:\> DK6Programmer.exe -l Available connections: COM18 <== Port is listed
Connect the TWELITE-R.
Run
DK6Programmer.exe -l. The newly displayed COM port is the LITE-R.
C:\> DK6Programmer.exe -l Available connections: COM18 COM4 <== The newly added port is the LITE-R
Reference: Example of a Writing Script Using WSL
WSL (Windows Subsystem for Linux) has some operational and performance limitations, but it can be used to run Windows utilities, such as referencing files on the Windows file system from a Linux shell or calling Windows commands.
The following is an example of a bash script for writing. If defined in .bashrc, it can simplify the input, for example, jn5189_write [BIN_FILE] [COM_PORT].
function jn5189_write ()
{
  PROG=/mnt/c/nxp/DK6ProductionFlashProgrammer/DK6Programmer.exe
  if [ -z "$2" -o ! -f "$1" ]; then
    echo "jn5189_write: [BIN_FILE] [COM_PORT]"
    echo "            e.g.) jn5189_write myfirm.bin COM3"
    $PROG -l
  else
    FILE=$1
    shift
    COM=$1
    shift
    BAUD=1000000
    $PROG -Y -V2 -P $BAUD -s $COM -p $FILE $*
  fi
}