MWings is a library for use on devices connected to a TWELITE programmed with the Parent and Repeater App (App_Wings). It interprets the format strings output by App_Wings and provides to the host device the data received by the parent device. It can also construct commands for App_Wings to control child devices.
This is the multi-page printable view of this section. Click here to print...
For suitable output, we recommend to use Google Chrome (15+) or Microsoft Edge (79+).
TWELITE WINGS API / MWings
A library for use on devices connected to the TWELITE parent device
1 - TWELITE Wings API / MWings for Python
TWELITE Wings API / MWings for Python
1.1 - TWELITE Wings API / MWings for Python
Latest Edition
By using the TWELITE Wings API (MWings), you can control TWELITE from Python scripts on your PC.
This documentation assumes the reader has knowledge and experience with Python.
Library Overview
The TWELITE Wings API (hereafter MWings) is a library for handling TWELITE from Python scripts.
Features
You can communicate with TWELITE child nodes through a TWELITE parent node connected to the host.
- Interpret received data and convert it to a dictionary, JSON, or pandas DataFrame*
- Send commands generated from dictionaries to the parent node
- The Lite version does not support pandas.
For Raspberry Pi, we recommend the Lite version instead of the standard version
- The module name is
mwingslite, notmwings - No dependencies on pandas, numpy, pyarrow, etc.
- On Raspberry Pi, these may not be installable from PyPI
- If pandas is not available, the function
to_df()for outputting DataFrames will raise an exception
- As with the standard version, dictionary and JSON string output is supported
- Required Python version is lowered to 3.11 or later (standard version requires 3.12 or later)
Write the Parent and Repeater App or Serial Communication App to the TWELITE connected to the host and set it as a parent node.
Example Use Cases
For example, you can implement systems like the following:
- Send temperature and humidity data received by MONOSTICK to a cloud server as JSON
- Record acceleration data received by MONOSTICK to a CSV or Excel file*
- Control an LED connected to TWELITE DIP via MONOSTICK from a PC
- The Lite version cannot output directly to CSV or Excel files.
Characteristics
This is a module for modern Python, by modern Python, for modern Python.
- Installable via pip or poetry
- Supports type hints
- Validates send/receive data using pydantic
- Basically conforms to PEP8*
- With exceptions. Details explained later.
Installation
Available from PyPI.
pip の場合
pip install mwings
poetry の場合
poetry add mwings
The Simplest Sample Script
In just 6 lines, you can output received data from the Extremely Simple! Standard App (App_Twelite) in JSON format.
import mwings as mw
twelite = mw.Twelite(mw.utils.ask_user_for_port())
@twelite.on(mw.common.PacketType.APP_TWELITE)
def on_app_twelite(packet):
    print(packet.to_json())
twelite.start()
The above is for explanatory purposes only. A practical script will be provided later.
Lite版の場合
Replace
import mwings as mw with import mwingslite as mw for the Lite version.Environment Setup and Operation Check
The MWings library can be installed simply using pip, but here we introduce how to build a development environment that also manages the Python interpreter and module dependencies. We will also create a sample script that displays the input state of TWELITE DIP in JSON format and check the operation of the library.
What You Need
- PC
- MONOSTICK (Parent and Repeater App / default settings)
- TWELITE DIP (Extremely Simple! Standard App / default settings)
- Connect peripherals such as switches (example: connect a tact switch between DI1 port and GND)
Environment Setup
The following is just one example. Any environment where Python 3.12 or later (3.11 or later for Lite version) is available is fine.
If you already have a preferred environment, feel free to skip ahead.
Information as of June 2024.
We take no responsibility for the use of external tools.
Also, please refrain from asking questions about external tools.
Installing pyenv
To manage the Python interpreter version, install pyenv.
For detailed steps, see the official pyenv documentation.
Linux
curl https://pyenv.run | bash
You may need to install development tools in advance
Debian-based
sudo apt update; sudo apt install build-essential libssl-dev zlib1g-dev libbz2-dev libreadline-dev libsqlite3-dev curl git libncursesw5-dev xz-utils tk-dev libxml2-dev libxmlsec1-dev libffi-dev liblzma-dev
Fedora-based
yum install gcc make patch zlib-devel bzip2 bzip2-devel readline-devel sqlite sqlite-devel openssl-devel tk-devel libffi-devel xz-devel
Reference: Home · pyenv/pyenv Wiki
macOS
brew update
brew install pyenv
Install Homebrew if necessary
/bin/bash -c "$(curl -fsSL https://raw.githubusercontent.com/Homebrew/install/HEAD/install.sh)"
You may need to install development tools in advance
Windows
There is no pyenv for Windows. Instead, use pyenv-win.
Alternatively, you can use Windows Subsystem for Linux.
For detailed steps, see the official pyenv-win documentation.
Invoke-WebRequest -UseBasicParsing -Uri "https://raw.githubusercontent.com/pyenv-win/pyenv-win/master/pyenv-win/install-pyenv-win.ps1" -OutFile "./install-pyenv-win.ps1"; &"./install-pyenv-win.ps1"
Installing Python with pyenv / pyenv-win
Install Python 3.12 or later (3.11 or later for Lite version), as required by MWings.
To list available versions, run:
pyenv install -l
For example, to install Python 3.12.4 and apply it system-wide:
pyenv install 3.12.4
pyenv global 3.12.4
To list installed versions, run:
pyenv versions
Installing pipx
To manage command-line tools such as poetry in an isolated environment, install pipx.
Linux
Debian-based
sudo apt update
sudo apt install pipx
pipx ensurepath
From pip (recommended for Raspberry Pi)
python3 -m pip install --user pipx
python3 -m pipx ensurepath
Fedora-based
sudo dnf install pipx
pipx ensurepath
Reference: Installation - pipx
macOS
brew install pipx
pipx ensurepath
Windows
scoop install pipx
pipx ensurepath
Install Scoop if necessary
Set-ExecutionPolicy -ExecutionPolicy RemoteSigned -Scope CurrentUser
Invoke-RestMethod -Uri https://get.scoop.sh | Invoke-Expression
Installing poetry
To manage the Python interpreter version and module dependencies for your project (similar to Node.js), install poetry.
pipx install poetry
If you get an error
If you get an error such as TypeError: __init__() got an unexpected keyword argument 'encoding', try installing pipx with pip instead of a package manager.
python3 -m pip install --user pipx
python3 -m pipx ensurepath
Creating a Project
Here, we will use mwtest as the project name.
Move to the directory where you want to create the project and run:
poetry new mwtest
For details, see the official poetry documentation.
This will generate the mwtest directory.
Project Setup
Move into the project directory and link it to the Python version you installed earlier with pyenv.
poetry env use 3.12.4
Install MWings.
poetry add mwings
If unresponsive on Linux
Try setting the following environment variable:
export PYTHON_KEYRING_BACKEND=keyring.backends.null.Keyring
For poetry commands, see the official documentation.
Creating the Simplest Sample Script
First, let’s try running the script introduced earlier.
import mwings as mw
twelite = mw.Twelite(mw.utils.ask_user_for_port())
@twelite.on(mw.common.PacketType.APP_TWELITE)
def on_app_twelite(packet):
    print(packet.to_json())
twelite.start()
Lite版の場合
Raspberry Pi のserial0を使う例を次に示します。
import mwingslite as mw
twelite = mw.Twelite("/dev/ttyS0")
@twelite.on(mw.common.PacketType.APP_TWELITE)
def on_app_twelite(packet):
    print(packet.to_json())
twelite.start()
なお pyserial の制約により、
mw.utils.ask_user_for_port()は/dev/ttyS0を検知できません。
上記の内容で poetry が生成した __init__.py と同じ階層に simple.py を作成します。
📁 mwtest
└ 📁 mwtest
  ├ 📄 __init__.py
  └ 📄 simple.py
Running the Simplest Sample Script
Connect MONOSTICK and run:
poetry run python simple.py
If there are multiple serial ports, please select the serial port.
If you get output in JSON string format, you have succeeded. An example of actual output is shown below.
{
  "time_parsed": "2024-02-20T03:16:50.150386+00:00",
  "packet_type": "APP_TWELITE",
  "sequence_number": 13699,
  "source_serial_id": "810E0E23",
  "source_logical_id": 120,
  "lqi": 84,
  "supply_voltage": 3249,
  "destination_logical_id": 0,
  "relay_count": 0,
  "periodic": true,
  "di_changed": [
    true,
    true,
    false,
    false
  ],
  "di_state": [
    false,
    false,
    false,
    false
  ],
  "ai_voltage": [
    8,
    272,
    1032,
    112
  ],
  "mwings_implementation": "python",
  "mwings_version": "1.0.0",
  "hostname": "silverstone.local",
  "system_type": "Darwin"
}
Contents of the JSON string
mwings.parsers.app_twelite.ParsedPacket
| Key | Value |
|---|---|
time_parsed | Reception time (default UTC, ISO8601 format) |
packet_type | Packet type |
sequence_number | Sequence number (time for App_Twelite) |
source_serial_id | Sender serial ID |
source_logical_id | Sender logical device ID |
lqi | Radio communication quality (8bit) |
supply_voltage | Supply voltage (mV) |
destination_logical_id | Destination logical device ID |
relay_count | Relay count |
periodic | Whether this is a periodic transmission |
di_changed | Whether each digital interface input changed |
di_state | State of each digital interface input |
ai_voltage | Input voltage of each analog interface |
mwings_implementation | MWings implementation (for future info) |
mwings_version | MWings version |
hostname | Name of the receiving host |
system_type | Type of system of the receiving host |
Creating a Practical Script
simple.py is just an explanatory sample. It is not a practical script.
This is because twelite.start() creates a thread to receive data, but does not provide a way to terminate it. It is also a very hard-to-read script.
Next, let’s create a more practical script. After running it, we will explain its contents.
This time, we will set the following three conditions:
- Make it possible to properly terminate the thread with
Ctrl+C - Conform to PEP8 (with some exceptions, details explained later)
- Introduce type hints
Below is an example applying these points.
# -*- coding:utf-8 -*-
# Written for Python 3.12
# Formatted with Black

# MWings example: Receive data, print JSON, typed

from zoneinfo import ZoneInfo

import mwings as mw


# Main function
def main() -> None:
    # Create a twelite object
    twelite = mw.Twelite(mw.utils.ask_user_for_port())

    # Use JST for received data
    twelite.set_timezone(ZoneInfo("Asia/Tokyo"))

    # Register an event handler
    @twelite.on(mw.common.PacketType.APP_TWELITE)
    def on_app_twelite(packet: mw.parsers.app_twelite.ParsedPacket) -> None:
        print(packet.to_json(verbose=True, spread=False))

    # Start receiving
    try:
        # Set as daemon thread
        twelite.daemon = True
        # Start the thread, Join to the main thread
        twelite.start()
        print("Started receiving")
        while True:
            twelite.join(0.5)
    except KeyboardInterrupt:
        # Stop the thread
        print("Flushing...")
        twelite.stop()
        print("Completed")


if __name__ == "__main__":
    # Call the main function
    main()
For the Lite version
At the beginning, change
import mwings as mw to import mwingslite as mw.Please save the above as practical.py.
📁 mwtest
└ 📁 mwtest
  ├ 📄 __init__.py
  ├ 📄 simple.py
  └ 📄 practical.py
Running the Practical Script
Run the following command to get output in JSON format, just like with simple.py.
poetry run python practical.py
However, this time you can exit with Ctrl+C without causing an error, and time_parsed should be in Japan Standard Time.
Explanation of the Practical Script
Code Explanation
Let’s explain practical.py.
import Statements
In practical.py, two modules are imported:
from zoneinfo import ZoneInfo

import mwings as mw
zoneinfo.ZoneInfois used to specify the time zone for the received timestamp.mwingsis the MWings library. It is imported asmwfor brevity. For the Lite version, usemwingslite.
Creating the Object
The mw.Twelite object serves as the interface to access the TWELITE parent node connected to the host.
    # Create a twelite object
    twelite = mw.Twelite(mw.utils.ask_user_for_port())
The mw.utils.ask_user_for_port() function gets a list of available serial ports on the host and returns the file descriptor path or COM port name selected by the user.
How to explicitly specify a serial port
Pass the file descriptor path or COM port name directly to the mw.Twelite constructor.
    # Linux
    twelite = mw.Twelite("/dev/ttyUSBx")
    # macOS
    twelite = mw.Twelite("/dev/cu.usbserial-MWxxxxxx")
    # Windows
    twelite = mw.Twelite("COMx")
If not using a serial port
For purposes such as interpreting a log file, specify None.
twelite = mw.Twelite(port=None)
Setting the Time Zone
By default, the reception time of data is treated as UTC.
In practical.py, this is set to JST.
    # Use JST for received data
    twelite.set_timezone(ZoneInfo("Asia/Tokyo"))
Pass an IANA time zone identifier to ZoneInfo.
Registering a Receive Handler
To process data sent from TWELITE child nodes, register a receive handler. Here, in the receive handler for the Extremely Simple! Standard App, the received data is converted to JSON format and output.
    # Register an event handler
    @twelite.on(mw.common.PacketType.APP_TWELITE)
    def on_app_twelite(packet: mw.parsers.app_twelite.ParsedPacket) -> None:
        print(packet.to_json(verbose=True, spread=False))
You can register a receive handler by applying the twelite.on() decorator ? to any function.
The receive handler must be defined in the same scope after initializing the
mw.Twelite object (in main() in practical.py). By restricting where the handler is defined, this encourages avoiding unnecessary pollution of the global namespace.Specifying packet types in receive handlers
The content of the data received by the handler is based on data classes defined according to the packet type.
Extremely Simple! Standard App
@twelite.on(mw.common.PacketType.APP_TWELITE)
def foobar(packet: mw.parsers.app_twelite.ParsedPacket):
    # handle packets
Remote App
@twelite.on(mw.common.PacketType.APP_IO)
def foobar(packet: mw.parsers.app_io.ParsedPacket):
    # handle packets
ARIA (Normal)
@twelite.on(mw.common.PacketType.APP_ARIA)
def foobar(packet: mw.parsers.app_aria.ParsedPacket):
    # handle packets
CUE App (Normal)
@twelite.on(mw.common.PacketType.APP_CUE)
def foobar(packet: mw.parsers.app_cue.ParsedPacket):
    # handle packets
CUE App (PAL Move / Dice)
@twelite.on(mw.common.PacketType.APP_CUE_PAL_EVENT)
def foobar(packet: mw.parsers.app_cue_pal_event.ParsedPacket):
    # handle packets
PAL Motion / CUE App (PAL Continuous)
@twelite.on(mw.common.PacketType.APP_PAL_MOT)
def foobar(packet: mw.parsers.app_pal_mot.ParsedPacket):
    # handle packets
Environment PAL
@twelite.on(mw.common.PacketType.APP_PAL_AMB)
def foobar(packet: mw.parsers.app_pal_amb.ParsedPacket):
    # handle packets
Open/Close PAL / ARIA & CUE App (Open/Close PAL)
@twelite.on(mw.common.PacketType.APP_PAL_OPENCLOSE)
def foobar(packet: mw.parsers.app_pal_openclose.ParsedPacket):
    # handle packets
Serial Communication (Format A, Simple)
@twelite.on(mw.common.PacketType.APP_UART_ASCII)
def foobar(packet: mw.parsers.app_uart_ascii.ParsedPacket):
    # handle packets
Serial Communication (Format A, Extended)
@twelite.on(mw.common.PacketType.APP_UART_ASCII_EXTENDED)
def foobar(packet: mw.parsers.app_uart_ascii_extended.ParsedPacket):
    # handle packets
ACT
@twelite.on(mw.common.PacketType.ACT)
def foobar(packet: mw.parsers.act.ParsedPacket):
    # handle packets
The data class ParsedPacket received by the handler has methods such as to_json() to convert to a JSON string, to_dict() to convert to a dictionary, and to_df() to convert to a pandas DataFrame.
Here, the to_json() method is used to convert to a JSON string.
print(packet.to_json(verbose=True, spread=False))
About optional arguments
If the verbose option is set to False, system information such as system_type will not be output. If the spread option is set to True, List-like elements such as di_state (of type mw.common.CrossSectional[T]) will be expanded and output as individual fields. However, time series data such as acceleration samples (of type mw.common.TimeSeries[T]) are not expanded.
Note that the spread option does not exist for to_df(). Non-time-series List-like data are always expanded into separate columns, and time-series data are expanded into separate rows.
Starting and Stopping Reception
mw.Twelite inherits from threading.Thread.
In practical.py, twelite.start() starts the receive process in a separate thread, and twelite.stop() stops it.
    # Start receiving
    try:
        # Set as daemon thread
        twelite.daemon = True
        # Start the thread, Join to the main thread
        twelite.start()
        print("Started receiving")
        while True:
            twelite.join(0.5)
    except KeyboardInterrupt:
        # Stop the thread
        print("Flushing...")
        twelite.stop()
        print("Completed")
Setting twelite.daemon to True makes the receiving subthread a daemon. When all non-daemon threads have exited, the whole Python program will also exit. Here, the main thread is kept waiting by repeatedly calling twelite.join().
For more about thread-related features inherited from
threading.Thread, see the official Python documentation.When the main thread detects Ctrl+C input, it calls twelite.stop() in the except block to stop the receive process. twelite.stop() waits until the subthread finishes calling the receive handler.
Note about join()
If you do not use a while loop as above, Ctrl+C may not be accepted on Windows.
    try:
        ...
        twelite.join()
    except KeyboardInterrupt:
        ...
Supplementary Explanation
PEP8 Compliance
practical.py and the MWings source code are formatted using the Black code formatter, which is compatible with PEP8.
Strictly speaking, it is not fully PEP8 compliant
There are at least two violations:
- PEP8 specifies a maximum line length of 79 characters, but Black’s default is 88 characters. This is to avoid lowering code quality by shortening variable names just to fit lines. Reference: PyCon2015 talk
- PEP8 suggests avoiding encoding declarations, but the encoding declaration is intentionally included. In Japanese environments, there is a higher risk of non-UTF-8 files mixing in than in English environments; also, MWings is developed using Emacs, which uses encoding declarations. Black does not detect this, perhaps because it is “should not have”.
- PEP8 also contains other recommendations open to debate, such as discouraging
len()for checking non-empty sequences (thanks to James Powell for his insights at PyCon JP 2024).
Except for the maximum line length, Black does not accept any configuration, making it a stubborn formatter, but it saves the trouble of formulating and sharing coding standards. Coding rules are often contentious, but spending resources on such trivial matters rather than on productive work goes against the Python spirit.
To add Black to your project, run:
poetry add --group dev black
Specifying the
dev group indicates it is a development dependency, similar to devDependencies in Node.js.You can run it on specific files or directories:
poetry run black mwtest
You can also check without formatting:
poetry run black --check mwtest
Type Hint Support
practical.py and the MWings source code support type hints.
What are type hints?
Type hints were introduced in Python 3.5. Type annotations in dynamically typed Python have no effect at runtime, but static type checkers can use them to improve code quality and reliability.
Libraries that do not support type hints will cause errors with static type checkers. The previous PAL Script did not support type hints.
The MWings library uses mypy, the official static type checker for Python.
To add mypy to your project, run:
poetry add --group dev mypy
Like Black, you can specify files or directories to check:
poetry run mypy mwtest
Related Information
Practical Script Applications
We provide scripts that further develop practical.py.
mwings_python/examples at main
log_export.py
Reads a text file containing output from the parent node, interprets it, saves the results as a pandas DataFrame, and finally outputs to a CSV or Excel file. Not supported in the Lite version.
Can be used as a command-line tool
poetry run python log_export.py -h
usage: log_export.py [-h] [-x] [-v] [-s] INPUT_FILE

Parse a log file for App_Wings

positional arguments:
  INPUT_FILE     text file contains logs from App_Wings

options:
  -h, --help     show this help message and exit
  -x, --excel    export an Excel file instead of CSV
  -v, --verbose  include system information
  -s, --sort     sort columns in the output
rx_export.py
Receives output from the connected parent node, interprets the results, saves them as a pandas DataFrame, and finally outputs to a CSV or Excel file. Not supported in the Lite version.
- If you select a CSV file, all results are saved in a single file.
- If you select an Excel file instead, the results are saved in separate sheets by packet type.
Can be used as a command-line tool
poetry run python rx_export.py -h
usage: rx_export.py [-h] [-x] [-v] [-s]

Log packets from App_Wings to csv or excel

options:
  -h, --help     show this help message and exit
  -x, --excel    export an Excel file instead of CSV
  -v, --verbose  include system information
  -s, --sort     sort columns in the output
rx_export.py saves all received data to a pandas DataFrame at once, so it is not suitable for long-term logging. However, it supports Excel file output.rx_export_csv_durable.py
Receives output from the connected parent node, interprets the results, and appends them to CSV files by source serial ID. Not supported in the Lite version.
Can be used as a command-line tool
poetry run python rx_export_csv_durable.py -h
usage: rx_export_csv_durable.py [-h] [-v] [-s]

Log packets from App_Wings to csv, line by line

options:
  -h, --help     show this help message and exit
  -v, --verbose  include system information
  -s, --sort     sort columns in the output
rx_export_csv_durable.py opens the CSV file and appends data each time it is received. Unlike rx_export.py, it does not support Excel file output, but it is suitable for long-term logging.rx_print_df.py
Receives output from the connected parent node, simply converts the interpreted results to a pandas DataFrame, and outputs them as a string. Not supported in the Lite version.
rx_print_dict.py
Receives output from the connected parent node, simply converts the interpreted results to a dictionary, and outputs them. Also supported in the Lite version.
rx_print_json.py
Receives output from the connected parent node, simply converts the interpreted results to a JSON string, and outputs them. Also supported in the Lite version.
tx_binary_uart.py
Sends binary data [0xBE, 0xEF] to TWELITE UART via the connected parent node running the Serial Communication App. Also supported in the Lite version.
tx_blink_dip_led.py
Blinks the LED connected to the DO1 port of TWELITE DIP via the connected Parent and Repeater App parent node. Also supported in the Lite version.
tx_blink_pal_notice.py
Turns on the LED of the Notification PAL in each color via the connected Parent and Repeater App parent node. Also supported in the Lite version.
This command makes the LED blink for 3 seconds every 8 seconds. Please set the Notification PAL’s inquiry interval (transmission interval) to a short value, such as 2 seconds. By default, it updates only once every 60 seconds.
API Reference
2 - TWELITE Wings API / MWings for 32-bit Arduinos
TWELITE Wings API / MWings for 32-bit Arduino boards
2.1 - TWELITE Wings API / MWings for 32-bit Arduinos
Latest Edition
2.1.1 - Using with TWELITE SPOT
How to use with the ESP32 on TWELITE SPOT
TWELITE SPOT Start Guide: See Receiving Data from TWELITE Child Devices.
2.1.2 - Using with Arduino UNO R4
How to use with the Arduino UNO R4 series
This guide explains how to connect TWELITE parent devices such as TWELITE UART or TWELITE DIP to the Arduino UNO R4 series and communicate with child devices using the MWings library.
Hardware Preparation
Preparing TWELITE
Write the Parent and Repeater App (App_Wings) to products such as TWELITE UART and TWELITE DIP.
Use the TWELITE STAGE APP for writing.
As of December 2023, the latest App_Wings (v1.3.0+) that supports setting Application ID via serial communication is not included in the TWELITE STAGE SDK (it will be added in the next release).
Please download the following files first, then write the firmware.
- For TWELITE BLUE: App_Wings_BLUE_L1305_V1-3-2.bin
- For TWELITE RED: App_Wings_RED_L1305_V1-3-2.bin
If you do not configure the Application ID via serial communication, you can use the conventional Parent and Repeater App.
Connection with Arduino UNO R4
Use the following TWELITE pins:
- VCC (connect to 3.3V)
- GND (connect to GND)
- TXD (connect to D0/RX)
- RXD (connect to D1/TX)
- RST (connect to any port such as D11)
- PRG (connect to any port such as D12)
Arduino UNO R4 I/O ports operate at 5V logic level, but TWELITE uses 3.3V logic level, so level shifting is required.
It is recommended to connect the RST and PRG pins to reset TWELITE during Arduino startup.
Below is an example wiring diagram based on the sample sketch included with the library.
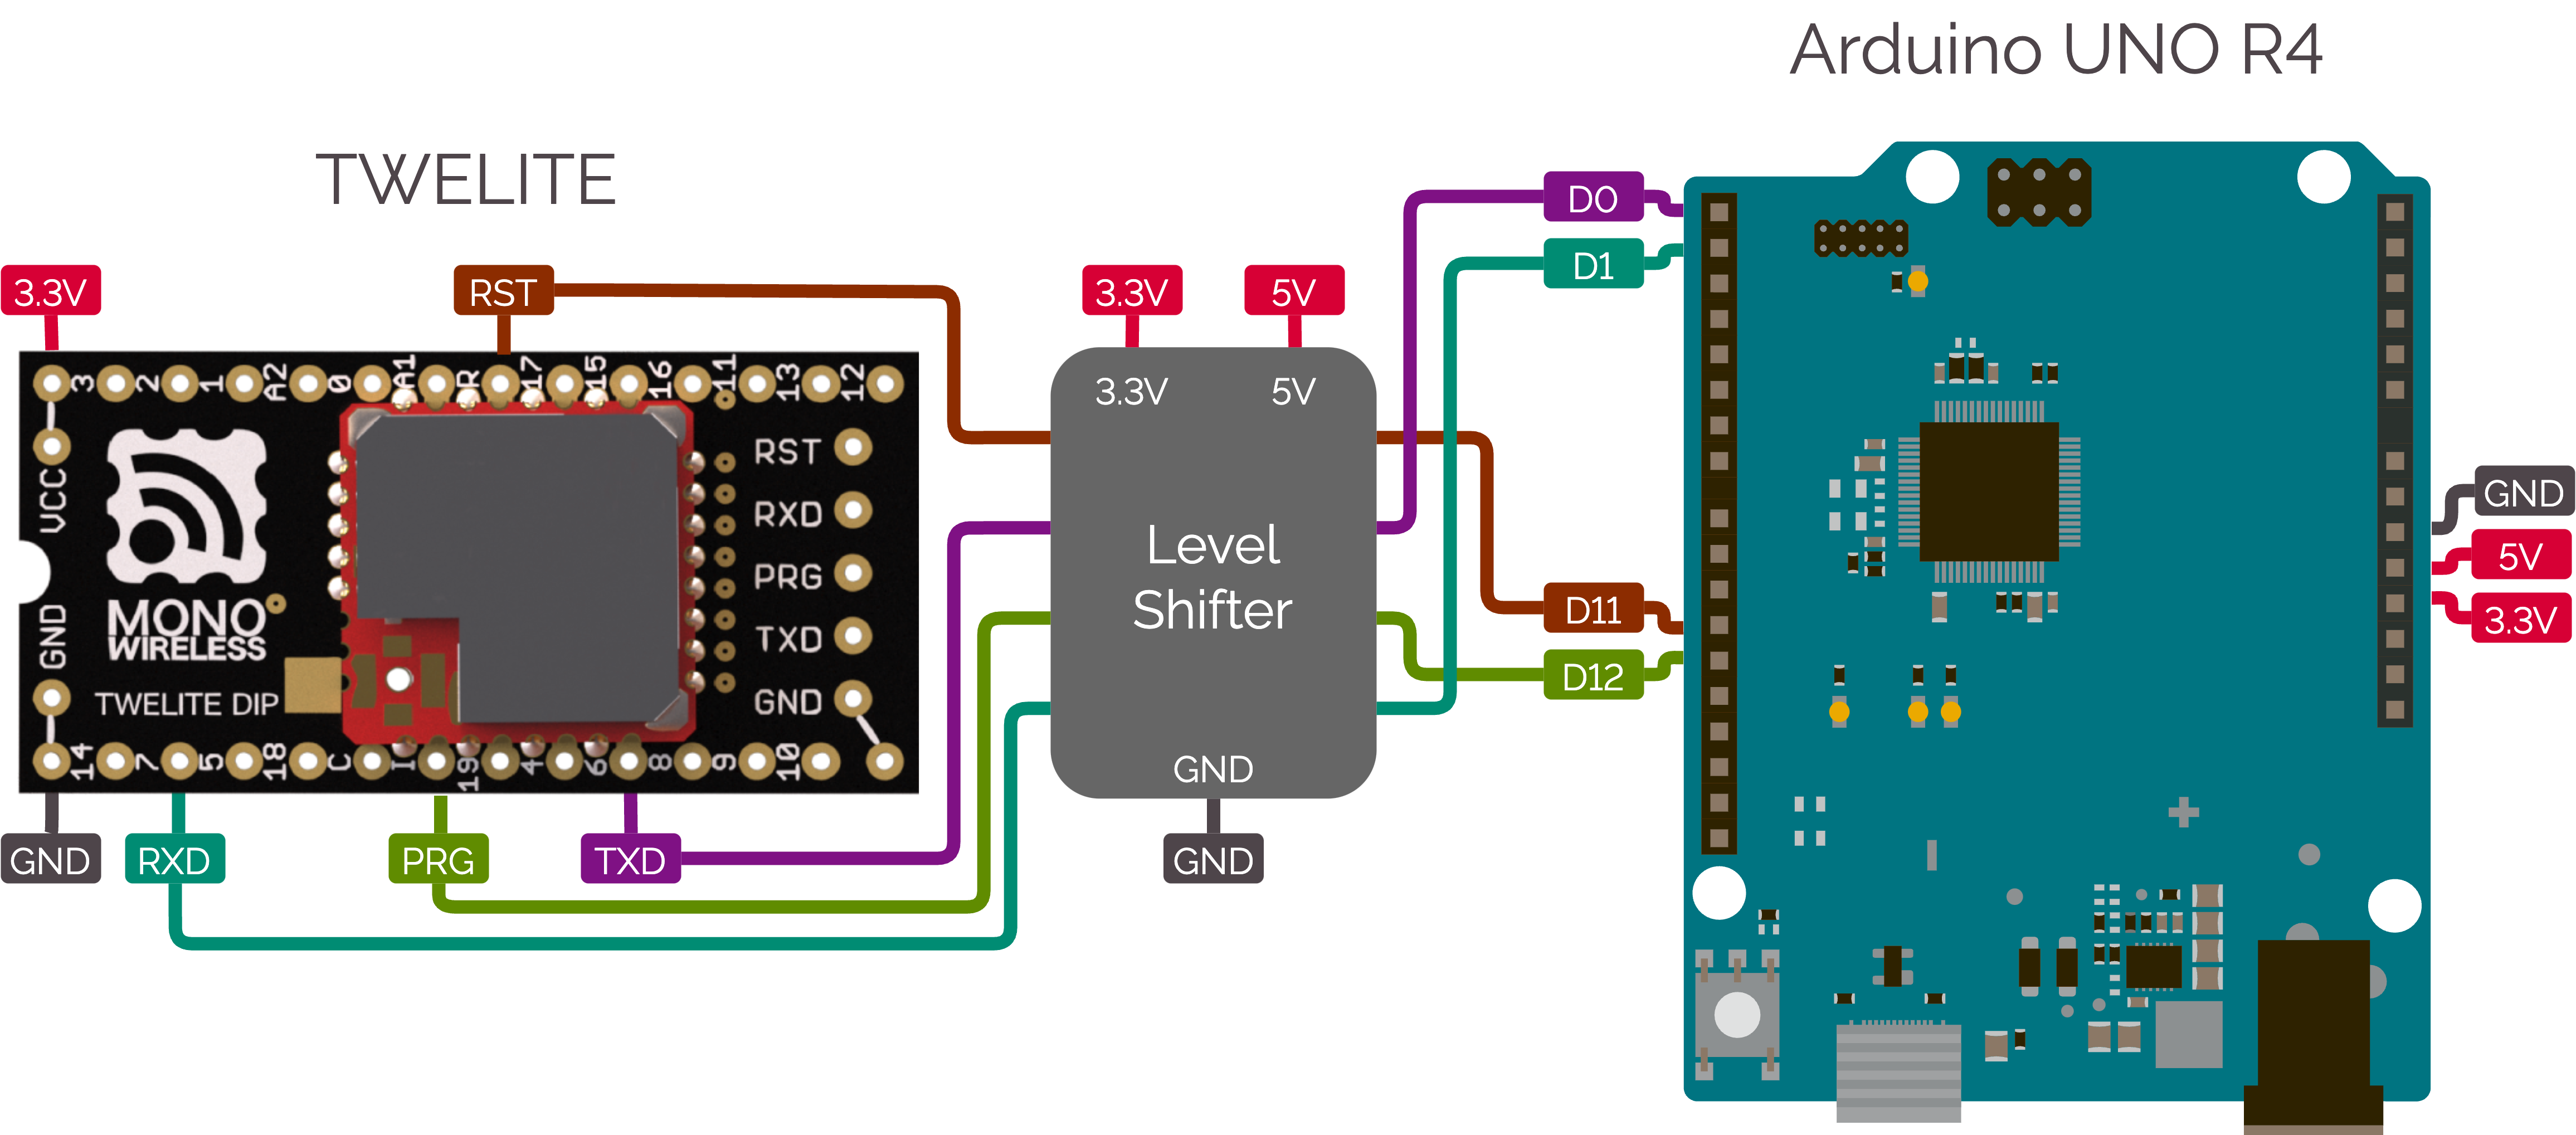
Example connection with Arduino
If you use shields with SPI connections such as the Arduino Ethernet Shield 2 which use pins D10-13, please assign other pins.
Software Preparation
Installing the Library
You can install it via the Arduino Library Manager.
Refer to the TWELITE SPOT manual: Installing the MWings Library.
Verifying the Sample Sketch Operation
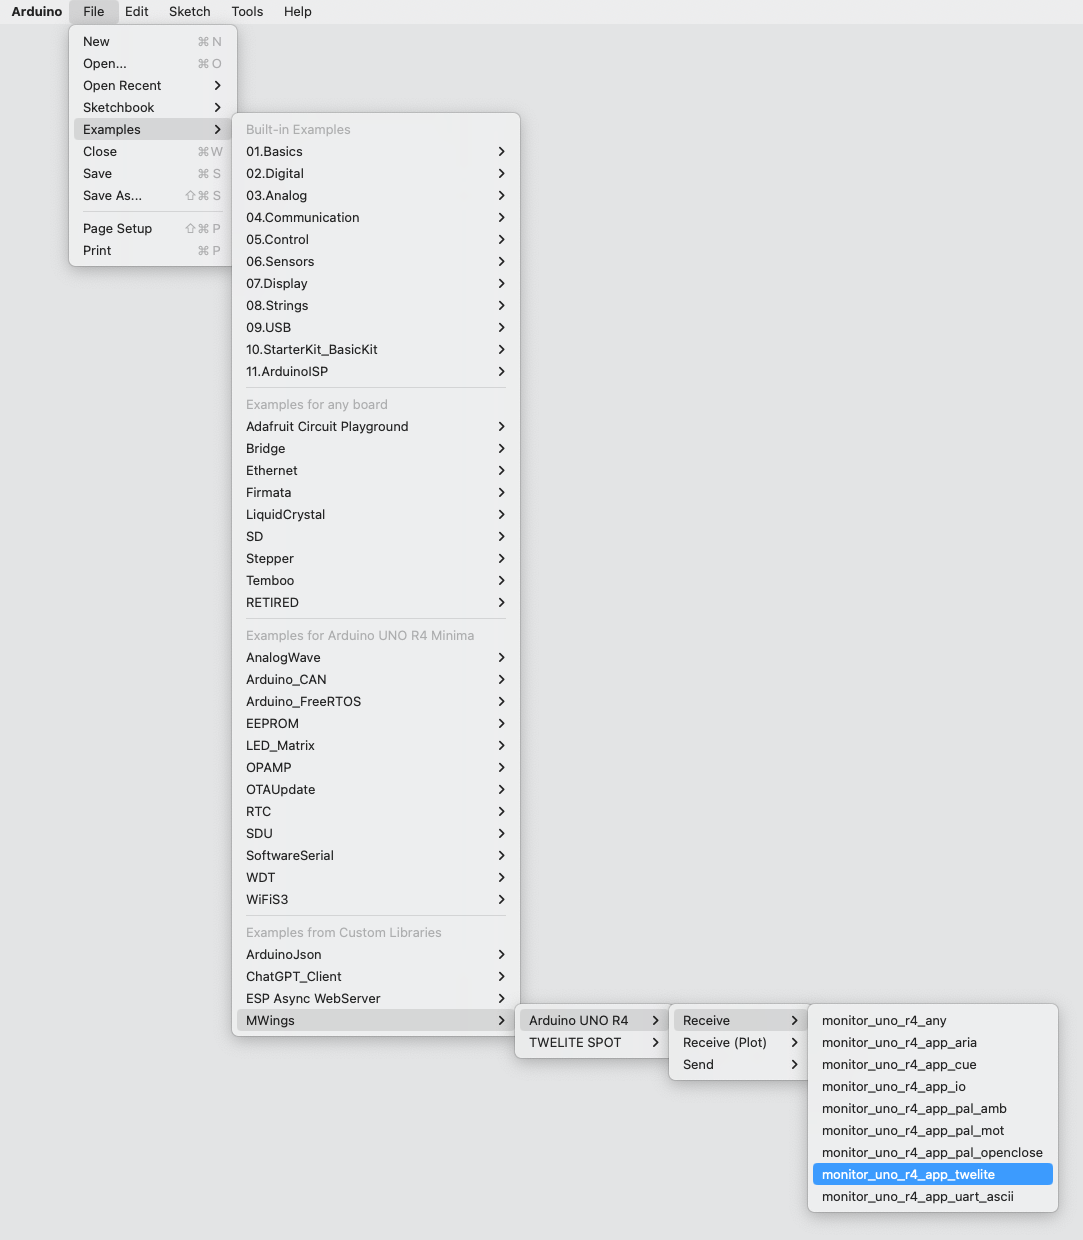
The library includes simple sample sketches for communicating with each TWELITE device.
For example, to receive data from the Extremely Simple! Standard App (App_Twelite), open the following sample sketch from the menu bar:
File > Examples > MWings > Arduino UNO R4 > Receive > monitor_uno_r4_app_twelite
Example display
monitor_uno_r4_app_twelite.ino
// Monitor example for TWELITE with Arduino UNO R4: Receive data from App_Twelite

#include <Arduino.h>
#include "MWings.h"

const int RST_PIN = D11;
const int PRG_PIN = D12;
const int LED_PIN = D13;        // Use on-board LED as indicator

const uint8_t TWE_CHANNEL = 18;
const uint32_t TWE_APP_ID = 0x67720102;

void setup()
{
    // Initialize serial ports
    while (!Serial && millis() < 5000); // Wait for internal USB-UART
    Serial.begin(115200);
    Serial.println("Monitor example for TWELITE with Arduino UNO R4: App_Twelite");
    Serial1.begin(115200);

    // Initialize TWELITE
    if (Twelite.begin(Serial1,
                      LED_PIN, RST_PIN, PRG_PIN,
                      TWE_CHANNEL, TWE_APP_ID)) {
        Serial.println("Successfully initialized TWELITE");
    } else {
        Serial.println("Failed to initialize TWELITE");
    }

    // Attach an event handler to process packets from App_Twelite
    Twelite.on([](const ParsedAppTwelitePacket& packet) {
        Serial.println("");
        Serial.print("Packet Timestamp:  ");
        Serial.print(packet.u16SequenceNumber / 64.0f, 1); Serial.println(" sec");
        Serial.print("Source Logical ID: 0x");
        Serial.println(packet.u8SourceLogicalId, HEX);
        Serial.print("LQI:               ");
        Serial.println(packet.u8Lqi, DEC);
        Serial.print("Supply Voltage:    ");
        Serial.print(packet.u16SupplyVoltage, DEC); Serial.println(" mV");
        Serial.print("Digital Input:    ");
        Serial.print(packet.bDiState[0] ? " DI1:Lo" : " DI1:Hi");
        Serial.print(packet.bDiState[1] ? " DI2:Lo" : " DI2:Hi");
        Serial.print(packet.bDiState[2] ? " DI3:Lo" : " DI3:Hi");
        Serial.println(packet.bDiState[3] ? " DI4:Lo" : " DI4:Hi");
        Serial.print("Analog Input:     ");
        Serial.print(" AI1:"); Serial.print(packet.u16AiVoltage[0]); Serial.print(" mV");
        Serial.print(" AI2:"); Serial.print(packet.u16AiVoltage[1]); Serial.print(" mV");
        Serial.print(" AI3:"); Serial.print(packet.u16AiVoltage[2]); Serial.print(" mV");
        Serial.print(" AI4:"); Serial.print(packet.u16AiVoltage[3]); Serial.println(" mV");
    });
}

void loop()
{
    // Update TWELITE
    Twelite.update();
}

/*
 * Copyright (C) 2023 Mono Wireless Inc. All Rights Reserved.
 * Released under MW-OSSLA-1J,1E (MONO WIRELESS OPEN SOURCE SOFTWARE LICENSE AGREEMENT).
 */
For details of the sketch, please refer to the TWELITE SPOT sketch explanations. Most of the content is common.
The following are specific to Arduino UNO R4.
Port Settings
Lines 6-8 configure Arduino ports excluding UART-related pins.
const int RST_PIN = D11;
const int PRG_PIN = D12;
const int LED_PIN = D13;        // Use on-board LED as indicator
| Pin | Role | Notes |
|---|---|---|
| D11 | TWELITE RST control | See the connection example above |
| D12 | TWELITE PRG control | See the connection example above |
| D13 | Communication indicator LED control | Uses built-in LED |
Waiting for USB Serial Port Initialization
Line 16 waits for the USB serial port (Serial) to initialize.
while (!Serial && millis() < 5000); // Wait for internal USB-UART
Arduino UNO R4 does not have a USB-serial converter IC like UNO R3; the ARM CPU itself handles USB serial conversion. Therefore, communication cannot occur before the serial port initialization completes.
Related Information
- MWings Library API Reference
- TWELITE SPOT Start Guide Sketch Explanation (most content is common)
- TWELITE SPOT Manual Partial Sketch Explanation (most content is common)
2.1.3 - Extending Packet Parsers
How to add packet parsers
In the MWings library, you can easily add packet parsers.
Here, as an example, we cover the process of adding a parser for the analog sensor of the wireless tag app (App_Tag).
Overview
To add a parser, you need to edit the following four files:
- (New) Parser header file
parser/FooBarPacketParser.h- Write the contents of the packet to be parsed and the criteria for a valid packet
- (New) Parser source file
parser/FooBarPacketParser.cpp- Write the part that interprets the packet contents
- (Append) Main header file
MWings.h- Add the parser
- (Append) Main source file
MWings.cpp- Add the parser
You can obtain the source files from GitHub.
Typically, place them in the libraries/ directory inside your Arduino home directory.
You can view the actual commit diffs on GitHub.
Added App_Tag (ADC) packet parser · monowireless/mwings_arduino@aa5ecdb
Parser Header File
Duplicate an existing file under parser/ and rename it.
Here, we create parser/AppTagAdcPacketParser.h.
#ifndef APPTAGADCPACKETPARSER_H
#define APPTAGADCPACKETPARSER_H

#include "MWings_Common.h"

/**
 * @struct ParsedAppTagAdcPacket
 * @brief  Packet content for App_Tag (ADC)
 */
struct ParsedAppTagAdcPacket final : public mwings::ParsedPacketBase {
    uint32_t u32RouterSerialId;
    uint8_t u8SensorType;
    uint16_t u16AiVoltage[2];
};

/**
 * @class apptagadc::PacketParser
 * @brief  Packet parser for App_Tag (ADC)
 */
namespace apptagadc {
class PacketParser final : public mwings::PacketParserBase {
public:
    // Check if the packet is from App_Tag (ADC)
    inline bool isValid(const BarePacket& barePacket) const override {
        if ((barePacket.u8At(12) == 0x10)
            and (barePacket.u32At(18) == 0)
            and (barePacket.u16PayloadSize == 22)) {
            return true;
        }
        return false;
    }

    // Parse from bare packet
    bool parse(const BarePacket& barePacket, mwings::ParsedPacketBase* const parsedPacket) const override;
};
}

extern apptagadc::PacketParser AppTagAdcPacketParser;

#endif  // APPTAGADCPACKETPARSER_H
Describing the Packet Contents to be Parsed
First, please check the App_Tag (Analog Sensor) output format.
Example output data
:80000000B700628201015A0010DF08FD09A300000000E9
| # | Data | Description | Value | |
|---|---|---|---|---|
: | char | Header | : | |
80000000 | 0 | uint32 | Router serial ID | No router |
B7 | 4 | uint8 | LQI | 183/255 |
0062 | 5 | uint16 | Sequence number | 98 |
8201015A | 7 | uint32 | Source serial ID | 0x201015A |
00 | 11 | uint8 | Source logical ID | 0x00 |
10 | 12 | uint8 | Sensor type | Analog sensor |
DF | 13 | uint8 | Supply voltage (mV) | 3330mV |
08FD | 14 | uint16 | ADC1 voltage | 2301mV |
09A3 | 16 | uint16 | ADC2 voltage | 2467mV |
00000000 | 18 | uint32 | Unused | |
E9 | 22 | uint8 | Checksum | 0xE9 |
char | Footer | \r | ||
char | Footer | \n |
After replacing the include guard, namespace, and comments, inherit from mwings::ParsedPacketBase and describe the packet contents.
Here, declare data unique to the target device. General data such as the destination logical device ID is already registered in mwings::ParsedPacketBase.
Items in mwings::ParsedPacketBase
| Type | Name | Description |
|---|---|---|
uint32_t | u32SourceSerialId | Source serial ID |
uint8_t | u8SourceLogicalId | Source logical device ID |
uint16_t | u16SequenceNumber | Sequence number |
uint8_t | u8Lqi | LQI |
uint16_t | u16SupplyVoltage | Supply voltage (mV) |
It’s fine to have unused fields such as supply voltage.
In the following section, unique data for App_Tag (Analog Sensor) is declared.
struct ParsedAppTagAdcPacket final : public mwings::ParsedPacketBase {
    uint32_t u32RouterSerialId;
    uint8_t u8SensorType;
    uint16_t u16AiVoltage[2];
};
Writing the Criteria for a Valid Packet
Create apptagadc::PacketParser inheriting from mwings::PacketParserBase and override the pure virtual function isValid() to specify the criteria for a valid packet.
Packets matching this condition will be parsed.
In the following, it checks that the sensor type is 0x10 (analog sensor), the unused area is 0, and the payload length is 22 bytes.
inline bool isValid(const BarePacket& barePacket) const override {
    if ((barePacket.u8At(12) == 0x10)
        and (barePacket.u32At(18) == 0)
        and (barePacket.u16PayloadSize == 22)) {
        return true;
    }
    return false;
}
Parser Source File
Duplicate an existing file under parser/ and rename it.
Here, we create parser/AppTagAdcPacketParser.cpp.
#include "AppTagAdcPacketParser.h"

apptagadc::PacketParser AppTagAdcPacketParser;

bool apptagadc::PacketParser::parse(const BarePacket& barePacket, mwings::ParsedPacketBase* const parsedPacket) const
{
    // WARNING: Note that there is NO RTTI
    ParsedAppTagAdcPacket* const parsedAppTagAdcPacket = static_cast<ParsedAppTagAdcPacket*>(parsedPacket);

    parsedAppTagAdcPacket->u32SourceSerialId = barePacket.u32At(7);
    parsedAppTagAdcPacket->u8SourceLogicalId = barePacket.u8At(11);
    parsedAppTagAdcPacket->u16SequenceNumber = barePacket.u16At(5);
    parsedAppTagAdcPacket->u8Lqi = barePacket.u8At(4);

    const uint16_t ecc = barePacket.u8At(13);
    if (ecc <= 170) {
        parsedAppTagAdcPacket->u16SupplyVoltage = 5 * ecc + 1950;
    } else {
        parsedAppTagAdcPacket->u16SupplyVoltage = 10 * (ecc - 170) + 2800;
    }

    parsedAppTagAdcPacket->u32RouterSerialId = barePacket.u32At(0);
    parsedAppTagAdcPacket->u8SensorType = barePacket.u8At(12);

    for (int i = 0; i < 2; i++) {
        parsedAppTagAdcPacket->u16AiVoltage[i] = barePacket.u16At(2*i+14);
    }

    return true;
}
Writing the Parsing Logic
After replacing the header file name and namespace, write the contents of parse().
The following stores the packet contents according to the data format.
Wireless Tag App (Analog Sensor) Output Format
| # | Data | Description | Notes |
|---|---|---|---|
char | Header | : only | |
| 0 | uint32 | Router serial ID | 80000000 if no router |
| 4 | uint8 | LQI | 0-255 |
| 5 | uint16 | Sequence number | |
| 7 | uint32 | Source serial ID | |
| 11 | uint8 | Source logical ID | |
| 12 | uint8 | Sensor type | |
| 13 | uint8 | Supply voltage (mV) | See Supply Voltage Calculation |
| 14 | uint16 | ADC1 voltage | |
| 16 | uint16 | ADC2 voltage | |
| 18 | uint32 | Unused | |
| 22 | uint8 | Checksum |
Use methods like BarePacket.u8At() to extract data from the raw payload.
// WARNING: Note that there is NO RTTI
ParsedAppTagAdcPacket* const parsedAppTagAdcPacket = static_cast<ParsedAppTagAdcPacket*>(parsedPacket);

parsedAppTagAdcPacket->u32SourceSerialId = barePacket.u32At(7);
parsedAppTagAdcPacket->u8SourceLogicalId = barePacket.u8At(11);
parsedAppTagAdcPacket->u16SequenceNumber = barePacket.u16At(5);
parsedAppTagAdcPacket->u8Lqi = barePacket.u8At(4);

const uint16_t ecc = barePacket.u8At(13);
if (ecc <= 170) {
    parsedAppTagAdcPacket->u16SupplyVoltage = 5 * ecc + 1950;
} else {
    parsedAppTagAdcPacket->u16SupplyVoltage = 10 * (ecc - 170) + 2800;
}

parsedAppTagAdcPacket->u32RouterSerialId = barePacket.u32At(0);
parsedAppTagAdcPacket->u8SensorType = barePacket.u8At(12);

for (int i = 0; i < 2; i++) {
    parsedAppTagAdcPacket->u16AiVoltage[i] = barePacket.u16At(2*i+14);
}
About static_cast
Here, the downcast from
mwings::ParsedPacketBase* to apptagadc::ParsedPacket is done using static_cast instead of dynamic_cast. This is due to hardware constraints that prevent using runtime type information.Main Header File
In addition to existing parsers, add the new parser.
Adding Include Directive
Include the packet parser header file.
//// AppTagAdcPacketParser for App_Tag (ADC)
#include "parser/AppTagAdcPacketParser.h"
Extending the Initializer List
Initialize the event handler to nullptr.
               //// AppTagAdcPacketParser for App_Tag (ADC)
               _onAppTagAdcPacket(nullptr),
Adding Cleanup Code
Reset the event handler to nullptr.
//// AppTagAdcPacketParser for App_Tag (ADC)
_onAppTagAdcPacket = nullptr;
Adding Event Handler Registration Method
Add an on() method to register the event handler.
//// AppTagAdcPacketParser for App_Tag (ADC)
inline void on(void (*callback)(const ParsedAppTagAdcPacket& packet)) { _onAppTagAdcPacket = callback; }
Adding Event Handler Member
Add a pointer to store the event handler.
//// AppTagAdcPacketParser for App_Tag (ADC)
void (*_onAppTagAdcPacket)(const ParsedAppTagAdcPacket& packet);
Editing Main Source File
Add the new parsing process in addition to the existing parsing.
Initializing the Event Handler
Ensure the event handler is initialized when begin() is called.
//// AppTagAdcPacketParser for App_Tag (ADC)
_onAppTagAdcPacket = nullptr;
Adding Parsing Process
Parse the target packet when received.
//// Start: AppTagAdcPacketParser for App_Tag (ADC)
if (AppTagAdcPacketParser.isValid(barePacket) and _onAppTagAdcPacket) {
    ParsedAppTagAdcPacket parsedAppTagAdcPacket;
    if (AppTagAdcPacketParser.parse(barePacket, &parsedAppTagAdcPacket)) {
        _onAppTagAdcPacket(parsedAppTagAdcPacket);
    }
}
//// End: AppTagAdcPacketParser for App_Tag (ADC)
Applying Changes
When you build the sketch, the library will also be rebuilt.