Hardware Preparation
Preparing TWELITE
Write the Parent and Repeater App (App_Wings) to products such as TWELITE UART and TWELITE DIP.
Use the TWELITE STAGE APP for writing.
As of December 2023, the latest App_Wings (v1.3.0+) that supports setting Application ID via serial communication is not included in the TWELITE STAGE SDK (it will be added in the next release).
Please download the following files first, then write the firmware.
- For TWELITE BLUE: App_Wings_BLUE_L1305_V1-3-2.bin
- For TWELITE RED: App_Wings_RED_L1305_V1-3-2.bin
Connection with Arduino UNO R4
Use the following TWELITE pins:
- VCC (connect to 3.3V)
- GND (connect to GND)
- TXD (connect to D0/RX)
- RXD (connect to D1/TX)
- RST (connect to any port such as D11)
- PRG (connect to any port such as D12)
Below is an example wiring diagram based on the sample sketch included with the library.
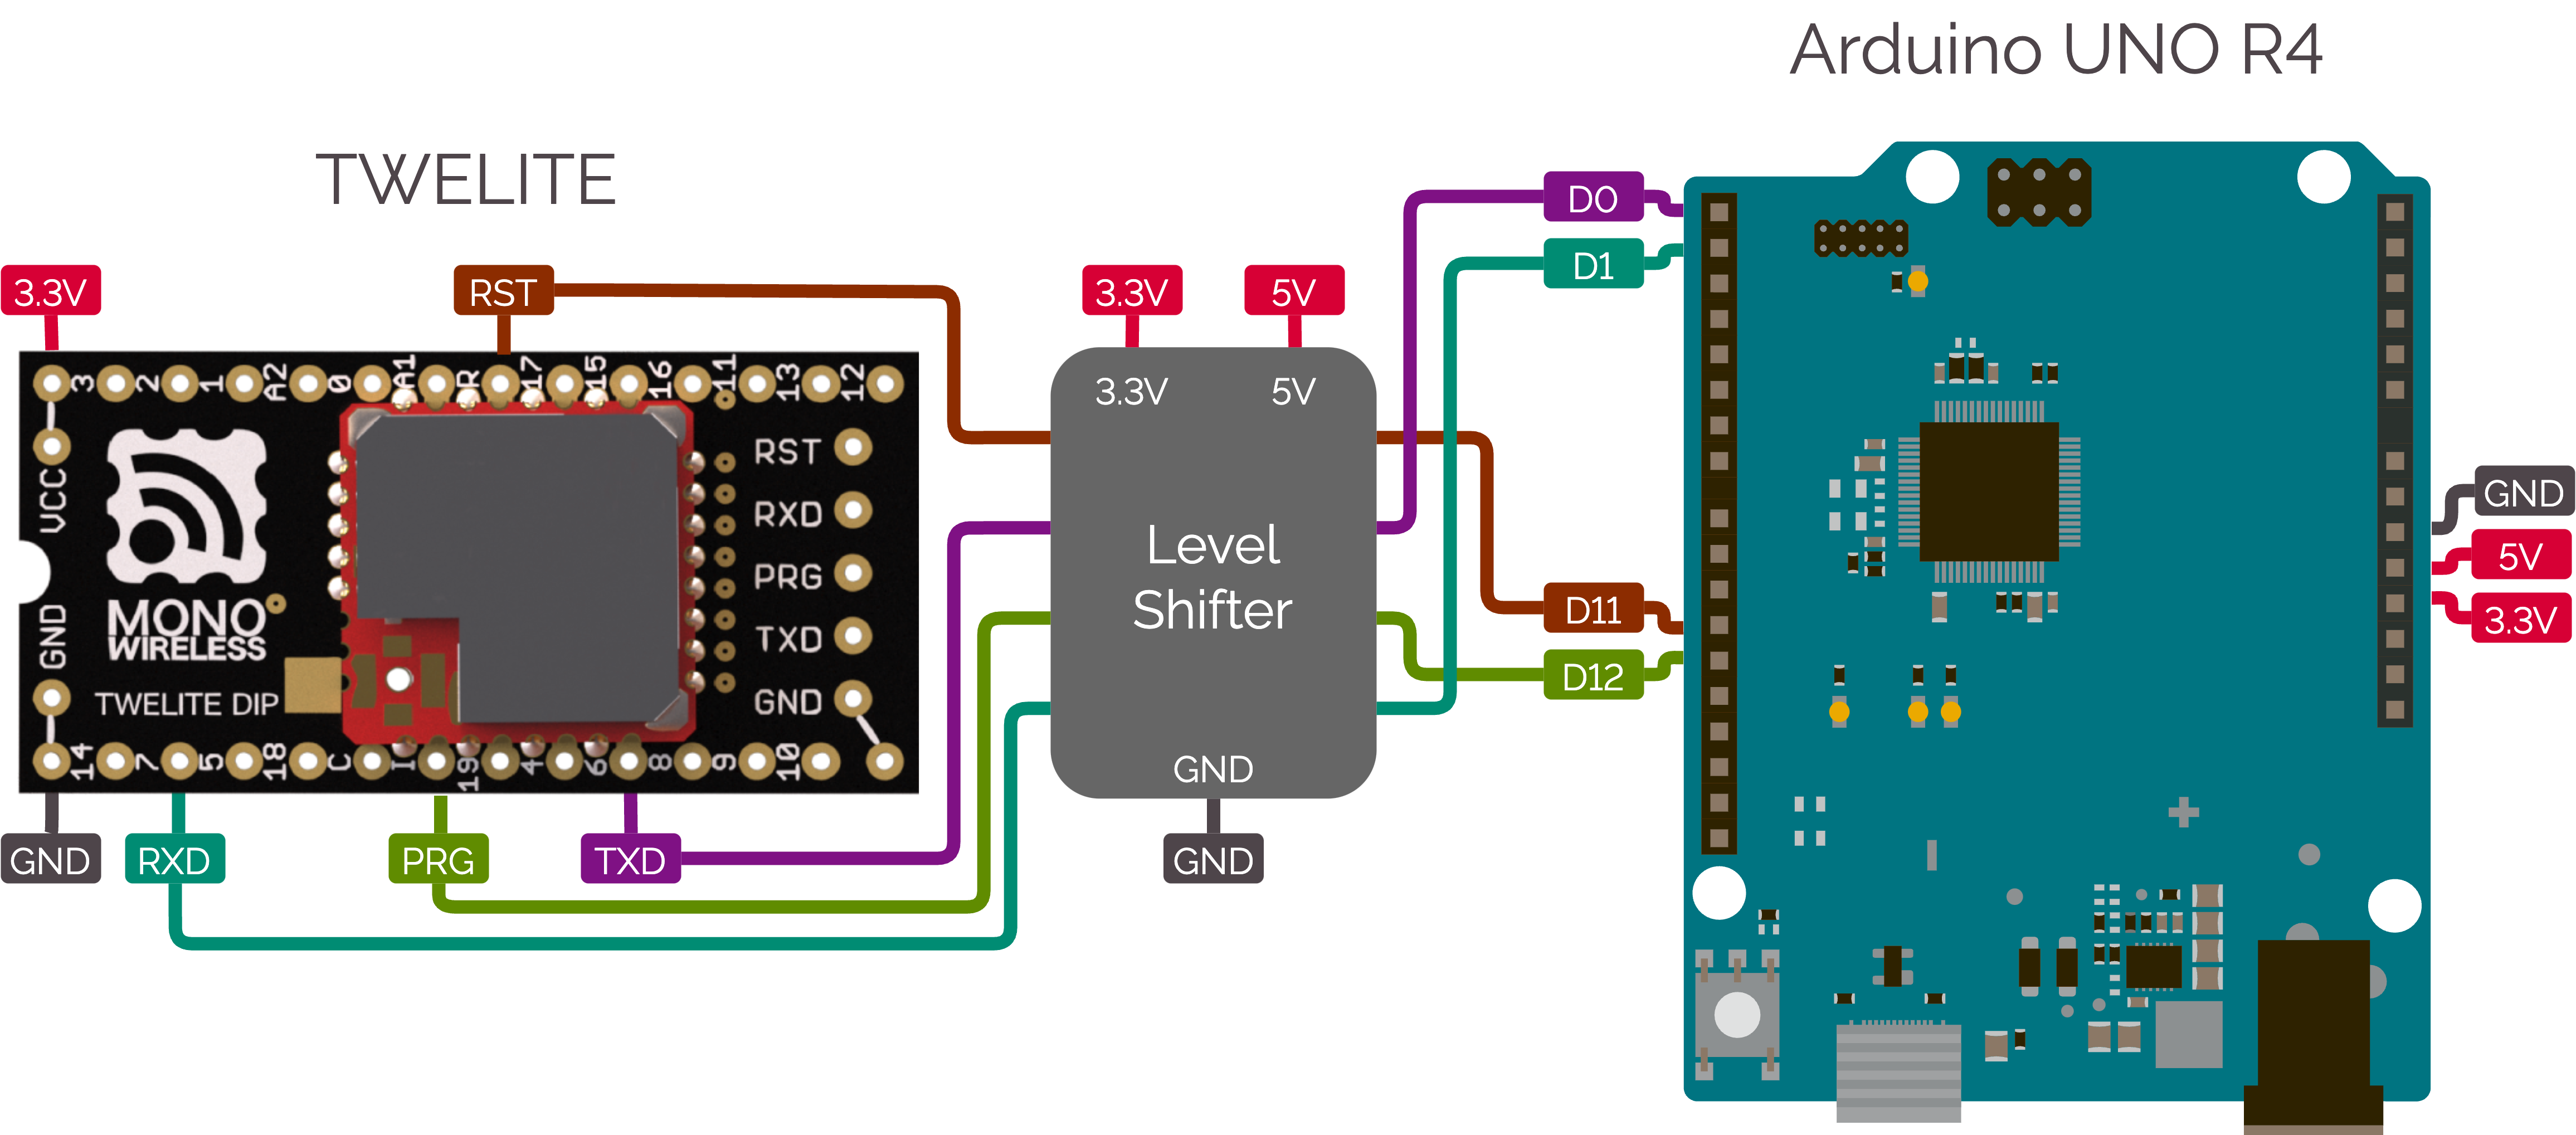
Example connection with Arduino
Software Preparation
Installing the Library
You can install it via the Arduino Library Manager.
Refer to the TWELITE SPOT manual: Installing the MWings Library.
Verifying the Sample Sketch Operation
The library includes simple sample sketches for communicating with each TWELITE device.
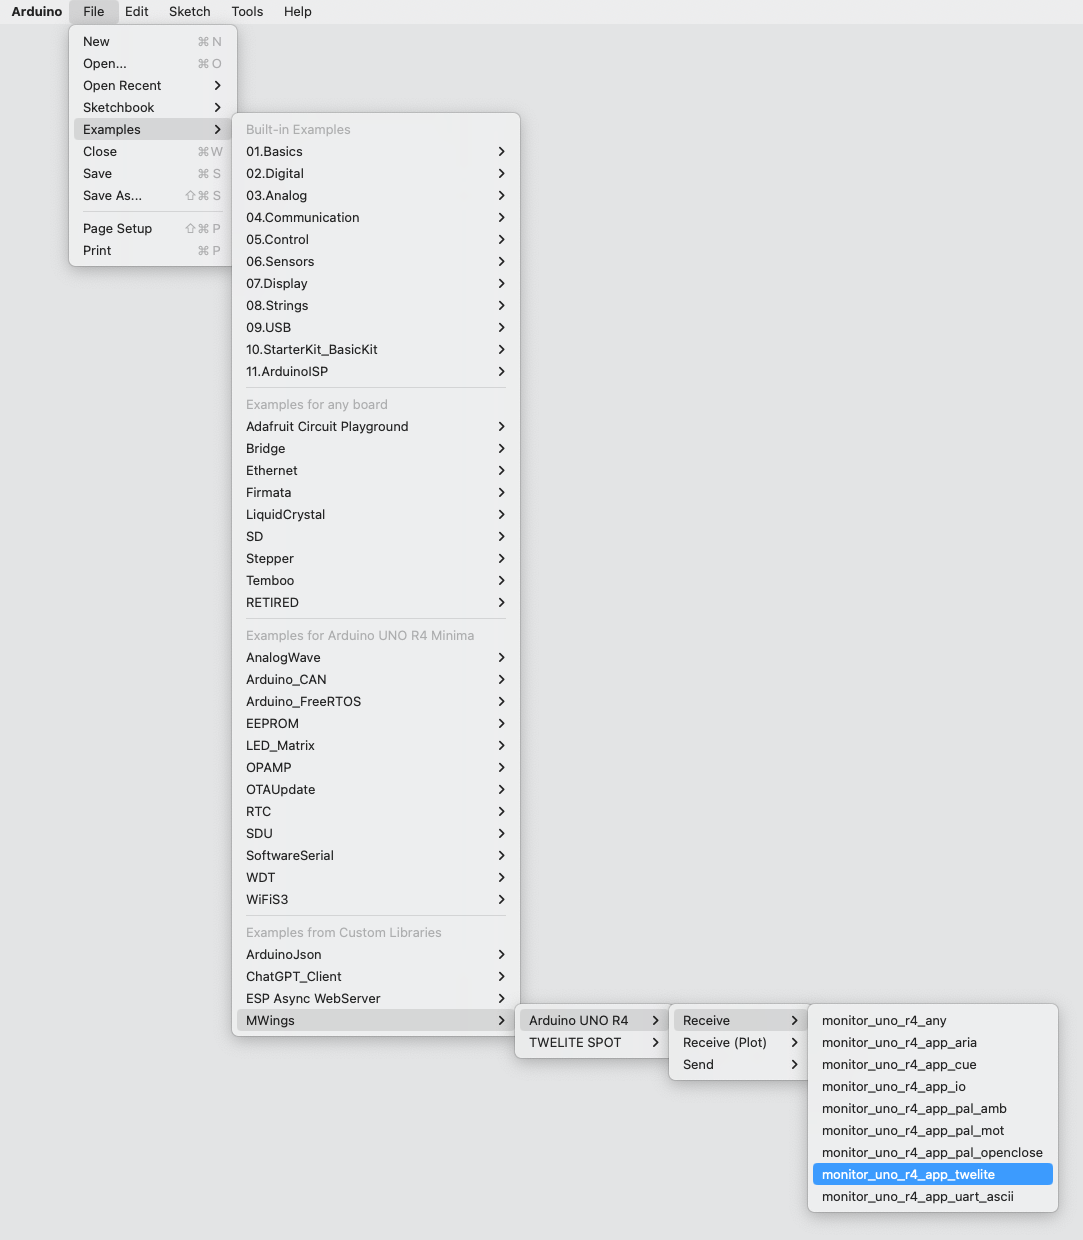
For example, to receive data from the Extremely Simple! Standard App (App_Twelite), open the following sample sketch from the menu bar:
File > Examples > MWings > Arduino UNO R4 > Receive > monitor_uno_r4_app_twelite
Example display
monitor_uno_r4_app_twelite.ino
// Monitor example for TWELITE with Arduino UNO R4: Receive data from App_Twelite

#include <Arduino.h>
#include "MWings.h"

const int RST_PIN = D11;
const int PRG_PIN = D12;
const int LED_PIN = D13;        // Use on-board LED as indicator

const uint8_t TWE_CHANNEL = 18;
const uint32_t TWE_APP_ID = 0x67720102;

void setup()
{
    // Initialize serial ports
    while (!Serial && millis() < 5000); // Wait for internal USB-UART
    Serial.begin(115200);
    Serial.println("Monitor example for TWELITE with Arduino UNO R4: App_Twelite");
    Serial1.begin(115200);

    // Initialize TWELITE
    if (Twelite.begin(Serial1,
                      LED_PIN, RST_PIN, PRG_PIN,
                      TWE_CHANNEL, TWE_APP_ID)) {
        Serial.println("Successfully initialized TWELITE");
    } else {
        Serial.println("Failed to initialize TWELITE");
    }

    // Attach an event handler to process packets from App_Twelite
    Twelite.on([](const ParsedAppTwelitePacket& packet) {
        Serial.println("");
        Serial.print("Packet Timestamp:  ");
        Serial.print(packet.u16SequenceNumber / 64.0f, 1); Serial.println(" sec");
        Serial.print("Source Logical ID: 0x");
        Serial.println(packet.u8SourceLogicalId, HEX);
        Serial.print("LQI:               ");
        Serial.println(packet.u8Lqi, DEC);
        Serial.print("Supply Voltage:    ");
        Serial.print(packet.u16SupplyVoltage, DEC); Serial.println(" mV");
        Serial.print("Digital Input:    ");
        Serial.print(packet.bDiState[0] ? " DI1:Lo" : " DI1:Hi");
        Serial.print(packet.bDiState[1] ? " DI2:Lo" : " DI2:Hi");
        Serial.print(packet.bDiState[2] ? " DI3:Lo" : " DI3:Hi");
        Serial.println(packet.bDiState[3] ? " DI4:Lo" : " DI4:Hi");
        Serial.print("Analog Input:     ");
        Serial.print(" AI1:"); Serial.print(packet.u16AiVoltage[0]); Serial.print(" mV");
        Serial.print(" AI2:"); Serial.print(packet.u16AiVoltage[1]); Serial.print(" mV");
        Serial.print(" AI3:"); Serial.print(packet.u16AiVoltage[2]); Serial.print(" mV");
        Serial.print(" AI4:"); Serial.print(packet.u16AiVoltage[3]); Serial.println(" mV");
    });
}

void loop()
{
    // Update TWELITE
    Twelite.update();
}

/*
 * Copyright (C) 2023 Mono Wireless Inc. All Rights Reserved.
 * Released under MW-OSSLA-1J,1E (MONO WIRELESS OPEN SOURCE SOFTWARE LICENSE AGREEMENT).
 */
For details of the sketch, please refer to the TWELITE SPOT sketch explanations. Most of the content is common.
The following are specific to Arduino UNO R4.
Port Settings
Lines 6-8 configure Arduino ports excluding UART-related pins.
const int RST_PIN = D11;
const int PRG_PIN = D12;
const int LED_PIN = D13;        // Use on-board LED as indicator
| Pin | Role | Notes |
|---|---|---|
| D11 | TWELITE RST control | See the connection example above |
| D12 | TWELITE PRG control | See the connection example above |
| D13 | Communication indicator LED control | Uses built-in LED |
Waiting for USB Serial Port Initialization
Line 16 waits for the USB serial port (Serial) to initialize.
while (!Serial && millis() < 5000); // Wait for internal USB-UART
Arduino UNO R4 does not have a USB-serial converter IC like UNO R3; the ARM CPU itself handles USB serial conversion. Therefore, communication cannot occur before the serial port initialization completes.
Related Information
- MWings Library API Reference
- TWELITE SPOT Start Guide Sketch Explanation (most content is common)
- TWELITE SPOT Manual Partial Sketch Explanation (most content is common)