By using the TWELITE STAGE SDK, you can develop custom firmware for TWELITE.
MWX Library and act
The MWX library aims to simplify the code representation for TWELITE wireless modules. Programs created with MWX are called act. There are two types of act: loop-based description and event-driven description (called behavior).
Loop-based description (setup(), loop())
Suitable for describing small-scale functions.
#include<TWELITE>constuint8_t PIN_LED =5;
voidsetup() {
pinMode(PIN_LED, OUTPUT);
}
voidloop() {
if (TickTimer.available()) {
uint32 t_now = millis();
// blink LED every 1024ms
digitalWrite(PIN_LED, (t_now >>10) &1? HIGH : LOW);
}
}
Event-driven application description
You can define a state machine within a class to handle various events and interrupt handlers, enabling clear code for complex application behaviors. This method is called behavior.
// myApp.hpp
...
classmyApp: MWX_APPDEFS_CRTP(myApp) {
...
void loop() {
// main loop
}
voidreceive(mwx::packet_rx& rx) {
// on receive
}
};
// myApp.cpp
...
MWX_DIO_EVENT(12, uint32_t arg) {
// on event from DIO12
}
Simplifying peripheral procedures
Classes are defined to handle commonly used UART, I2C, SPI, ADC, DIO, timers, and pulse counters.
voidloop() {
while(Serial.available() {
auto x = Serial.read(); ... } // serial message
if (Analogue.available() {
auto x = Analogue.read(...); } // adc values
if (Buttons.available() {
Buttons.read(...); } // DIO changes
if (the_twelite.receiver.available()) {
auto&& rx = the_twelite.receiver.read(); } // on rx packet
}
Defining a simple relay network
This relay network is implemented equivalently to the TWELITE standard application. It manages device addresses with 8-bit logical IDs and does not perform network construction communication, allowing wireless packets to be sent to the network immediately after power-on.
#include<TWELITE>#include<NWK_SIMPLE>voidsetup() {
...
auto&& nwksmpl = the_twelite.network.use<NWK_SIMPLE>();
nwksmpl << NWK_SIMPLE::logical_id(0xFE)
// set Logical ID. (0xFE means a child device with no ID)
<< NWK_SIMPLE::repeat_max(3);
// can repeat a packet up to three times.
}
voidloop() {
...
vTransmit();
...
}
voidvTransmit() {
if (auto&& pkt = the_twelite.network.use<NWK_SIMPLE>().prepare_tx_packet();
pkt << tx_addr(0x00) // to parent
<< tx_retry(0x3); // set retry
pack_bytes(pkt.get_payload() // prepare payload data
, uint8_t(0x01)
, uint16_t(analogRead(PIN_ANALOGUE::A1))
, uint16_t(analogRead_mv(PIN_ANALOGUE::VCC)));
pkt.transmit(); // transmit!
}
Compatibility with TWELITE APPS packets is not guaranteed
In TWELITE APPS, the relay count is basically limited to 3 times, but act packets can be relayed up to 64 times.
When increasing the relay count, please note that packets that have already been relayed (whose duplicate packet management table has been cleared) may be relayed again if they return after a certain time due to taking a detour.
Board definitions for PAL and MONOSTICK
Easily handle sensors and other components on the board.
#include<TWELITE>#include<PAL_AMB>// include the board support of PAL_AMB
voidsetup() {
auto&& brd = the_twelite.board.use<PAL_AMB>(); // use PAL AMB
uint8_t u8dip = brd.get_DIP_SW(); // check DIP switch status
brd.set_led(LED_TIMER::BLINK, 100); // LED switches on/off every 100ms
...
// start capture of sensors
brd.sns_SHTC3.begin();
}
voidloop() {
if (TickTime.available()) { // check every ms
auto&& brd = the_twelite.board.use<PAL_AMB>();
if (brd.sns_LTR308ALS.available()) {
Serial << brd.sns_SHTC3.get_temp();
} else {
// notify sensor that 1ms passed.
brd.sns_SHTC3.process_ev(E_EVENT_TICK_TIMER);
}
}
}
1 - Development Environment
About the development environment (OS, etc.)
To build the development environment, you need to install software packages and agree to their licenses. Additionally, security settings may be required on your PC or workstation.
Although we take great care during distribution, please also ensure to check for viruses and other threats on your side.
Please consult your environment administrator regarding your security policies and operations (e.g., whether external applications can be installed).
Furthermore, when installing or running the development environment, the OS may be involved and require configuration (e.g., running applications from unknown developers. Many of the development environment tools or introduced tools do not have mechanisms to verify the developer). Please refer to general information for configuration methods.
To write applications using the MWX library, the following are required:
MWSDK (Software Development Kit)
Development editor (We recommend Microsoft Visual Studio Code)
Windows
The compiler toolchain is relatively less dependent on the environment, so it is expected to work on many systems; however, we recommend currently supported Windows 10 and 11 versions. If your environment differs and causes issues, please prepare an environment based on the ones we have verified.
Below are the versions used in development:
Windows 11 21H2 (Visual Studio 2019)
FTDI driver installed and working (required for MONOSTICK, TWELITE R operation)
You can run the compiler in WSL (Windows Subsystem for Linux) environments. However, writing firmware and similar operations should be done using utilities on Windows 10.
WSL environment is not mandatory.
Linux
The compiler toolchain is relatively less dependent on the environment, so it is expected to work on many systems; however, we recommend currently supported distributions. If your environment differs and causes issues, please prepare an environment based on the ones we have verified.
Below are the versions used in development:
Ubuntu 18.04 LTS 64bit
Ubuntu 20.04 LTS 64bit
32-bit systems are not supported.
macOS
The compiler toolchain is relatively less dependent on the environment, so it is expected to work on many systems; however, we recommend currently supported macOS versions. If your environment differs and causes issues, please prepare an environment based on the ones we have verified.
Below are the versions used in development:
macOS 10.14 Mojave (Intel)
macOS 12 Monterey (Apple Silicon)
Development Tools such as Visual Studio Code
For tools and usage to run the development environment, please refer to information from the developers or communities.
For efficient code writing, we recommend using Visual Studio Code (VSCode).
Since the MWX library requires more header files than typical C development, VSCode demands more PC resources for code interpretation.
VSCode is not mandatory. You may use any editor you are comfortable with.
Build results on Linux/WSL/macOS differ from those on Windows 10. Although we have not observed differences affecting normal operation, disabling gcc’s LTO tends to increase binary size by a few percent.
If you have doubts about operation, please always build and verify reproduction on Windows 10 or 11 before contacting us.
2 - Installing the SDK
Installing the TWELITE SDK
Installing the TWELITE STAGE SDK
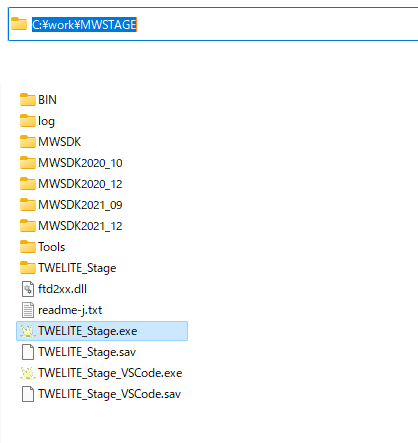
Download the TWELITE STAGE SDK distribution archive (ZIP, etc.) and extract it to an appropriate folder.
Once extracted as shown below, the installation is complete.
Example Folder
Setting Environment Variables
When building from the command line, please set the environment variables. This is not necessary for the TWELITE STAGE app as it sets them automatically.
Set MWSDK_ROOT and MWSDK_ROOT_WINNAME (Windows only).
Windows
Here, the extracted folder name is assumed to be C:\MWSTAGE. If you installed to a different folder, please adjust accordingly.
Run C:\MWSTAGE\Tools\SET_ENV.CMD. This sets the following environment variables:
To uninstall the TWELITE STAGE SDK from your PC, please do the following:
Run UNSET_ENV.cmd to clear the environment variable settings.
Delete the MWSTAGE folder.
Linux
Set the MWX_ROOT environment variable in your development environment or shell.
There are several ways to do this, but you can add the following settings to your home folder’s .profile file (create it if it doesn’t exist). This will enable building in VSCode as well. Make sure the environment variables are applied.
To add this without an editor, run the following commands. The $ is the prompt and may differ depending on your environment. Replace /foo/bar/MWSTAGE with the folder where you installed the SDK.
cd $HOME
echo MWSDK_ROOT=/foo/bar/MWSTAGE/MWSDK>>.profile
echo export MWSDK_ROOT>>.profile
macOS
Set the MWX_ROOT environment variable so that it is reflected in your development environment or shell.
There are several ways to do this, but you can add the following settings to your home folder’s .profile file (create it if it doesn’t exist). This will enable building in VSCode as well.
To add this without an editor, run the following commands. The $ is the prompt and may differ depending on your environment. Replace /foo/bar/MWSTAGE with the folder where you installed the SDK.
To apply MWSDK_ROOT system-wide, use launchd.
Some VSCode settings reference environment variables, but they are not required for building.
3 - Building Act
Building act
An application program written with the MWX library is called an act. First, build and write it.
About the build folder structure
Building with Visual Studio Code (referred to as VSCode)
This page describes several build methods, but all of them ultimately execute the make command. For details, please refer to the explanation of the Makefile.
Depending on the OS environment, security warnings may appear when running each executable program (build toolchain such as make or gcc). You will need to configure settings to suppress these warnings. Whether to operate the program with warnings suppressed should be decided by the customer or system administrator after consultation.
About the build folder structure
Open the folder where you installed MWSDK (MWSDK_ROOT, e.g., C:\MWSDK). It has the following structure:
Act files are stored under Act_samples. (Some parts are omitted below)
Act_samples
  |
  +-CoreAppTwelite    : Act for the board with the same structure as App_TweLite
  +-PAL_AMB           : Act for environmental sensing PAL
  +-PAL_MAG           : Act for open/close sensing PAL
  +-PAL_MOT           : Act for motion sensing PAL
  ..
  +-Parent-MONOSTICK  : Parent act for MONOSTICK
  +-PingPong          : PingPong act
  +-PulseCounter      : Act using pulse counter
  +-act0              : Scratch (just to try writing) act
These acts are simple examples that serve as a reference for writing MWX library programs, but many acts have the following functions:
Acquire sensor values
After acquiring sensor values, send a wireless packet to the parent device
After sending is complete, sleep for a fixed time (or wait for an interrupt)
The Parent-MONOSTICK act receives and displays packets. This parent act outputs in ASCII format. (It starts with : like :00112233AABBCC...FF[CR][LF], and the middle part expresses bytes in hexadecimal with two ASCII characters. The ending ?? is also two characters representing a byte called LRC checksum. Reference: ASCII format)
When actually running, try the following combinations.
Parent
Child
Explanation
BRD_APPTWELITE
BRD_APPTWELITE
The parent device boots with M1 pin set to LOW (GND level). In normal mode (always running), you can verify operation like App_Twelite.
PingPong
PingPong
Operates with two child devices. When one sends a Ping packet, the other returns a Pong packet.
Parent-MONOSTICK
Others
You can verify packet transmission from child acts.
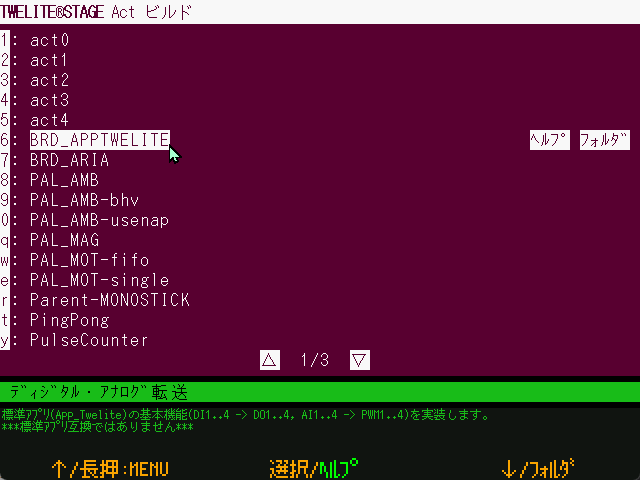
Now, let’s look inside the PingPong folder among the acts.
You can also build other acts in Act_samples. In that case, please replace folder and file names accordingly.
A .cpp file with the same name as the folder is always required directly under the folder.
For small acts, write all in this .cpp file. For larger projects, refer to the Makefile explanation to split into multiple files for building.
There is an act file PingPong.cpp directly under the PingPong folder. If you rename the folder, be sure to rename the .cpp file to the same name as the folder.
Next, open the build folder.
Act_samples
  +-PingPong
    +-build
      +-Makefile        : makefile
      +-build-BLUE.cmd  : Build script for TWELITE BLUE (Windows)
      +-build-RED.cmd   : Build script for TWELITE RED (Windows)
      +-build-clean.cmd : Delete obj_* files
Scripts and Makefile required for building are stored here.
By running make TWELITE={BLUE or RED} in the folder containing this Makefile, the build is executed. Building in VSCode also internally calls make.
Building with TWELITE STAGE app
Using the TWELITE STAGE app, you can build, write, and run. Here, we explain from launching the TWELITE STAGE app up to building.
0. Connect TWELITE
Connect MONOSTICK or TWELITE R to your USB port.
TWELITE is a delicate electronic component, so handle it with care. Below are typical precautions.
Especially when using TWELITE R, often the electronic board is exposed without a case, which may cause unintended shorts or noise leading to malfunction of the USB device.
In such cases, quitting the application and unplugging/replugging the USB device usually recovers it. Worst case, USB device or PC damage may occur.
Handle the board carefully.
Circuit mistakes
Check the circuit again before powering.
Be careful of reverse battery insertion or overvoltage.
Static electricity
Even voltages that are not felt can cause semiconductor failure. Simple measures like touching metal before work, wristbands, or dedicated mats have significant effects.
Shorts caused by metal objects
Keep metal objects away from the board. Cluttered clips may cause shorts, and batteries could discharge heavily and heat dangerously.
1. Launch TWELITE STAGE app
Launch the executable TWELITE_Stage.{extension} in the {TWELITE SDK installation} folder (Reference: TWELITE STAGE app manual).
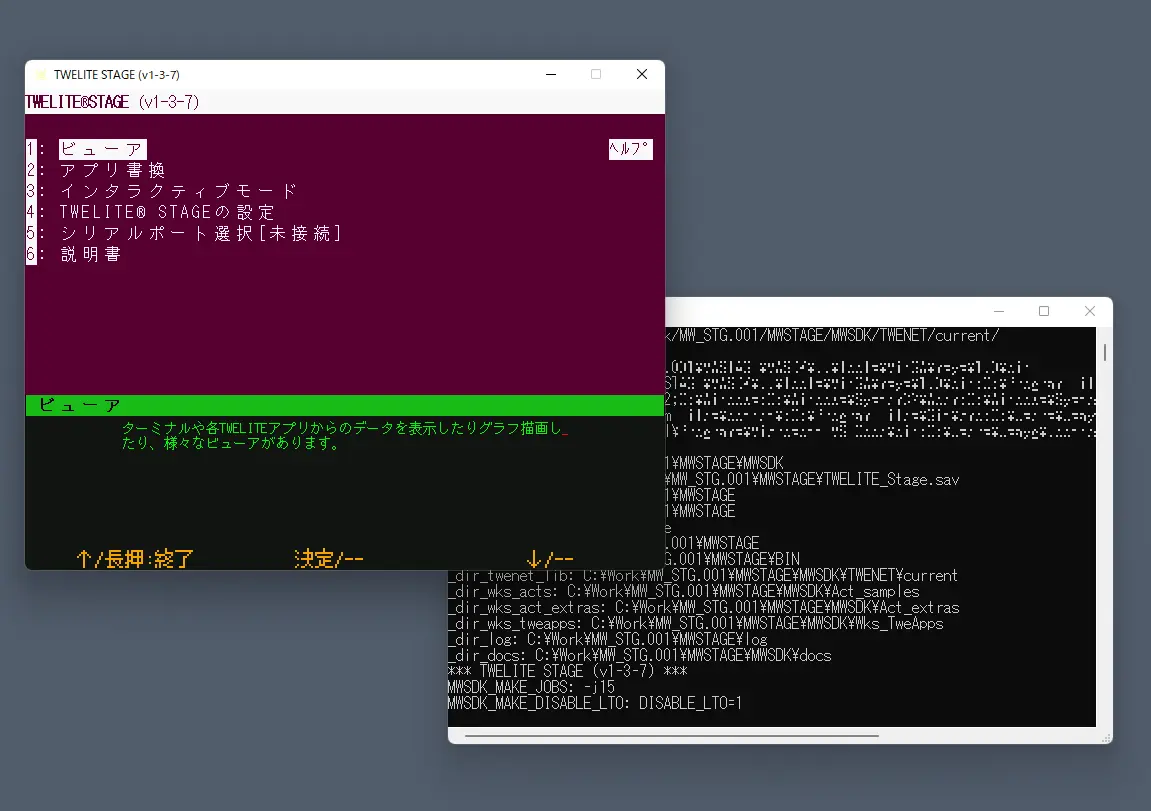
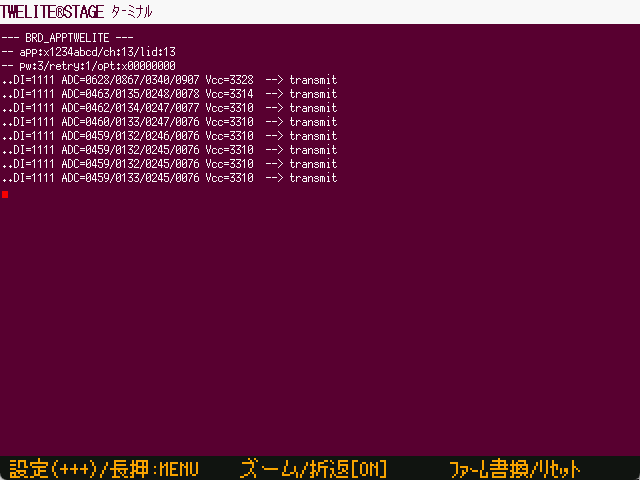
Below is a screen example during TWELITE STAGE app operation. There is a main screen on the left and a command prompt screen, but operate the main screen. The command prompt shows various info and input data from the TWELITE microcontroller serial port but is usually not used.
Screen example
Main operations on the main screen are:
Left mouse click (select)
Right double-click (go back to previous screen)
Quickly press ESC twice, or once on some screens (go back)
Hold Alt(⌘) key (help screen)
Normal keyboard input (follow screen instructions)
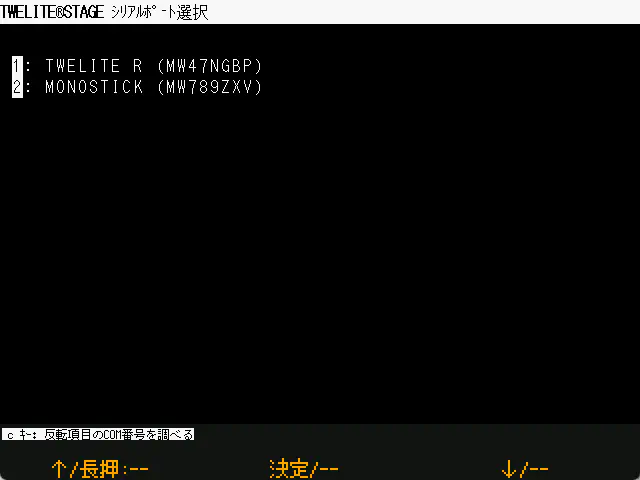
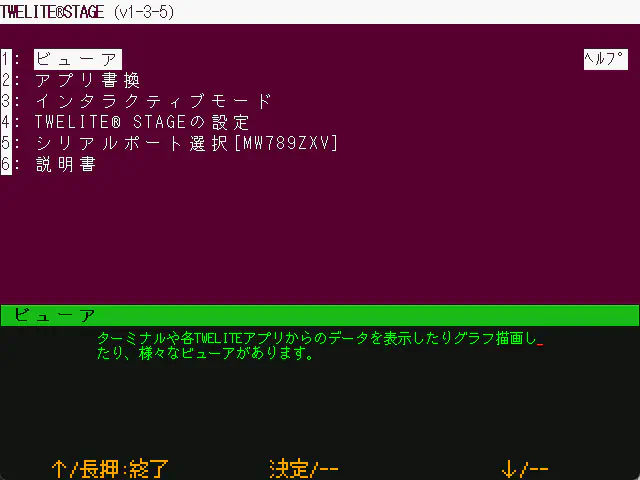
This screen appears first when launching the TWELITE STAGE app. If TWELITE R or MONOSTICK is connected beforehand, it will be listed here. Select the TWELITE device to operate. You can also select it later by other operations.
Before selecting the app write menu, confirm TWELITE connection and serial port selection. You can check the serial port selection status by holding the Alt(⌘) key to display the help screen.
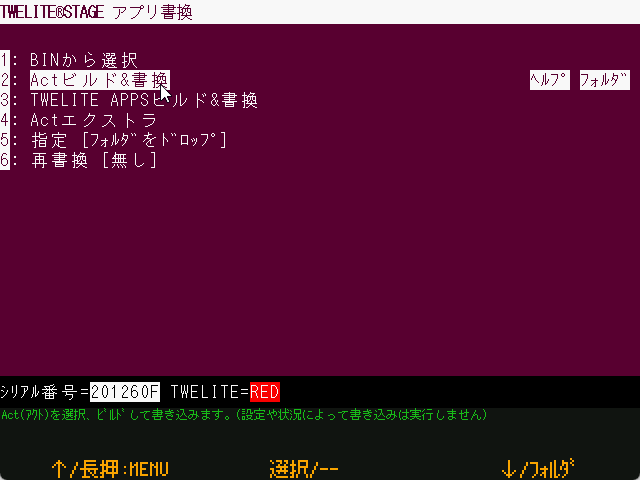
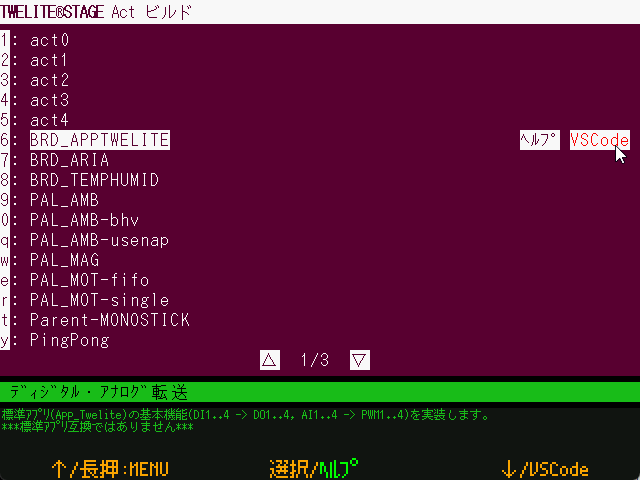
App write menu
Projects accessible from the TWELITE STAGE app are categorized. The right Help shows related info in a browser. The Folder opens the project folder.
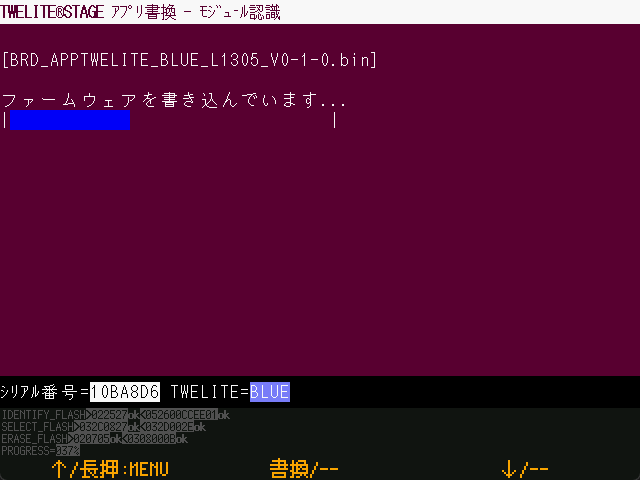
If TWELITE is connected, the model is identified when selecting the menu. (The app internally builds according to the identified TWELITE model.)
If an error occurs here, return to the main menu and reselect the menu. If unresolved, try clearing serial port selection with Alt(⌘) + 0 in the TWELITE STAGE app, and check USB connections. Some USB errors require restarting your computer.
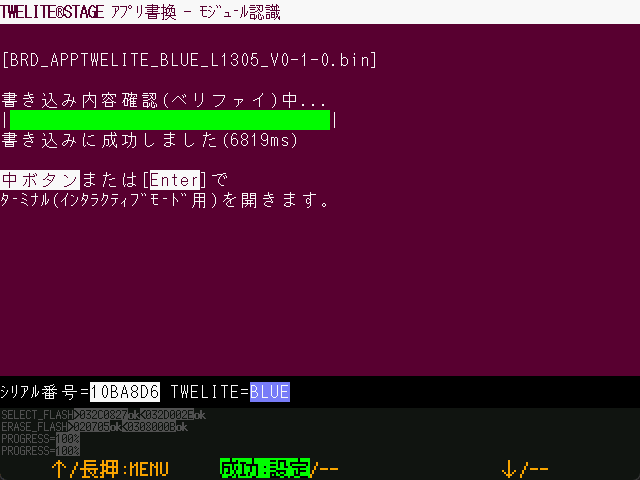
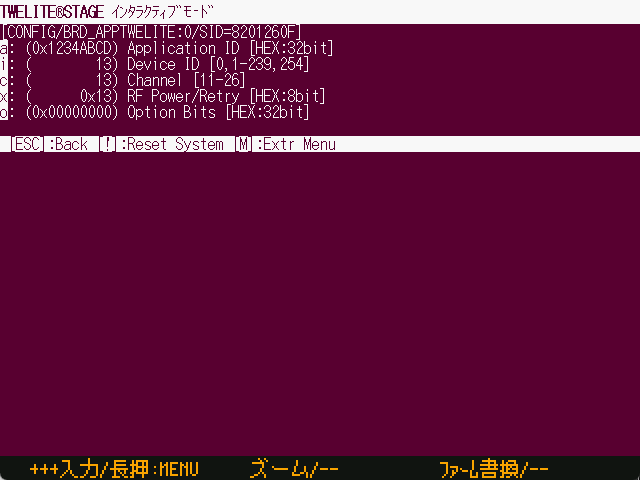
After writing completes successfully, it proceeds to interactive mode (settings screen). The screen appears only if the firmware supports interactive mode.
In interactive mode, you can configure various settings such as the TWELITE wireless channel.
VSCode is a powerful editor for source editing, but you can also build firmware for TWELITE microcontrollers within VSCode.
Launch VSCode from the project list under the “Build & Write” menu in the TWELITE STAGE app.
Press the [VSCode] button on the right of the build list.
VSCode settings
This requires configuration in the TWELITE STAGE app.
Set “Open folder with code (VSCode)” to 1 in STAGE settings.
Open with VSCode
For Windows, Linux, and macOS, the executable TWELITE_Stage_VSCode.{extension} with this setting enabled is distributed by default.
If VSCode is already running, necessary settings may not be reflected. In that case, close VSCode and launch it again from the TWELITE STAGE app.
Because system environment variables are used for info reflection, problems may occur when running multiple TWELITE STAGE instances referencing different library folders simultaneously. If the environment variable MWSDK_ROOT is set correctly in the VSCode terminal, builds are expected to work properly.
VSCode build tasks
Open the workspace you want to build first. The workspace included with the TWELITE STAGE SDK has build task definitions.
Below is an example with an English interface, showing the opened workspace.
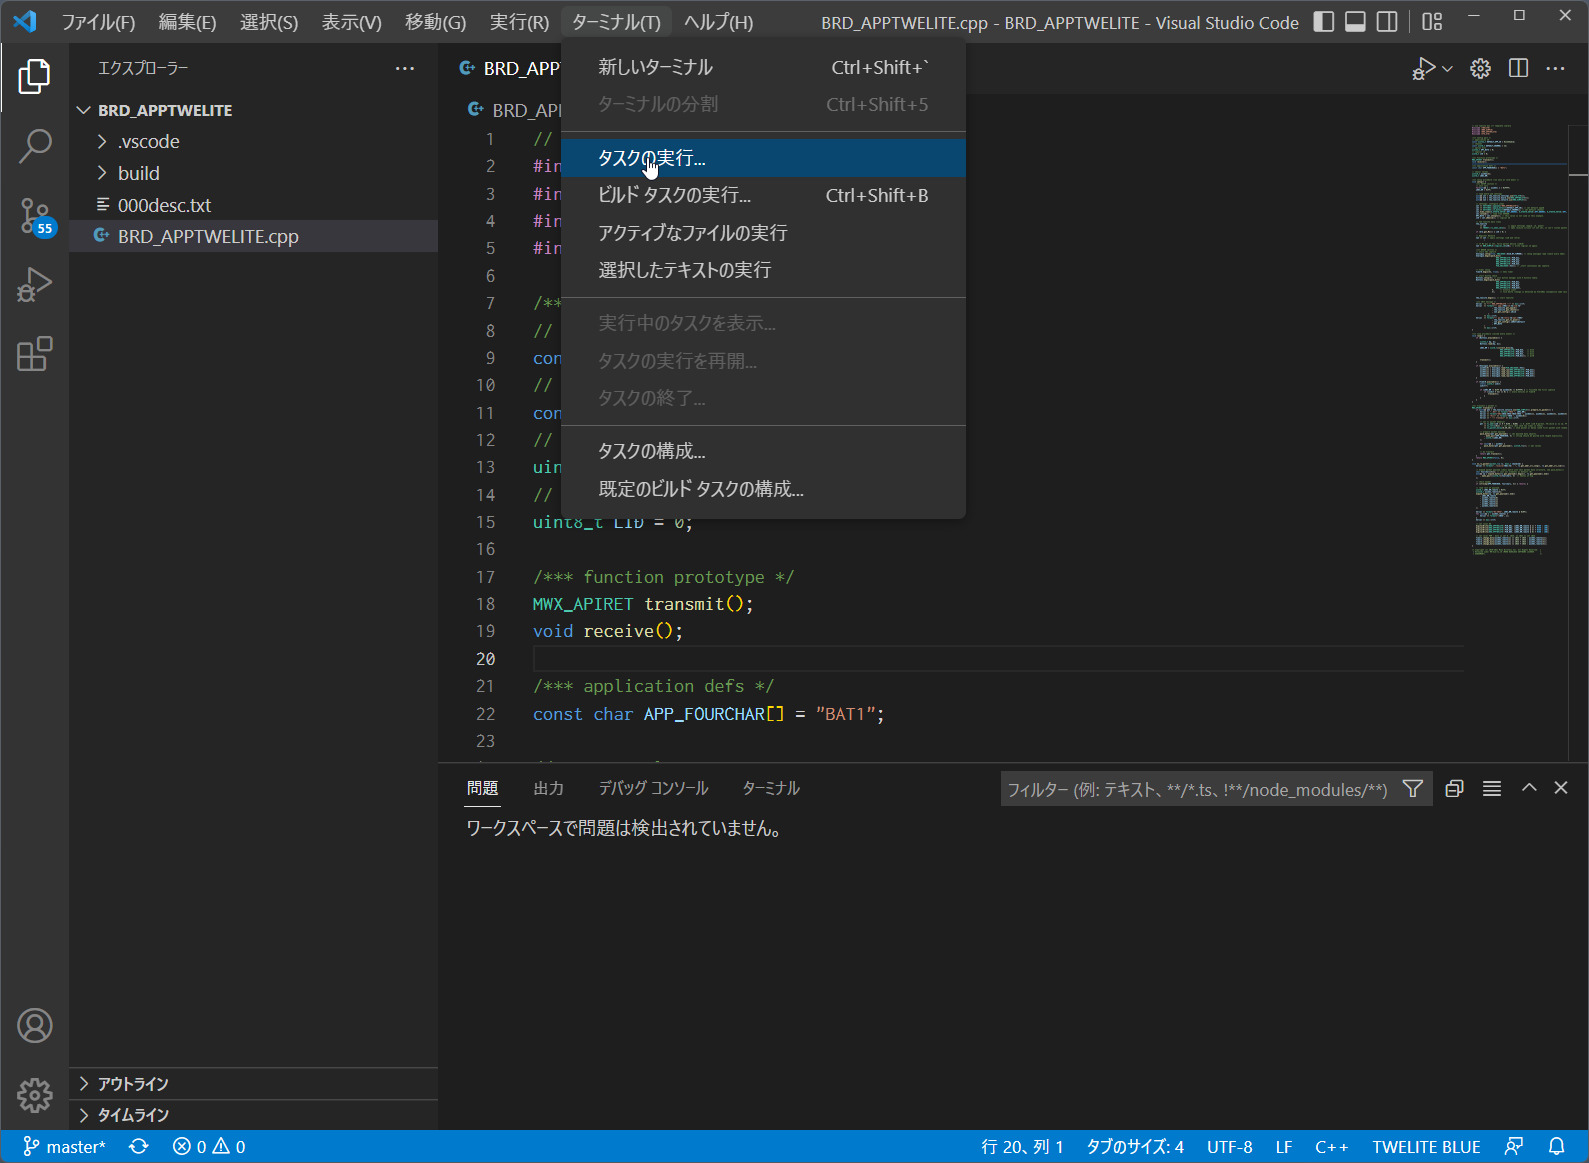
Open [Terminal>Run Task...].
Run task menu
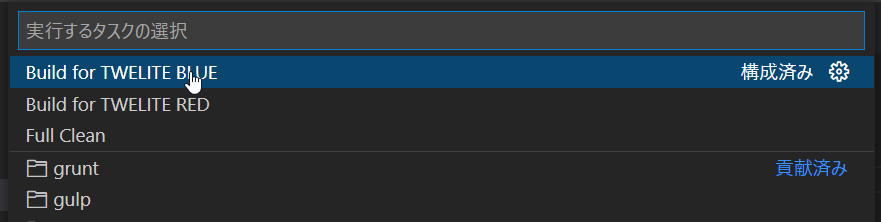
Select the TWELITE wireless module type (BLUE/RED) and act name to build. In the example below, Build for TWELITE BLUE is selected. The build starts immediately after selection.
Select build task
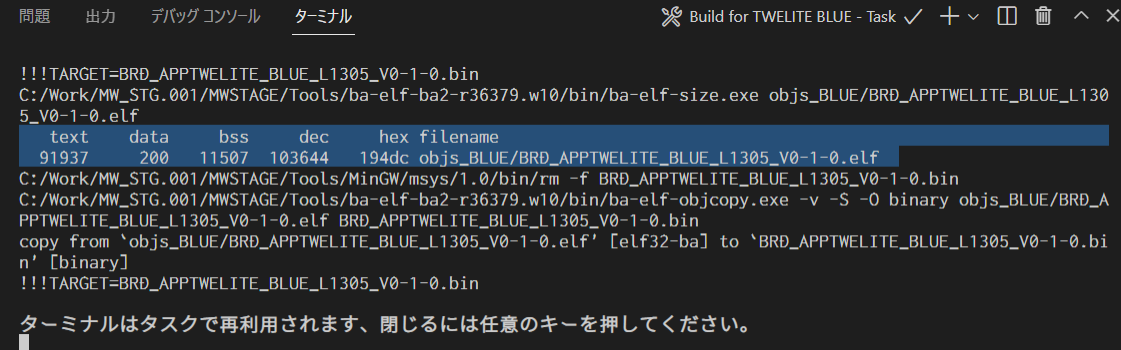
Build progress is output in the terminal at the bottom.
Build progress
If built correctly, a message showing the .elf file generated with size info (text data bss dec hex filename) appears as shown in the inverted part of the example.
Also, a BIN file (e.g., BRD_APPTWELITE_BLUE_???.bin) should be created under the build folder. Please check.
The VSCode task definition includes a conversion for folder names incompatible with Windows file system (e.g., /c/User/... to C:/User/...).
The conversion rule in .vscode/tasks.json is not perfect but rewrites drive name parts in output messages to a format recognized by VSCode. This allows error file names and line numbers to be displayed in VSCode from compile messages.
If the build fails, first check the error messages. Messages containing the word error often help identify the cause easily.
Also, try cleaning (deleting intermediate files in objs_??? folders) and rebuilding. (If intermediate files from other environments remain, all operations including make clean may fail.)
Building from command line
Additional information for building from the command line.
Knowledge of command line (bash, zsh, etc.) usage is required.
Security warnings may appear when running executables depending on OS. Configuration to suppress warnings is needed. (Whether to operate with warnings suppressed should be decided by the customer or system administrator.)
Linux, macOS environment
Run make in a window running bash or zsh (or other shell). Confirm the environment variable MWSDK_ROOT is set correctly. For example, if installed at /work/MWSDK, add the following to ~/.profile or similar:
MWSDK_ROOT=/work/MWSDK
export MWSDK_ROOT
Run make from the command line. If make is missing, install the package.
On Linux, install via package manager (APT example):
sudo apt install make
or
sudo apt install build-essential
On macOS, included in Command Line Tools for Xcode.
xcode-select --install
Windows environment
Run {MWSTAGE SDK installation}/MWSDK/WIN_BASH.cmd. Environment variables and make utility are set.
Build
Build as follows:
cd $MWSDK_ROOT
cd Act_samples/PingPong/build
pwd
/mnt/c/MWSDK/Act_samples/PingPong/build
ls
... list files
rm -rfv objs_*
... delete intermediate files just in casemake TWELITE=BLUE
... build for BLUE
make -j8 TWELITE=BLUE
... parallel build for BLUE (8 processes)
Command examples
See the Makefile explanation for details.
make TWELITE=BLUE: Build for TWELITE BLUE
make TWELITE=RED: Build for TWELITE RED
make cleanall: Delete intermediate files
About intermediate files
When building, objs_??? folders are created containing intermediate files. These files depend on the build environment, so leftover files from other environments cause make errors and build failures.
Deleting objs_??? folders directly may resolve make errors.
4 - Creating a New Project
Creating a new project
To create a new project, copy an existing sample act folder with a different name and edit the file names.
The destination folder does not have to be under the MWSDK directory. However, the folder name must not contain spaces or Japanese characters.
The project file structure is as follows (using PingPong as an example):
The only file that needs editing is the PingPong.cpp file name. Change it to the same name as the folder, AlphaBravo.cpp.
Run build\build-BLUE.cmd to generate the BIN file (on Windows 10).
On Linux/WSL/macOS, run make TWELITE=BLUE to verify that the build succeeds.
Editing the Build Definition
If you need to add files to the build target, edit build/Makefile. .c and .cpp files directly under the project folder are added automatically, but other files require manual editing.
See the Makefile documentation for editing instructions.
VSCode Configuration
If you use VSCode, edit the definitions under .vscode as needed.
Many samples included in the TWELITE STAGE SDK are set up as follows:
The TWELITE STAGE SDK library source code references ${env:MWSDK_TWENET_LIBSRC}/include/** and ${env:MWSDK_TWENET_LIBSRC}/src/**. This environment variable MWSDK_TWENET_LIBSRC is automatically set when opening the project from the TWELITE STAGE app in VSCode.
By default, no additional options such as -D are set for the build tasks.
5 - Installing VSCode for act
Install Visual Studio Code for act development
This page explains the introduction of VSCode for firmware development of the TWELITE wireless module. It does not cover general VSCode usage.
We apologize to those who arrived here via search engines.
We hope you will remember TWELITE, a wireless module characterized by ultra-low power consumption.
To facilitate writing the source code of act, we include configuration files for code interpretation in Visual Studio Code (VSCode).
VSCode reads source files and header files to interpret the source code, which helps with function definition information and completion of function and method names (LSP). Compared to traditional C libraries, the MWX library loads a larger amount of header files. Depending on your environment, the editor may feel slow.
To analyze source code and build from VSCode, information such as the folder where the library source code is stored is required. This information is reflected by launching VSCode from the TWELITE STAGE app. (Specifically, appropriate environment variables are set when starting VSCode. The project settings refer to these environment variables.)
Installing VSCode
Our support does not cover inquiries about how to install or use VSCode. Please refer to publicly available information.
Depending on your environment, security settings may be required for installation. Please check with your system administrator about installation feasibility and refer to official sources and general information for the procedure.
Features of VSCode
Editing source code
Intellisense based on source code interpretation(* This does not guarantee that all definitions are interpreted correctly)
MWX library samples include a .vscode definition. This definition uses the MWSDK_ROOT environment variable to locate the library source code (under {MWSDK_ROOT}/TWENET/current).
When starting VSCode from TWELITE STAGE, the above environment variables and others are set. If VSCode is already running, these settings may not be applied.
VSCode’s source code interpretation does not always exactly match compiler interpretation (due to differences between GCC and clang, etc.). Also, depending on the editing state, interpretation may become more incomplete.
6 - Build Definition Makefile
Build definition with Makefile
The Makefile is stored in build/Makefile. By running the make command, the act is pre-defined to be built.
In MWSDK 2020-04, the .cpp files in the project folder are automatically detected, so usually there is no need to modify the Makefile.
Editing is required when source files are placed in subfolders.
In MWSDK 2019-12 and earlier, if there are multiple .cpp files, editing the Makefile is necessary.
After copying the project folder from another environment, always delete the build/objs_??? folder. If intermediate files from another environment remain, make will result in an error.
(From MWSDK 2020-04 onwards) You can avoid errors by running clean with USE_APPDEPS=0 and then running the make command again.
make USE_APPDEPS=0 TWELITE=BLUE clean
...
make TWELITE=BLUE
make parameters
TWELITE=
Specify the build target as BLUE or RED. For TWELITE BLUE, specify make TWELITE=BLUE.
all
Executes the build. Usually omitted, and run like make TWELITE=BLUE.
clean
Deletes intermediate build files. Run like make TWELITE=BLUE clean.
cleanall
Deletes all intermediate files. Run like make cleanall. This is equivalent to deleting all objs_??? folders in the build folder.
USE_APPDEPS=0 or 1
Setting 1 (default) determines build files based on file dependencies. For example, if a header file changes, related source files will be recompiled.
Setting 0 disables dependency evaluation. If set to 0, make will not error even if inconsistent intermediate files remain.
Makefile definition
Depending on the size of the act and when defining behaviors, source files are usually split and built.
One of the build files is project_folder_name.cpp.
If you want to define other files, edit the build/Makefile in the project folder.
Below is an example Makefile from the sample PAL_AMB-behavior.
##############################################################################
# Copyright (C) 2019 Mono Wireless Inc. All Rights Reserved.
# Released under MW-SLA-*J,*E (MONO WIRELESS SOFTWARE LICENSE
# AGREEMENT).
##############################################################################
# USER PROJECT BUILD DEFINITION.
##############################################################################
#####################################################################
## set TWELITE model
TWELITE ?= BLUE
#TWELITE = RED
#####################################################################
## set application version (MUST SET THIS.)
VERSION_MAIN =0VERSION_SUB =1VERSION_VAR =0#####################################################################
## set an additional source file
## the default file name is dirname.
## for C++ files compiled with g++ (must have .cpp suffix)
APPSRC_CXX += myAppBhvParent.cpp
APPSRC_CXX += myAppBhvParent-handlers.cpp
APPSRC_CXX += myAppBhvChild.cpp
APPSRC_CXX += myAppBhvChild-handlers.cpp
## for C files compiled with gcc (must have .c suffix)
#APPSRC += my_c_file.c
## Additional Src/Include Path
# if set, find source files from given dirs.
#
APP_COMMON_SRC_DIR_ADD1 = ../Parent
APP_COMMON_SRC_DIR_ADD2 = ../Child
#APP_COMMON_SRC_DIR_ADD3 =
#APP_COMMON_SRC_DIR_ADD4 =
#####################################################################
## set misc option for compiler
## C++ flags passed to g++
# e.g. CXXFLAGS += -DMY_DEFS
#CXXFLAGS +=
## C++/C flags passed to g++/gcc
# e.g. CFLAGS += -DMY_DEFS
#CFLAGS +=
## include opts
# e.g. INCFLAGS += -I../my_common_src/
#INCFLAGS +=
## optimize flag (default is -Os, normally no need to change)
#OPTFLAG=-O2
#####################################################################
## must include mwx.mk (the makefile body part.)
MWSDK_PATH?=$(realpath $(MWSDK_ROOT))include$(MWSDK_PATH)/MkFiles/mwx.mk#####################################################################
VERSION_???
Specify the version number. It will be reflected in the built file name.
## set application version (MUST SET THIS.)
VERSION_MAIN =0VERSION_SUB =1VERSION_VAR =0
During compilation, these are passed as definitions like -DVERSION_MAIN=0-DVERSION_SUB=1-DVERSION_VAR=0.
Adding source files
(From MWSDK 2020-04 onwards) If files are not placed in subfolders, no additional specification is required. All .c and .cpp files in the project folder are added automatically.
What is needed when adding source files are APPSRC_CXX and APP_COMMON_SRC_DIR_ADD?.
When placing source files in subfolders, specifying the folder APP_COMMON_SRC_DIR_ADD? is mandatory.
Append the source file names to APPSRC_CXX. These file names must not include folder names. Even if they are in subfolders, specify them without folder names (i.e., if the same file name exists in multiple subfolders, the build will fail).
You can also pass several other options to the compiler and linker.
Option
Description
CXXFLAGS
Specify compile options for C++ source files.
CFLAGS
Specify compile options for C/C++ source files.
INCFLAGS
Specify include paths for header files.
OPTFLAGS
Define when you want to apply compile options other than the default -Os for special reasons.
LDFLAGS
Specify linker options. (Although not mentioned in the comments of the above Makefile, you can specify this.)
7 - Other Platforms
Using other platforms
Build definitions are prepared so that some functions (serparser, pktparser, Serial objects for console) can be built on other platforms as well. Only the necessary files are extracted.
Build definitions are stored in the {mwx library directory}/stdio folder. For build instructions, please refer to README.md (link is on GitHub).
Must be able to compile with C++11.
Must have access to C++11 standard library headers (such as utility, algorithm, functional, iterator).
new/delete/virtual are not used.
Memory allocation using new may be used exceptionally.
In serparser/pktparser, delete is used in alloc_heap that uses the new operator.
(Reference) However, some parts of the mwx library are designed under the assumption that delete is not considered.