There is also a product specialized for binary data transmission: TWELITE UART.
If you are using TWELITE UART, you can skip Writing Firmware and start from List of Communication Modes onward.
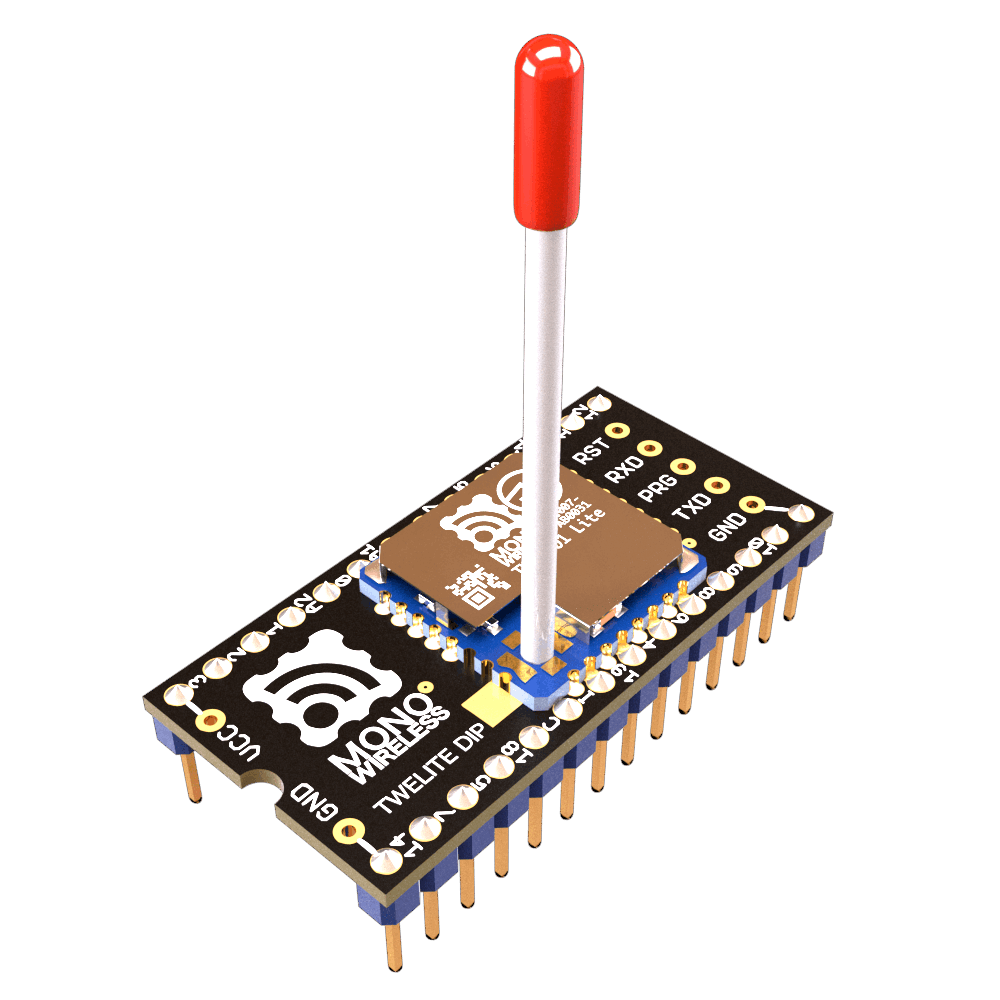
Products Used
 |  |
|---|---|
| TWELITE DIP | TWELITE R2 |
| TWELITE Parent/Child | USB Adapter |
| Serial Communication App | - |
| 2 units | 2 units |
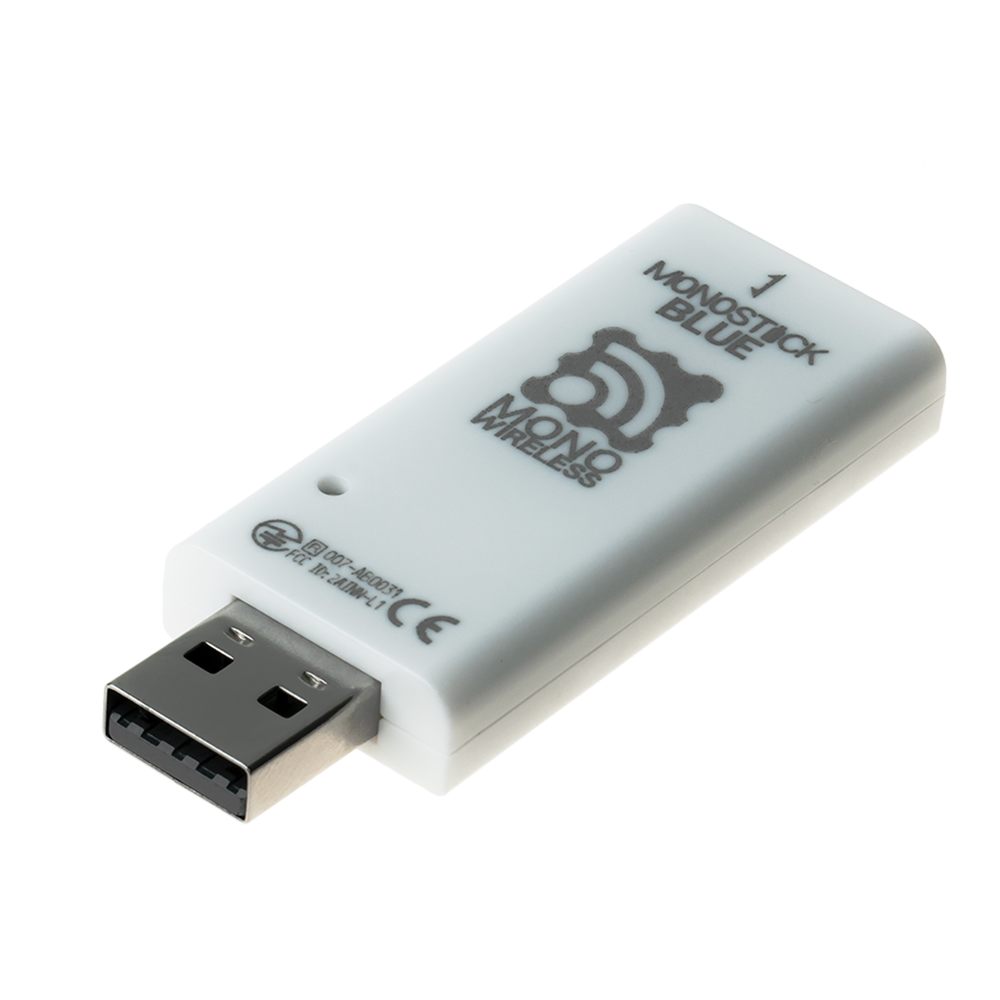
Note: The TWELITE DIP and TWELITE R2 pair is equivalent to a single MONOSTICK. The following combination is also acceptable.
 |
|---|
| MONOSTICK |
| TWELITE Parent/Child |
| Serial Communication App |
| 2 units |
Serial Communication App
Rewrite the TWELITE firmware to the Serial Communication App (App_Uart), which is specialized for wireless serial communication. While the “Extremely Simple! Standard App” also has a function for transmitting binary data via serial communication, its functionality is very limited.
Writing Firmware
Rewrite all Parent, Child, and Repeater devices.
- Install the TWELITE STAGE SDK and launch the TWELITE STAGE App
- From Serial Port Selection, select the connected device
- From the “Main Menu”, select “2: App Write”
- Choose “1: Select from BIN” and select
App_Uart... - Press
Enterseveral times until the write is complete
By default, after a successful write, the device transitions to the following Interactive Mode screen.
--- CONFIG/TWE UART APP V1-04-5/SID=0x82018ca0/LID=0x78 -- ---
 a: set Application ID (0x67720103)
 i: set Device ID (120=0x78)
 c: set Channels (18)
 x: set RF Conf (3)
 r: set Role (0x0)
 l: set Layer (0x1)
 b: set UART baud (38400)
 B: set UART option (8N1)
 m: set UART mode (E)
 k: set Tx Trigger (sep=0x0d0a, min_bytes=0 dly=0[ms])
 h: set header format [;U;%t;%i;0x%A;%q;%s;<*>;%X;\n]
 C: set crypt mode (0)
 o: set option bits (0x00000100)
---
 S: save Configuration
 R: reset to Defaults
List of Communication Modes
The Serial Communication App provides five communication modes, allowing you to select the most suitable one for your application.
- Format Mode (ASCII): Applies a format to both transmission and reception.
- Format Mode (Binary): The binary version of Format Mode (ASCII).
- Chat Mode: Mode for text chat.
- Transparent Mode: Purely wireless-enables UART without applying any format.
- Header Transparent Mode: Applies a format only to the receiver’s output.
By default, the app starts in Header Transparent Mode.
Below, we introduce communication test procedures using four of these modes. Please select and try the mode that interests you.
- Header Transparent Mode
- No format is applied on the transmitting side.
- The receiver’s output format provides information such as the logical device ID of the sender and the received radio signal quality.
- This is a well-balanced mode.
- Transparent Mode
- No format is applied to either transmission or reception.
- The input on the transmitting side and the output on the receiving side are equivalent.
- This is the simplest mode, but functionality is limited.
- Format Mode (ASCII)
- Applies a format to both transmission and reception.
- Requires external devices to support the format, but allows you to specify the destination and identify the sender.
- Binary data is represented as hexadecimal strings.
- Format Mode (Binary)
- Applies a format to both transmission and reception.
- Requires external devices to support the format, but allows you to specify the destination and identify the sender.
- Binary data is represented as-is.
In this example, we will connect two TWELITEs to the same PC and loop back data. Normally, you would use this to connect external devices wirelessly.
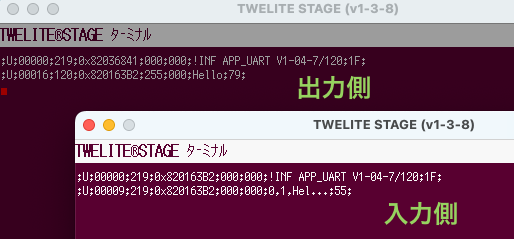
Header Transparent Mode
Let’s use Header Transparent Mode to send the ASCII string Hello from both sides.
How to Configure
The default mode of the Serial Communication App is Header Transparent Mode. Therefore, you can use it as-is with the initial settings.
Communication Test
1. Launch Two TWELITE STAGE Apps
Start two instances of the TWELITE STAGE App (TWELITE_Stage.exe/.command/.run).
TWELITE_Stage_1 and TWELITE_Stage_2).2. Open the Terminal
After selecting the serial port on both TWELITE STAGE Apps, choose “1: Viewer” > “1: Terminal”.
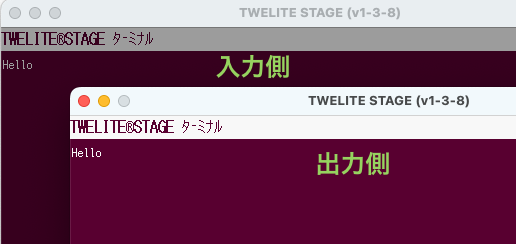
3. Send from One Side
Select one of the windows, type Hello, and press Enter. The message will appear in the other window.
Send from One Side
4. Send from the Other Side
Select the other window, type Hello, and press Enter. The message will appear in the original window.
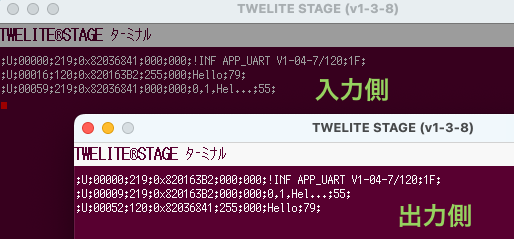
Send from the Other Side
The following sequence can be interpreted as shown below.
;U;00052;120;0x82036841;255;000;Hello;79;
| Data | Description | Value | |
|---|---|---|---|
U | char | Fixed value | U |
00052 | uint16 | Timestamp at output | 52 seconds |
120 | uint8 | Sender’s logical device ID | 120 (Child without ID) |
0x82036841 | uint32 | Sender’s extended address | 82036841 |
255 | uint8 | LQI (Link Quality Indicator) | 255/255 |
000 | uint8 | Sender’s sequence number | 0 |
Hello | [uint8] | Input data | Hello |
79 | uint8 | XOR checksum | 0x79 |
For details on the format, please refer to the manual.
Transparent Mode
Let’s try sending the ASCII string Hello from both sides using Transparent Mode.
How to Configure
Set m: Communication Mode to D.
Communication Test
1. Launch Two TWELITE STAGE Apps
Start two instances of the TWELITE STAGE App (TWELITE_Stage.exe/.command/.run).
TWELITE_Stage_1 and TWELITE_Stage_2).2. Open the Terminal
In both TWELITE STAGE Apps, after selecting the serial port, choose “1: Viewer” > “1: Terminal”.
3. Send from One Side
Select one of the windows, type Hello, and press Enter. The message will appear in the other window.

Send from One Side
4. Send from the Other Side
Select the other window, type Hello, and press Enter. The message will appear in the original window.
Send from the Other Side
Since no formatting is applied to either input or output, the data you enter is output as-is.
Hello
Format Mode (ASCII)
Let’s use Format Mode (ASCII) to send the binary data 0x5A 0xAB 0x90 0x00 from both sides.

Saab 9000 CD 2.3
How to Configure
Set m: Communication Mode to A.
Set i: Logical Device ID to 0 (Parent) on one device, and to 1 (Child, ID 1) on the other.
Communication Test (Simple Format)
Let’s first try the simple, basic format.
1. Launch Two TWELITE STAGE Apps
Start two instances of the TWELITE STAGE App (TWELITE_Stage.exe/.command/.run).
TWELITE_Stage_1 and TWELITE_Stage_2).2. Open the Terminal
After selecting the serial port in both TWELITE STAGE Apps, choose “1: Viewer” > “1: Terminal”.
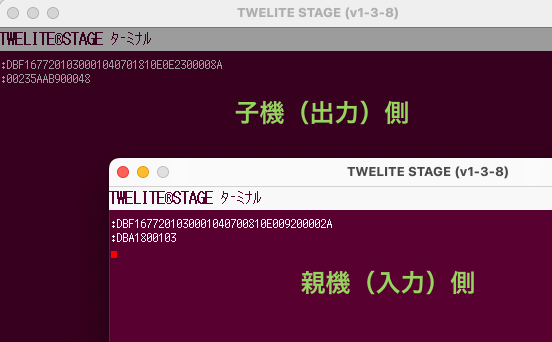
3. Send from the Parent Side
First, copy the following sequence:
:01235AAB900047
The above sequence represents the following:
| Data | Description | Value | |
|---|---|---|---|
: | char | Header (fixed value) | : |
01 | uint8 | Destination logical device ID | 0x01 Child |
23 | uint8 | Arbitrary command number | 0x23 |
5AAB9000 | [uint8] | Data to send | 0x5A 0xAB 0x90 0x00 |
47 | uint8 | Checksum (LRC) | 0x47 |
char | Footer (newline) | CR (0x0D/\r) | |
char | Footer (newline) | LF (0x0A/\n) |
For details of the format, see the manual.
Next, select the Parent side window.
Finally, paste with Alt+V/⌘+V and press Enter. The data will be reflected on the Child side window.
Send from Parent Side
On the receiving side, the sequence can be interpreted as follows:
:00235AAB900048
| Data | Description | Value | |
|---|---|---|---|
: | char | Header (fixed value) | : |
00 | uint8 | Sender’s logical device ID | 0x00 Parent |
23 | uint8 | Command number | 0x23 |
5AAB9000 | [uint8] | Received data | 0x5A 0xAB 0x90 0x00 |
48 | uint8 | Checksum (LRC) | 0x48 |
char | Footer (newline) | CR (0x0D/\r) | |
char | Footer (newline) | LF (0x0A/\n) |
For details of the format, see the manual.
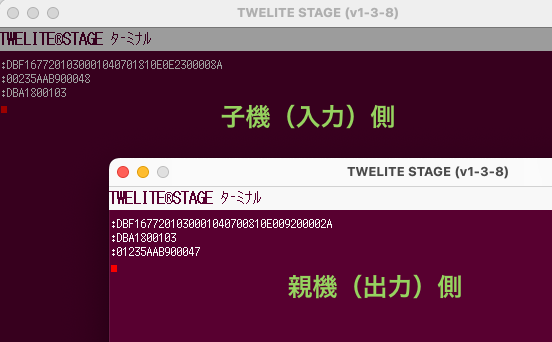
:DBA1..., see the manual.4. Send from the Child Side
First, copy the following sequence:
:00235AAB900048
The above sequence represents the following:
| Data | Description | Value | |
|---|---|---|---|
: | char | Header (fixed value) | : |
00 | uint8 | Destination logical device ID | 0x00 Parent |
23 | uint8 | Arbitrary command number | 0x23 |
5AAB9000 | [uint8] | Data to send | 0x5A 0xAB 0x90 0x00 |
48 | uint8 | Checksum (LRC) | 0x48 |
char | Footer (newline) | CR (0x0D/\r) | |
char | Footer (newline) | LF (0x0A/\n) |
For details of the format, see the manual.
Next, select the Child side window.
Finally, paste with Alt+V/⌘+V and press Enter. The data will be reflected on the Parent side window.
Send from Child Side
On the receiving side, the sequence can be interpreted as follows:
:01235AAB900047
| Data | Description | Value | |
|---|---|---|---|
: | char | Header (fixed value) | : |
01 | uint8 | Sender’s logical device ID | 0x01 Child |
23 | uint8 | Command number | 0x23 |
5AAB9000 | [uint8] | Received data | 0x5A 0xAB 0x90 0x00 |
47 | uint8 | Checksum (LRC) | 0x47 |
char | Footer (newline) | CR (0x0D/\r) | |
char | Footer (newline) | LF (0x0A/\n) |
For details of the format, see the manual.
:DBA1..., see the manual.Communication Test (Extended Format)
Next, let’s try the advanced extended format.
1. Launch Two TWELITE STAGE Apps
Start two instances of the TWELITE STAGE App (TWELITE_Stage.exe/.command/.run).
TWELITE_Stage_1 and TWELITE_Stage_2).2. Open the Terminal
After selecting the serial port in both TWELITE STAGE Apps, choose “1: Viewer” > “1: Terminal”.
3. Send from the Parent Side
First, copy the following sequence:
:01A0CDFF5AAB9000FE
The above sequence represents the following:
| Data | Description | Value | |
|---|---|---|---|
: | char | Header (fixed value) | : |
01 | uint8 | Destination logical device ID | 0x01 Child |
A0 | uint8 | Command number (fixed value) | 0xA0 |
CD | uint8 | Arbitrary response ID | 0xCD |
FF | uint8 | Option None | 0xFF |
5AAB9000 | [uint8] | Data to send | 0x5A 0xAB 0x90 0x00 |
FE | uint8 | Checksum (LRC) | 0xFE |
char | Footer (newline) | CR (0x0D/\r) | |
char | Footer (newline) | LF (0x0A/\n) |
For details of the format, see the manual.
Next, select the Parent side window.
Finally, paste using Alt+V/⌘+V and press Enter. The data will appear in the Child side window.
Send from Parent Side
On the receiving side, the sequence can be interpreted as follows:
:00A0CD82036841FFFFFFFFFF00045AAB9000D1
| Data | Description | Value | |
|---|---|---|---|
: | char | Header (fixed value) | : |
00 | uint8 | Sender’s logical device ID | 0x00 Parent |
A0 | uint8 | Command number (fixed value) | 0xA0 |
CD | uint8 | Response ID | 0xCD |
82036841 | uint32 | Sender’s extended address | 0x82036841 |
FFFFFFFF | uint32 | Destination extended address | 0xFFFFFFFF None |
FF | uint8 | LQI | 255/255 |
0004 | uint16 | Length of following data | 4 bytes |
5AAB9000 | [uint8] | Received data | 0x5A 0xAB 0x90 0x00 |
D1 | uint8 | Checksum (LRC) | 0xD1 |
char | Footer (newline) | CR (0x0D/\r) | |
char | Footer (newline) | LF (0x0A/\n) |
For details of the format, see the manual.
:DBA1..., see the manual.4. Send from the Child Side
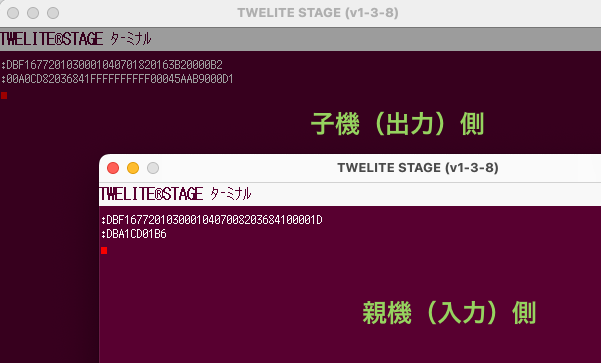
First, copy the following sequence:
:00A0CDFF5AAB9000FF
The above sequence represents the following:
| Data | Description | Value | |
|---|---|---|---|
: | char | Header (fixed value) | : |
00 | uint8 | Destination logical device ID | 0x00 Parent |
A0 | uint8 | Command number (fixed value) | 0xA0 |
CD | uint8 | Arbitrary response ID | 0xCD |
FF | uint8 | Option None | 0xFF |
5AAB9000 | [uint8] | Data to send | 0x5A 0xAB 0x90 0x00 |
FF | uint8 | Checksum (LRC) | 0xFF |
char | Footer (newline) | CR (0x0D/\r) | |
char | Footer (newline) | LF (0x0A/\n) |
For details of the format, see the manual.
Next, select the Child side window.
Finally, paste using Alt+V/⌘+V and press Enter. The data will appear in the Parent side window.
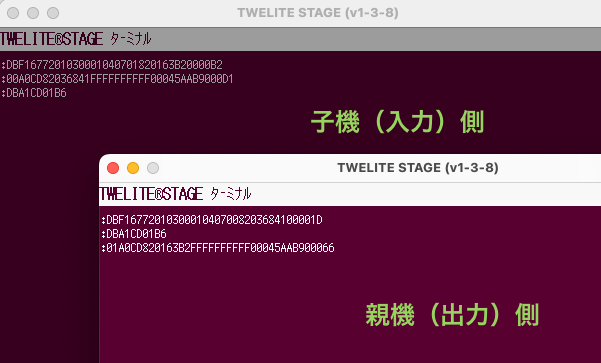
Send from Child Side
On the receiving side, the sequence can be interpreted as follows:
:01A0CD820163B2FFFFFFFFFF00045AAB900066
| Data | Description | Value | |
|---|---|---|---|
: | char | Header (fixed value) | : |
01 | uint8 | Sender’s logical device ID | 0x01 Child |
A0 | uint8 | Command number (fixed value) | 0xA0 |
CD | uint8 | Response ID | 0xCD |
820163B2 | uint32 | Sender’s extended address | 0x820163B2 |
FFFFFFFF | uint32 | Destination extended address | 0xFFFFFFFF None |
FF | uint8 | LQI | 255/255 |
0004 | uint16 | Length of following data | 4 bytes |
5AAB9000 | [uint8] | Received data | 0x5A 0xAB 0x90 0x00 |
66 | uint8 | Checksum (LRC) | 0x66 |
char | Footer (newline) | CR (0x0D/\r) | |
char | Footer (newline) | LF (0x0A/\n) |
For details of the format, see the manual.
:DBA1..., see the manual.Format Mode (Binary)
Let’s use Format Mode (Binary) to send the binary data 0x5A 0xAB 0x90 0x00 from both sides.
Saab 9000 CD 2.3
From here on, the 0x prefix for binary data will be omitted.
For example, 0x5A 0xAB 0x90 0x00 will be shown as 5A AB 90 00.
How to Configure
Set m: Communication Mode to B.
Set the i: Logical Device ID to 0 (Parent) on one terminal, and to 1 (Child, ID 1) on the other.
Prepare an Environment that Supports Binary Data
The terminal features of the TWELITE STAGE App and TeraTerm do not support binary data. You need to use a terminal software that supports binary format.
Here, we use CoolTerm as an example.
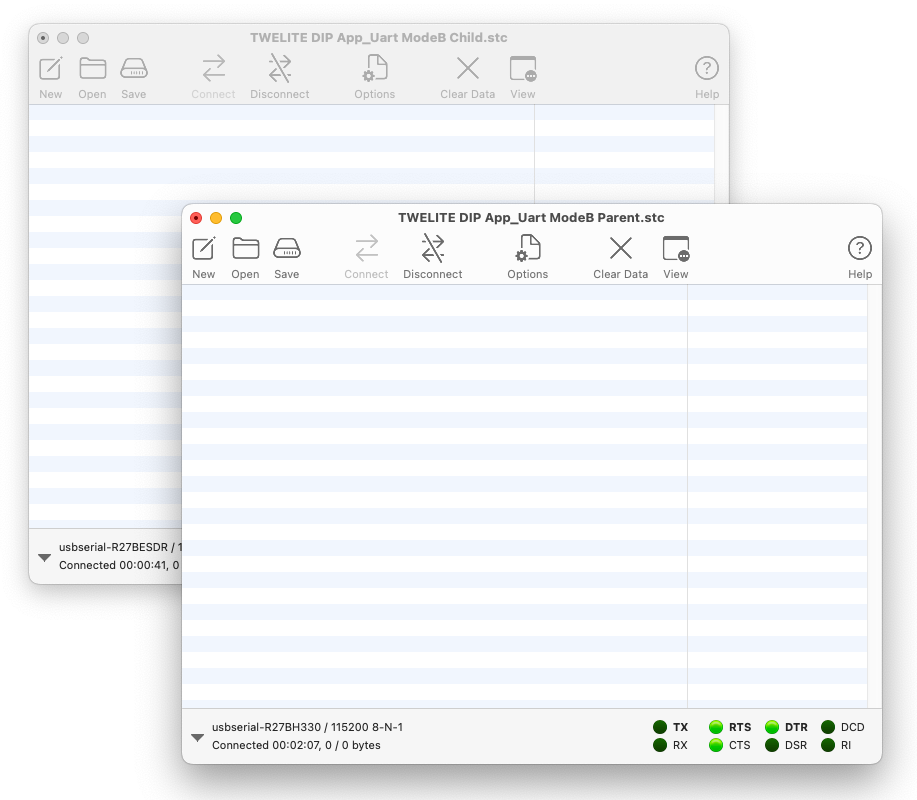
Communication Test (Simple Format)
Let’s first try the simple, basic format.
1. Open Two CoolTerm Windows
Open two CoolTerm windows and connect each to a device.
About Configuration
Set Options > Terminal > Terminal Mode to Raw Mode, and uncheck Options > Transmit > Send String Options > Terminate 'Send String' Data.
For details on configuration, see UART Communication Without Using the STAGE App.
To display received data in hexadecimal, select View > View Hex. Click Connect to connect.
Two CoolTerm windows open
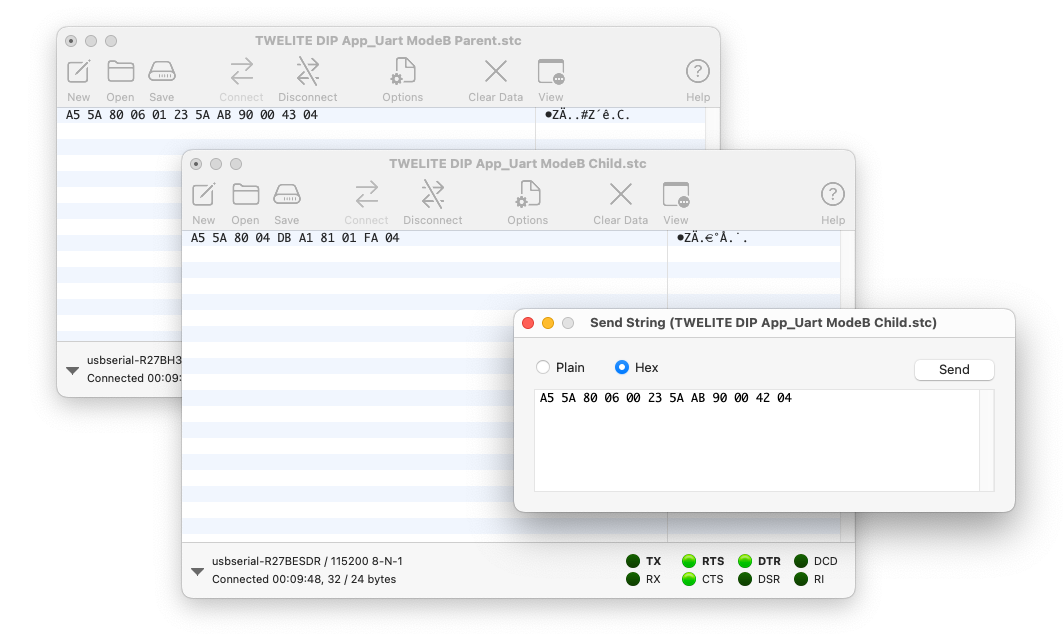
2. Send from the Parent Side
Select the Parent window, then choose Connection > Send String... to open the send window, and select the Hex radio button.
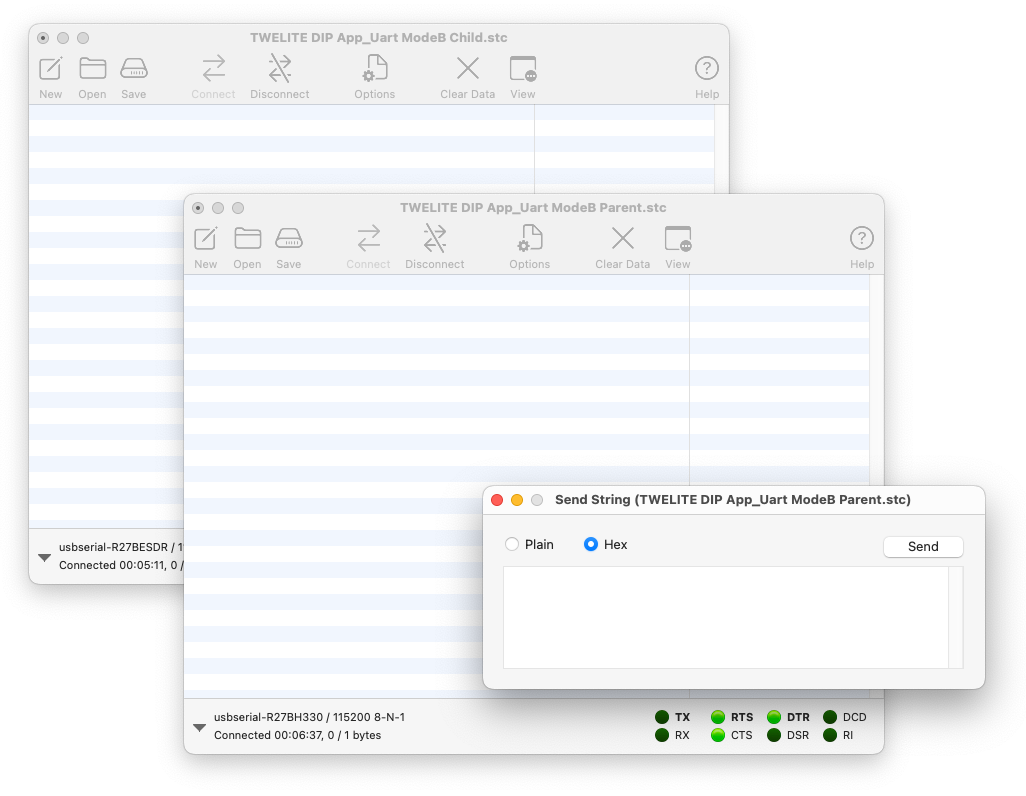
Send window open
Enter the following and click Send to transmit from the Parent.
A5 5A 80 06 01 23 5A AB 90 00 43 04
The above sequence represents the following:
| Data | Description | Value | |
|---|---|---|---|
A5 | uint8 | Header (fixed value) | 0xA5 |
5A | uint8 | Header (fixed value) | 0x5A |
8006 | uint16 | Data length | 6 bytes |
01 | uint8 | Destination Logical Device ID | 0x01 Child |
23 | uint8 | Arbitrary command number | 0x23 |
5AAB9000 | [uint8] | Data to send | 5A AB 90 00 |
43 | uint8 | Checksum (XOR) | 0x43 |
04 | uint8 | Footer | EOT (0x04) |
For details of the format, see the manual.
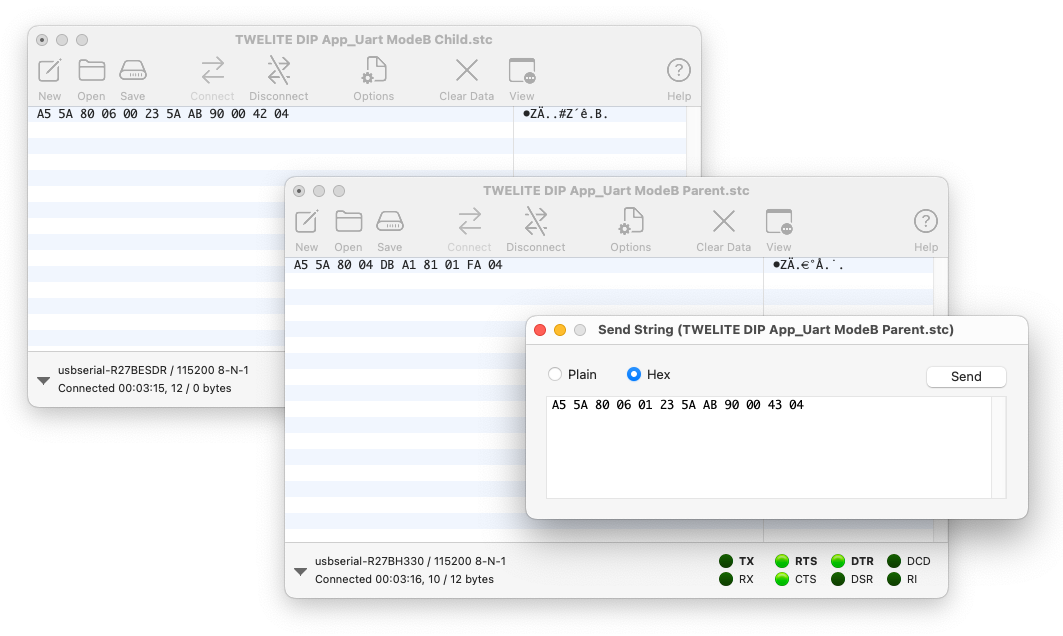
Send from Parent Side
On the receiving side, the sequence can be interpreted as follows:
A5 5A 80 06 00 23 5A AB 90 00 42 04
| Data | Description | Value | |
|---|---|---|---|
A5 | uint8 | Header (fixed value) | 0xA5 |
5A | uint8 | Header (fixed value) | 0x5A |
8006 | uint16 | Data length | 6 bytes |
00 | uint8 | Sender Logical Device ID | 0x00 Parent |
23 | uint8 | Command number | 0x23 |
5AAB9000 | [uint8] | Received data | 5A AB 90 00 |
42 | uint8 | Checksum (XOR) | 0x42 |
04 | uint8 | Footer | EOT (0x04) |
For details of the format, see the manual.
A5 5A 80 04 DBA1..., see the manual.3. Sending from the Child Side
Just as with the Parent, select the Child window, then go to Connection > Send String... to open the send window, and make sure the Hex radio button is selected.
Enter the following content and click Send to transmit to the Parent.
A5 5A 80 06 00 23 5A AB 90 00 42 04
The above sequence represents the following:
| Data | Description | Value | |
|---|---|---|---|
A5 | uint8 | Header (fixed value) | 0xA5 |
5A | uint8 | Header (fixed value) | 0x5A |
8006 | uint16 | Data length | 6 bytes |
00 | uint8 | Destination Logical Device ID | 0x00 Parent |
23 | uint8 | Arbitrary command number | 0x23 |
5AAB9000 | [uint8] | Data to send | 5A AB 90 00 |
42 | uint8 | Checksum (XOR) | 0x42 |
04 | uint8 | Footer | EOT (0x04) |
For details of the format, see the manual.
Send from Child Side
On the receiving side, the sequence can be interpreted as follows:
A5 5A 80 06 01 23 5A AB 90 00 43 04
| Data | Description | Value | |
|---|---|---|---|
A5 | uint8 | Header (fixed value) | 0xA5 |
5A | uint8 | Header (fixed value) | 0x5A |
8006 | uint16 | Data length | 6 bytes |
01 | uint8 | Sender Logical Device ID | 0x01 Child |
23 | uint8 | Command number | 0x23 |
5AAB9000 | [uint8] | Received data | 5A AB 90 00 |
43 | uint8 | Checksum (XOR) | 0x43 |
04 | uint8 | Footer | EOT (0x04) |
For details of the format, see the manual.
A5 5A 80 04 DB A1..., see the manual.Communication Test (Extended Format)
Next, let’s try the advanced extended format.
1. Open Two CoolTerm Windows
Open two CoolTerm windows and connect each to a device.
About Configuration
Set Options > Terminal > Terminal Mode to Raw Mode, and uncheck Options > Transmit > Send String Options > Terminate 'Send String' Data.
For details on configuration, see UART Communication Without Using the STAGE App.
To display received data in hexadecimal, select View > View Hex. Click Connect to connect.
Two CoolTerm windows open
2. Send from the Parent Side
Select the Parent window, then choose Connection > Send String... to open the send window, and select the Hex radio button.
Send window open
Enter the following and click Send to transmit to the Child.
A5 5A 80 08 01 A0 CD FF 5A AB 90 00 F2 04
The above sequence represents the following:
| Data | Description | Value | |
|---|---|---|---|
A5 | uint8 | Header (fixed value) | 0xA5 |
5A | uint8 | Header (fixed value) | 0x5A |
8008 | uint16 | Data length | 8 bytes |
01 | uint8 | Destination Logical Device ID | 0x01 Child |
A0 | uint8 | Command number (fixed value) | 0xA0 |
CD | uint8 | Arbitrary response ID | 0xCD |
FF | uint8 | Option None | 0xFF |
5AAB9000 | [uint8] | Data to send | 0x5A 0xAB 0x90 0x00 |
F2 | uint8 | Checksum (XOR) | 0xF2 |
04 | uint8 | Footer | EOT (0x04) |
For details of the format, see the manual.
Send from Parent Side
On the receiving side, the sequence can be interpreted as follows:
A5 5A 80 12 00 A0 CD 81 0E 0E 23 FF FF FF FF BA 00 04 5A AB 90 00 10 04
| Data | Description | Value | |
|---|---|---|---|
A5 | uint8 | Header (fixed value) | 0xA5 |
5A | uint8 | Header (fixed value) | 0x5A |
8012 | uint16 | Data length | 18 bytes |
00 | uint8 | Sender Logical Device ID | 0x00 Parent |
A0 | uint8 | Command number (fixed value) | 0xA0 |
CD | uint8 | Response ID | 0xCD |
810E0E23 | uint32 | Sender extended address | 0x810E0E23 |
FFFFFFFF | uint32 | Destination extended address | 0xFFFFFFFF None |
BA | uint8 | LQI | 186/255 |
0004 | uint16 | Length of following data | 4 bytes |
5AAB9000 | [uint8] | Received data | 0x5A 0xAB 0x90 0x00 |
10 | uint8 | Checksum (XOR) | 0x10 |
04 | uint8 | Footer | EOT (0x04) |
For details of the format, see the manual.
A5 5A 80 04 DB A1..., see the manual.3. Send from the Child Side
As with the Parent, select the Child window, then go to Connection > Send String... to open the send window, and make sure the Hex radio button is selected.
Enter the following and click Send to transmit to the Parent.
A5 5A 80 08 00 A0 CD FF 5A AB 90 00 F3 04
The above sequence represents the following:
| Data | Description | Value | |
|---|---|---|---|
A5 | uint8 | Header (fixed value) | 0xA5 |
5A | uint8 | Header (fixed value) | 0x5A |
8008 | uint16 | Data length | 8 bytes |
00 | uint8 | Destination Logical Device ID | 0x00 Parent |
A0 | uint8 | Command number (fixed value) | 0xA0 |
CD | uint8 | Arbitrary response ID | 0xCD |
FF | uint8 | Option None | 0xFF |
5AAB9000 | [uint8] | Data to send | 0x5A 0xAB 0x90 0x00 |
F3 | uint8 | Checksum (XOR) | 0xF3 |
04 | uint8 | Footer | EOT (0x04) |
For details of the format, see the manual.

Send from Child Side
On the receiving side, the sequence can be interpreted as follows:
A5 5A 80 12 01 A0 CD 81 0E 00 92 FF FF FF FF BA 00 04 5A AB 90 00 AE 04
| Data | Description | Value | |
|---|---|---|---|
A5 | uint8 | Header (fixed value) | 0xA5 |
5A | uint8 | Header (fixed value) | 0x5A |
8012 | uint16 | Data length | 18 bytes |
01 | uint8 | Sender Logical Device ID | 0x01 Child |
A0 | uint8 | Command number (fixed value) | 0xA0 |
CD | uint8 | Response ID | 0xCD |
810E0092 | uint32 | Sender extended address | 0x820163B2 |
FFFFFFFF | uint32 | Destination extended address | 0xFFFFFFFF None |
BA | uint8 | LQI | 186/255 |
0004 | uint16 | Length of following data | 4 bytes |
5AAB9000 | [uint8] | Received data | 0x5A 0xAB 0x90 0x00 |
AE | uint8 | Checksum (XOR) | 0xAE |
04 | uint8 | Footer | EOT (0x04) |
For details of the format, see the manual.
A5 5A 80 04 DB A1..., see the manual.