By using a dedicated library, you can communicate with TWELITE child devices via TWELITE STICK from Python.
Much of the content on this page also applies to the MONOSTICK series.
Basic Operation Check
Connect the TWELITE STICK
Connect the TWELITE STICK to your PC’s USB port.
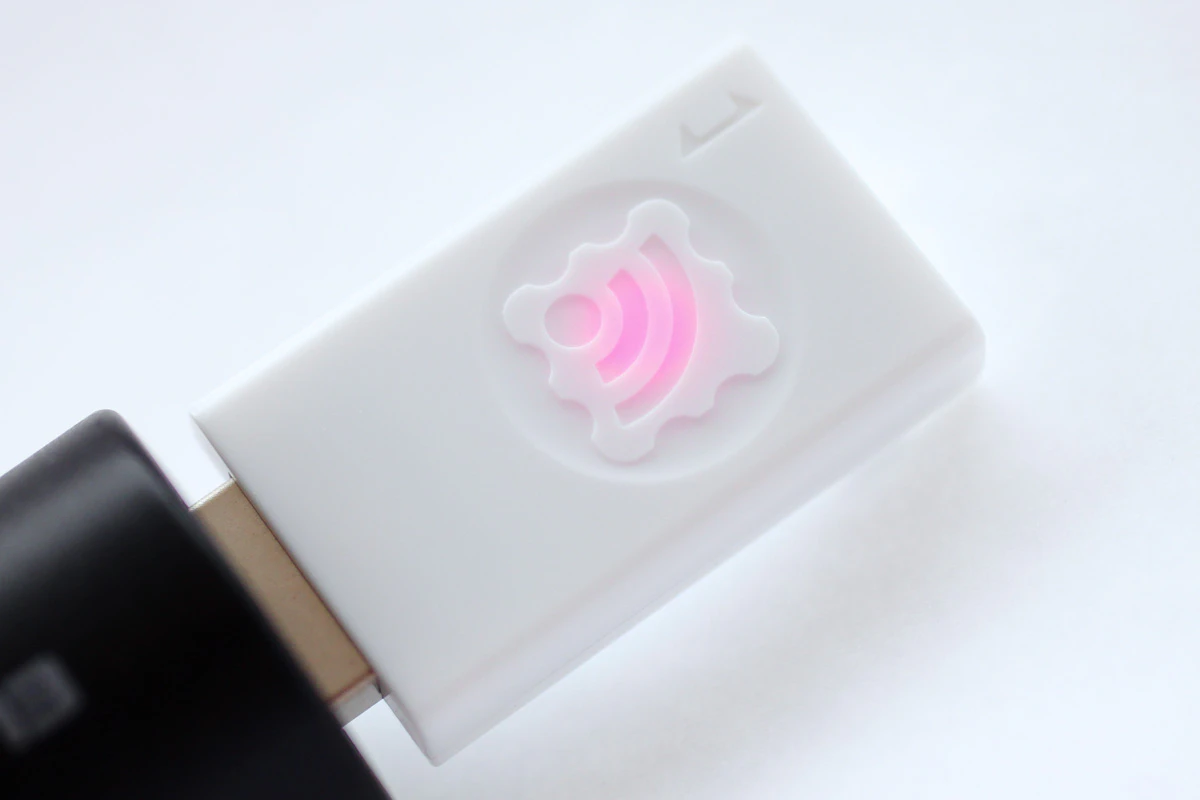
The factory-default TWELITE is configured in Parent mode of the Parent and Repeater App. It can send and receive data to and from child devices in the TWELITE series, and the logo should light up magenta.
Factory default state
Installing the MWings Library
Prepare a Python 3.12 or later environment.
Install the MWings module, which interprets the output of the Parent and Repeater App.
pip install mwings
The MWings module allows communication with TWELITE child devices via a TWELITE parent device connected to the host.
Interprets data received from the parent and converts it into a dictionary, JSON, or pandas DataFrame format*
Sends commands generated from dictionaries to the parent device
*The Lite version does not support pandas
For detailed installation instructions and full feature documentation, refer to the MWings for Python Manual.
In modern Python development, managing Python versions and project-level dependencies is essential. The manual introduces how to set up an environment using pyenv and poetry.
This version removes the dependency on pandas, avoiding potential conflicts with numpy. Although it does not support DataFrame output, it retains output functions for dictionaries and JSON strings.
Because of its lightweight nature, it can also be a good option on regular PCs if you do not need pandas functionality.
Confirming Data Reception
Verify that TWELITE STICK can interpret the received data.
This script will print the contents of all types of packets received by the TWELITE STICK in JSON format to the terminal, allowing you to confirm the data.
# -*- coding:utf-8 -*-# Written for Python 3.12# Formatted with Black# MWings example: Receive data, print JSON, typedfrom zoneinfo import ZoneInfo
import mwings as mw
# Main functiondefmain() ->None:
# Create a twelite object twelite = mw.Twelite(mw.utils.ask_user_for_port())
# Use JST for received data twelite.set_timezone(ZoneInfo("Asia/Tokyo"))
# Register event handlers@twelite.on(mw.common.PacketType.APP_ARIA)
defon_app_aria(packet: mw.parsers.app_aria.ParsedPacket) ->None:
print(packet.to_json(verbose=False, spread=True))
@twelite.on(mw.common.PacketType.APP_CUE)
defon_app_cue(packet: mw.parsers.app_cue.ParsedPacket) ->None:
print(packet.to_json(verbose=False, spread=True))
@twelite.on(mw.common.PacketType.APP_CUE_PAL_EVENT)
defon_app_cue_pal_event(packet: mw.parsers.app_cue_pal_event.ParsedPacket) ->None:
print(packet.to_json(verbose=False, spread=True))
@twelite.on(mw.common.PacketType.APP_IO)
defon_app_io(packet: mw.parsers.app_io.ParsedPacket) ->None:
print(packet.to_json(verbose=False, spread=True))
@twelite.on(mw.common.PacketType.APP_TWELITE)
defon_app_twelite(packet: mw.parsers.app_twelite.ParsedPacket) ->None:
print(packet.to_json(verbose=False, spread=True))
@twelite.on(mw.common.PacketType.APP_PAL_AMB)
defon_app_pal_amb(packet: mw.parsers.app_pal_amb.ParsedPacket) ->None:
print(packet.to_json(verbose=False, spread=True))
@twelite.on(mw.common.PacketType.APP_PAL_MOT)
defon_app_pal_mot(packet: mw.parsers.app_pal_mot.ParsedPacket) ->None:
print(packet.to_json(verbose=False, spread=True))
@twelite.on(mw.common.PacketType.APP_PAL_OPENCLOSE)
defon_app_pal_openclose(packet: mw.parsers.app_pal_openclose.ParsedPacket) ->None:
print(packet.to_json(verbose=False, spread=True))
@twelite.on(mw.common.PacketType.APP_UART_ASCII)
defon_app_uart_ascii(packet: mw.parsers.app_uart_ascii.ParsedPacket) ->None:
print(packet.to_json(verbose=False, spread=True))
@twelite.on(mw.common.PacketType.APP_UART_ASCII_EXTENDED)
defon_app_uart_ascii_extended(
packet: mw.parsers.app_uart_ascii_extended.ParsedPacket,
) ->None:
print(packet.to_json(verbose=False, spread=True))
@twelite.on(mw.common.PacketType.ACT)
defon_act(packet: mw.parsers.act.ParsedPacket) ->None:
print(packet.to_json(verbose=False, spread=True))
# Start receivingtry:
# Set as daemon thread twelite.daemon =True# Start the thread, Join to the main thread twelite.start()
print("Started receiving")
whileTrue:
twelite.join(0.5)
exceptKeyboardInterrupt:
# Stop the thread print("Flushing...")
twelite.stop()
print("Completed")
if __name__ =="__main__":
# Call the main function main()
For example, if you have prepared a factory-default TWELITE DIP running the Extremely Simple! Standard App as a child device, just like in the previous section Using TWELITE STAGE APP, you should see an output like the following. To stop the script, press Ctrl+C.
It is useful as a command-line tool for logging received data over extended periods.
python rx_export_csv_durable.py -h
usage: rx_export_csv_durable.py [-h][-v][-s]Log packets from App_Wings to csv, line by line
options:
-h, --help show this help message and exit
-v, --verbose include system information
-s, --sort sort columns in the output
Sending and Receiving Arbitrary Data
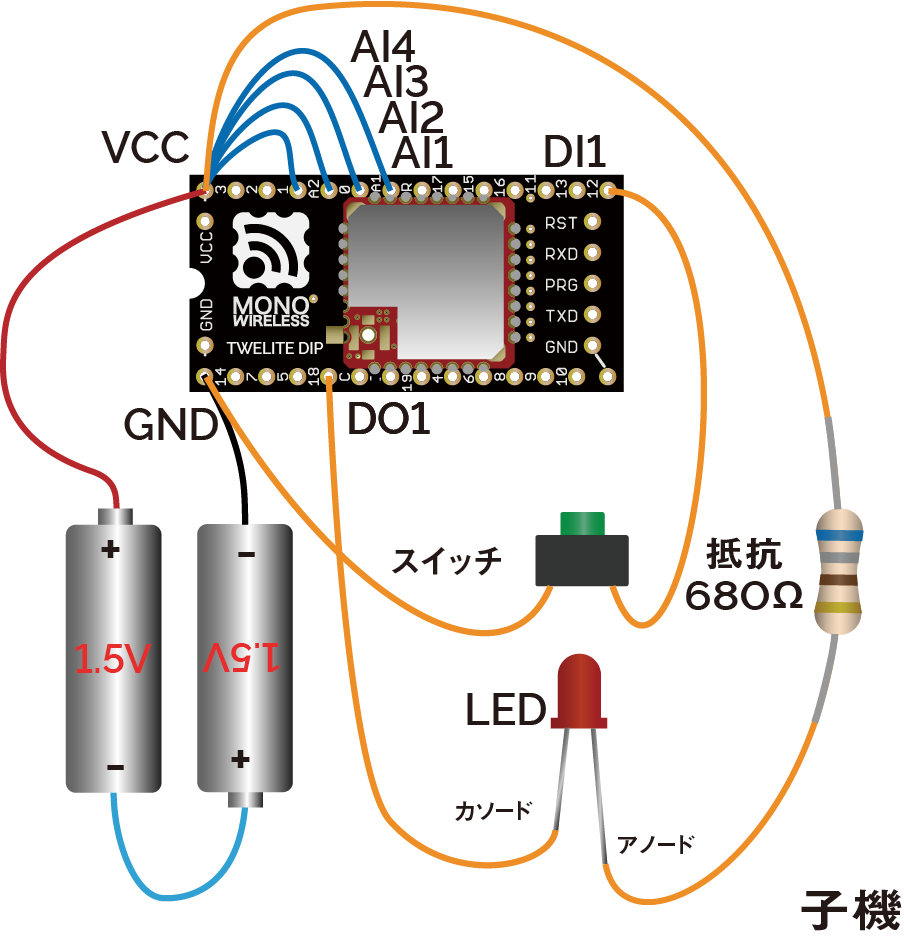
Here, let’s create a script that specifically communicates with a TWELITE DIP child device prepared just like in Using TWELITE STAGE APP.
Example wiring of TWELITE DIP child device
The goal is to display the state of a switch connected to the DI1 pin of the TWELITE DIP and control an LED connected to the DO1 pin.
Receiving Only Standard App Data
Modify rx_print_json.py to create a simplified script that only receives data from the Extremely Simple! Standard App.
# -*- coding:utf-8 -*-from zoneinfo import ZoneInfo
import mwings as mw
# Main functiondefmain() ->None:
# Create a twelite object twelite = mw.Twelite(mw.utils.ask_user_for_port())
# Use JST for received data twelite.set_timezone(ZoneInfo("Asia/Tokyo"))
# Register event handlers@twelite.on(mw.common.PacketType.APP_TWELITE)
defon_app_twelite(packet: mw.parsers.app_twelite.ParsedPacket) ->None:
print(packet.to_json(verbose=False, spread=True))
# Start receivingtry:
# Set as daemon thread twelite.daemon =True# Start the thread, Join to the main thread twelite.start()
print("Started receiving")
whileTrue:
twelite.join(0.5)
exceptKeyboardInterrupt:
# Stop the thread print("Flushing...")
twelite.stop()
print("Completed")
if __name__ =="__main__":
# Call the main function main()
Script Mechanism
By calling twelite.start(), a thread for receiving is launched, and twelite.on registers an event handler for each application type (in this case, on_app_twelite()), which is invoked upon each packet reception.
In the previous script, we used the to_json() method to output all data as a JSON string.
Here, we’ll extract only the state of the DI1 pin from parsers.app_twelite.ParsedPacket using the di_state field and display a virtual LED in the terminal.
If pressing the switch connected to the DI pin of TWELITE DIP causes the red light to appear, it indicates success.
Example display
Sending Commands to the Parent Device
In addition to displaying data received by the TWELITE STICK, you can also send data from the TWELITE STICK.
In the script’s main loop, we call threading.Thread.join() every 0.5 seconds so that the receiving thread can also terminate when the main thread ends.
# Start the thread, Join to the main thread twelite.start()
print("Started receiving")
whileTrue:
twelite.join(0.5)
Using this mechanism, let’s control the DO1 pin of the TWELITE DIP from the main loop and try blinking the LED every 0.5 seconds.
Modify the previous script as follows. The full script below includes all changes made so far.
# -*- coding:utf-8 -*-from zoneinfo import ZoneInfo
from typing import Any
import mwings as mw
# Main functiondefmain() ->None:
# Create a twelite object twelite = mw.Twelite(mw.utils.ask_user_for_port())
# Use JST for received data twelite.set_timezone(ZoneInfo("Asia/Tokyo"))
# Register event handlers@twelite.on(mw.common.PacketType.APP_TWELITE)
defon_app_twelite(packet: mw.parsers.app_twelite.ParsedPacket) ->None:
print(f"\rDO1 LED: {"🔴"if packet.di_state[0] else"⚪"}", end='', flush=True)
# Initialize command initial: dict[str, Any] = {
"destination_logical_id": 0x78, # All child devices"di_to_change": [True, False, False, False], # Enable DI1"di_state": [False, False, False, False], # Initial state of DIx }
command = mw.serializers.app_twelite.Command(**initial)
# Toggle the DI1 statedeftoggle_di1() ->None:
command.di_state[0] =not command.di_state[0]
twelite.send(command)
# Start receivingtry:
# Set as daemon thread twelite.daemon =True# Start the thread, Join to the main thread twelite.start()
print("Started receiving")
whileTrue:
toggle_di1() # Send twelite.join(0.5) # ReceiveexceptKeyboardInterrupt:
# Stop the thread print("Flushing...")
twelite.stop()
print("Completed")
if __name__ =="__main__":
# Call the main function main()
Script Mechanism
First, the contents of serializers.app_twelite.Command are initialized. Then, a closure toggle_di1() is defined to invert di_state[0] and send it. By calling toggle_di1() from the main loop, the LED is made to blink.
When you run this script, it displays a virtual LED just like before.
Example display
At the same time, the LED connected to the DO1 pin of TWELITE DIP should continuously blink. When you stop the script, the blinking stops.
Packet reception and command transmission can be handled asynchronously.
1 - Communicating with Child Devices Using Python (Web Server IoT)
Send data from child devices to a web server using Python
As a practical application, this guide demonstrates how to build an IoT system using a web server.
The content on this page also applies to the MONOSTICK series.
Collecting Temperature and Humidity Data from TWELITE ARIA
Let’s build a simple IoT system that receives temperature and humidity data from the sensor tag TWELITE ARIA, sends it to a web server, and displays it on a graph.
In the basic script for TWELITE DIP, we only performed simple operations on DI1 and DO1. However, in an actual IoT system, it is necessary to send acquired data to an upstream server using methods such as REST APIs.
The former does not require TWELITE R2/R3, while the latter allows smoother operation.
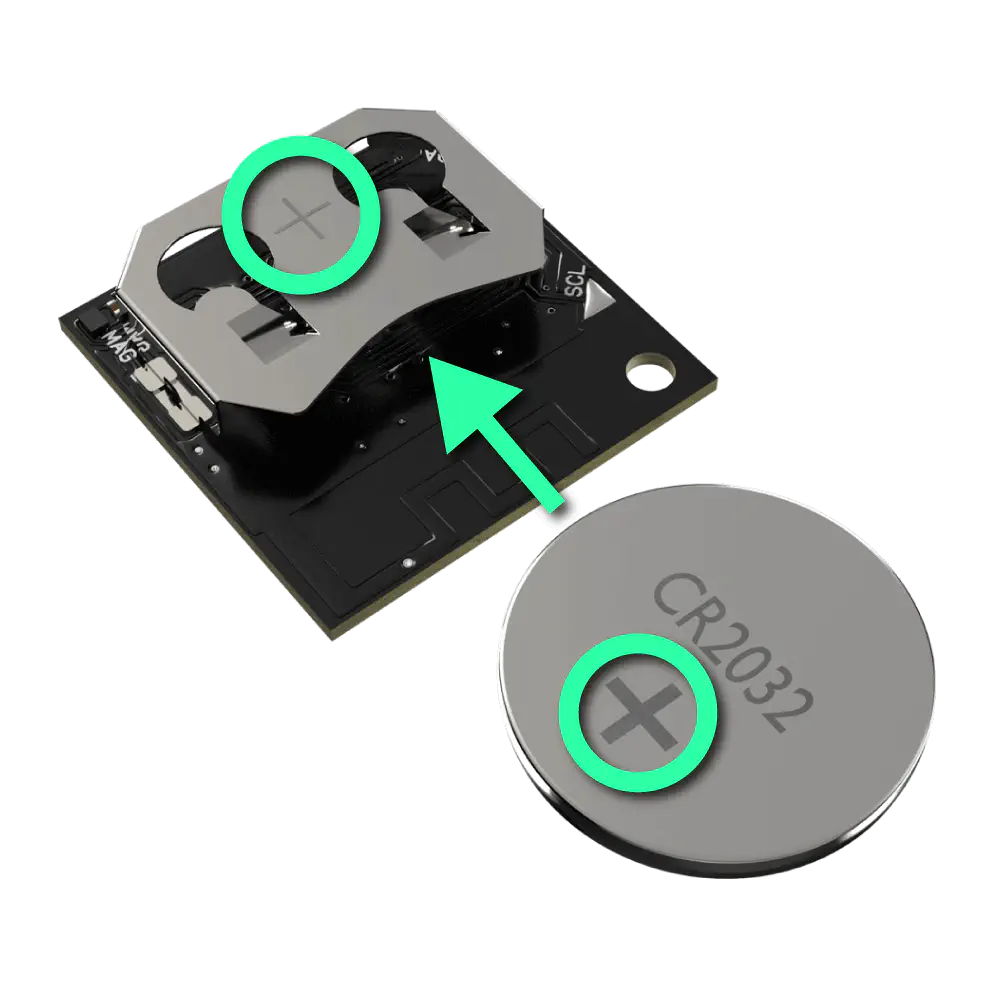
Starting TWELITE ARIA
Insert a CR2032 battery to power up TWELITE ARIA.
Insert CR2032 battery
Writing and Running the Script
Installing Required Modules
Prepare Python 3.12 or later and install the mwings (or mwingslite) and requests modules.
pip install mwings requests
Creating the Script
Create the script stick_aria_thingspeak.py as shown below. Use mwings.parsers.app_aria to receive data and the requests module to send HTTP GET requests to ThingSpeak.
Replace the initial API_KEY with the key you saved earlier.
# -*- coding:utf-8 -*-from zoneinfo import ZoneInfo
from time import perf_counter
import mwings as mw
import requests
API_KEY ="XXXXXXXXXXXXXXXX"# Replace with your ThingSpeak API keyBASE_URL ="https://api.thingspeak.com/update"SEND_MIN_INTERVAL =20# Minimum interval in seconds to send data to ThingSpeak# Main functiondefmain() ->None:
# Create a twelite object twelite = mw.Twelite(mw.utils.ask_user_for_port())
# Use JST for received data twelite.set_timezone(ZoneInfo("Asia/Tokyo"))
# Initialize last send time last_send_time = perf_counter() - SEND_MIN_INTERVAL
# Initialize the target serial ID target_serial_id =-1# Register event handlers@twelite.on(mw.common.PacketType.APP_ARIA)
defon_app_aria(packet: mw.parsers.app_aria.ParsedPacket) ->None:
# Filter packets by serial IDif target_serial_id <0:
# Set the serial ID from the received packet target_serial_id = packet.source_serial_id
print(f"Serial ID set to {target_serial_id:08X}")
elif packet.source_serial_id != target_serial_id:
# Ignore packets from other serial ID devices print(
f"Ignoring packet from serial ID {packet.source_serial_id:08X}, expected {target_serial_id:08X}" )
return# Throttle sending to ThingSpeakif perf_counter() - last_send_time < SEND_MIN_INTERVAL:
print("Skipping send due to minimum interval")
return# Skip sending if within the minimum interval last_send_time = perf_counter() # Update last send time# Send data to ThingSpeak payload = {
"api_key": API_KEY,
"field1": f"{packet.temp_100x /100.0:.2f}", # Temperature"field2": f"{packet.humid_100x /100.0:.2f}", # Humidity"field3": f"{packet.supply_voltage}", # Supply voltage (mV)"field4": f"{packet.lqi}", # Link Quality Indicator }
response = requests.get(BASE_URL, params=payload)
# Check the response statusif response.status_code ==200:
print(f"OK: entry ID = {response.text}")
else:
print(f"NG: status code = {response.status_code}")
# Start receivingtry:
# Set as daemon thread twelite.daemon =True# Start the thread, Join to the main thread twelite.start()
print("Started receiving")
whileTrue:
twelite.join(0.5) # ReceiveexceptKeyboardInterrupt:
# Stop the thread print("Flushing...")
twelite.stop()
print("Completed")
if __name__ =="__main__":
# Call the main function main()
Running the Script
Execute the script.
python stick_aria_thingspeak.py
If data is successfully received from TWELITE ARIA and sent correctly, you will see the following output showing entry IDs in sequence:
Started receiving
Serial ID set to 8201C2DC
OK: entry ID = 1
OK: entry ID = 2
OK: entry ID = 3
OK: entry ID = 4
OK: entry ID = 5
...
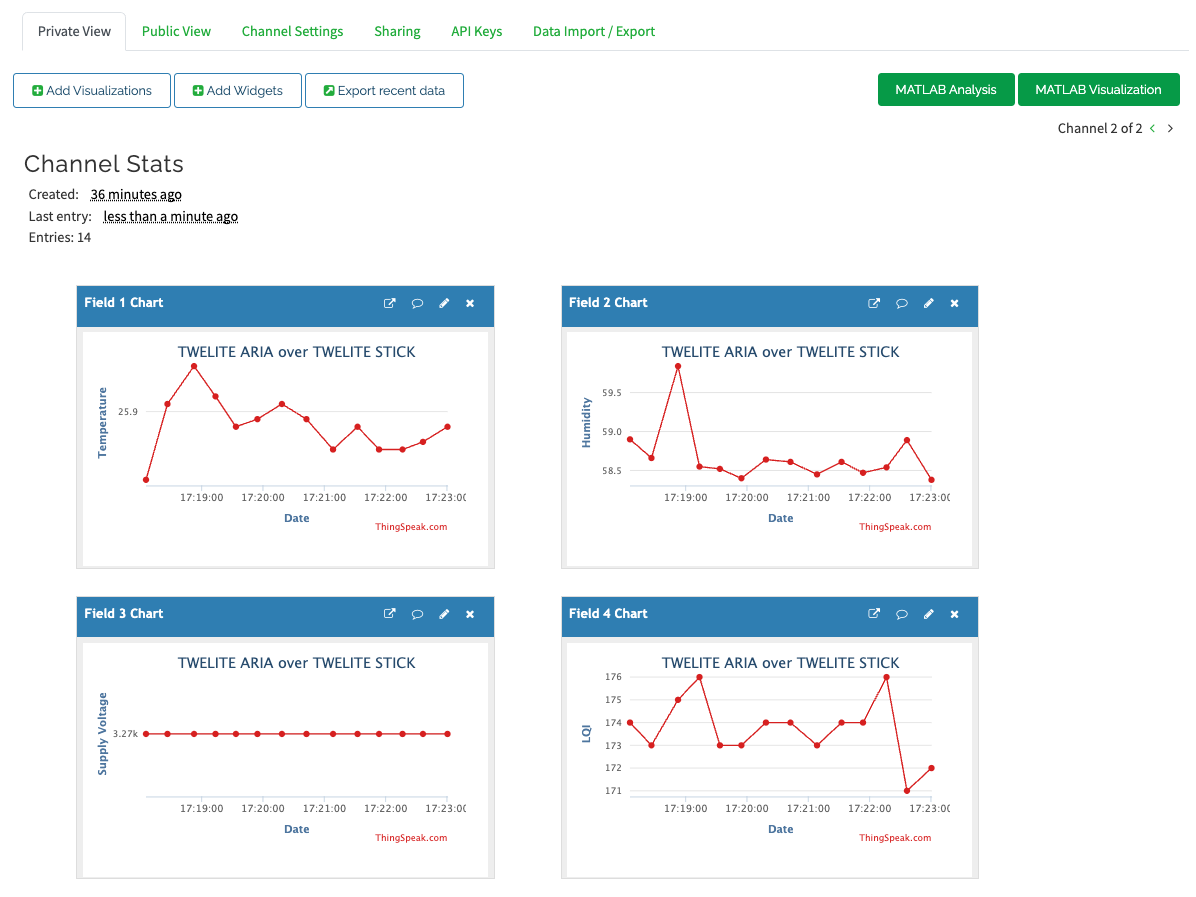
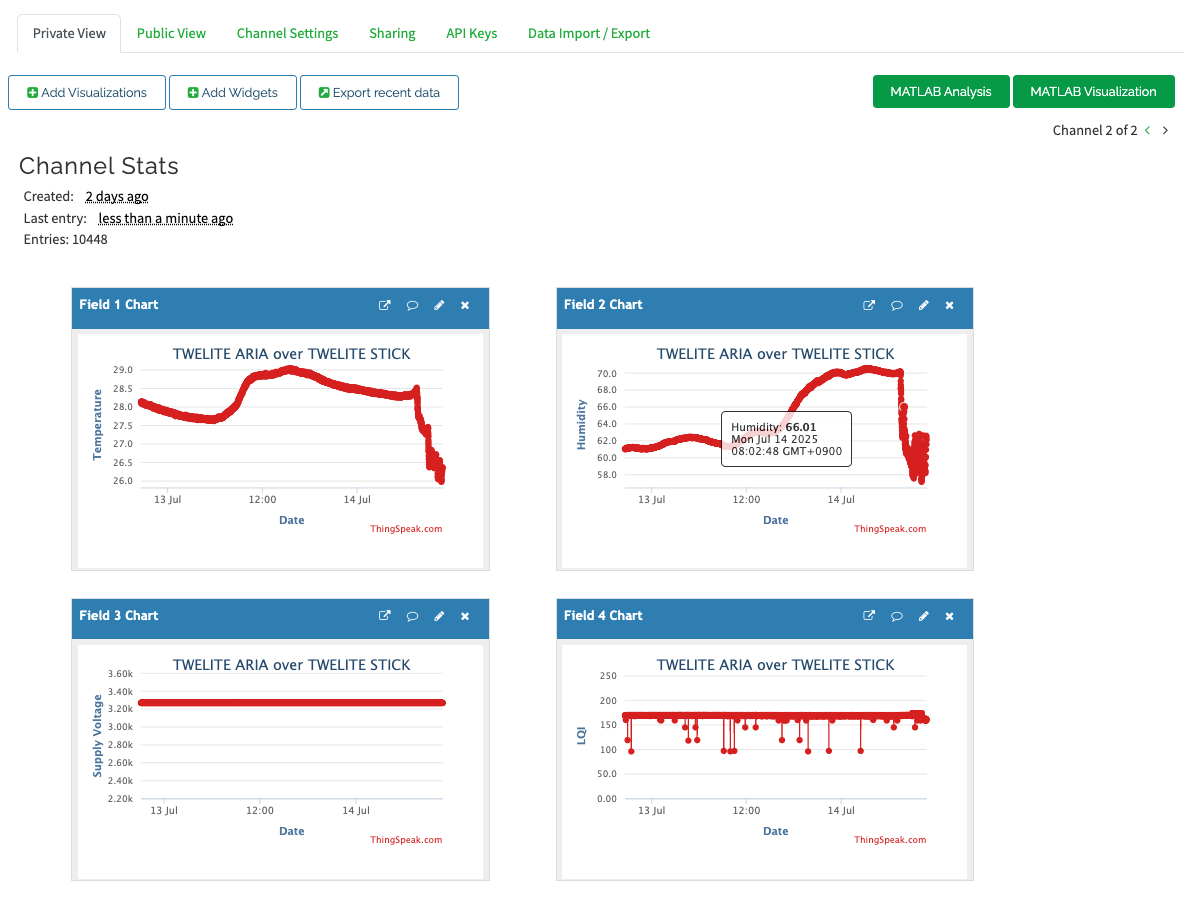
Click the “Private View” tab on ThingSpeak. The transmitted data should appear as a graph.
By default, the Y-axis range adjusts dynamically. You can configure the min and max values for each graph via the ✏️ icon.
For example, based on the operating voltage of TWELITE, you can set Y-Axis Min and Y-Axis Max for the Field 3 Chart.
Displaying approximately 2 days of data
You’ve successfully built a simple IoT system integrated with a web server!
Script Overview
Filtering for Sending and Receiving
To prevent overloading the server, data is sent only at intervals defined by SEND_MIN_INTERVAL.
To avoid mixing data from multiple devices, the serial ID of the first device is used as the target.
The data sent to the server is constructed in the following section:
# Send data to ThingSpeakpayload = {
"api_key": API_KEY,
"field1": f"{packet.temp_100x /100.0:.2f}", # Temperature"field2": f"{packet.humid_100x /100.0:.2f}", # Humidity"field3": f"{packet.supply_voltage}", # Supply voltage (mV)"field4": f"{packet.lqi}", # Link Quality Indicator}
response = requests.get(BASE_URL, params=payload)
From mwings.parsers.app_aria, we retrieve the temperature, humidity, coin cell voltage, and signal quality (LQI) expressed as a value between 0 and 255, then convert these to strings to construct the query for the GET request.
In the basic script for TWELITE DIP, we only performed simple operations with DI1 and DO1. However, applications designed for actual monitoring require a user interface like the one found in TWELITE STAGE APP.
Dear PyGui (DPG) is a UI toolkit based on Dear ImGui written in C++ and OpenGL.
It is commonly used in development tool interfaces. While it is not suited for highly customized designs, it features lightweight performance and simple syntax.
Wiring and Starting the TWELITE DIP
In this application, when a signal is received via DIx or AIx of the TWELITE DIP, a signal is simultaneously output to DOx or PWMx.
In addition to VCC and GND, freely connect any of the following 16 pins:
Type
Pin
1
2
3
4
Range
Notes
Digital Input
DIx
#15
#16
#17
#18
0.0V - VCC
Internal pull-up
Analog Input
AIx
#22
#23
#24
#25
0.0V - 2.0V
Invalid if exceeded
Digital Output
DOx
#5
#8
#9
#12
0.0V - VCC
Connect LED cathode
PWM Output
PWMx
#4
#6
#7
#11
0% - 100%
Voltage at VCC level
Creating and Running the Script
Installing Modules
Install the mwings (or mwingslite) and dearpygui modules.
The initialization of Dear PyGui is handled by initialize_viewport().
This function sets up the font file and defines the size of the OS window (referred to as the Viewport).
definitialize_viewport(self) ->None:
"""Set up Dear PyGui context, fonts, and viewport."""...
The interface within the OS window is defined in create_windows().
Child windows on the screen are created using dpg.window(), and components are defined within them.
By assigning a tag to a component, you can modify its values and attributes from the program (similar to the id= in HTML).
defcreate_windows(self) ->None:
"""Create and configure all Dear PyGui windows and their contents."""...
Buttons, combo boxes, sliders, and checkboxes that accept user input can register a callback.
defon_select_port(self, sender: Any, app_data: str, user_data: Any) ->None:
"""Handle serial port selection from the combo box."""...
As with other scripts, data received from a child TWELITE is handled by an event handler.
When building an executable with Nuitka
When building an executable (e.g., .exe) using Nuitka, converting method bindings into C may cause self to be duplicated, resulting in too many arguments. In such cases, implement the callback by returning a closure as shown below.
from typing import Any, Callable
...defcb_for_select_port(self) -> Callable[[Any, str, Any], None]:
"""Make a callback for serial port selection from the combo box."""defcallback(sender: Any, app_data: str, user_data: Any) ->None:
self.selected_port = app_data
return callback
... dpg.add_combo(
... callback=self.cb_for_select_port(),
)
In on_app_twelite(), data to be reflected in DOx is registered immediately using tag, and data for PWMx is passed to update_plot() via member variables.
defon_app_twelite(self, packet: mw.parsers.app_twelite.ParsedPacket) ->None:
"""Update the GUI based on incoming TWELITE DIP packet data."""...
When the “Connect” button is pressed, start() is called.
This function initializes mwings.Twelite and registers the receive handler.
Since the receive handler is defined as a method, the add_listener method is used instead of the decorator @on used previously.
defstart(self) ->None:
"""Start TWELITE communication and register listeners."""...
Because Dear PyGui is built on a low-level API, the application controls frame rendering directly, allowing you to define your own rendering loop. While the OS window is open, loop() is repeatedly called.
Once connected to the serial port, loop() performs the following three tasks:
defloop(self) ->None:
"""Perform periodic updates while the application is running."""...
The entire application runs when show() is called.
defshow(self) ->None:
"""Main execution loop of the application."""...
The program exits the rendering loop either when dpg.is_dearpygui_running() becomes False after closing the window, or upon receiving a KeyboardInterrupt (Ctrl+C), and then cleans up mwings.Twelite and dearpygui.