セクションの複数ページをまとめています。 印刷またはPDF形式で保存...
TWELITE Wings API / MWings for 32-bit Arduinos
1 - TWELITE SPOT に使用する
2 - Arduino UNO R4 に使用する
ハードウェアの準備
TWELITE の準備
TWELITE UART や TWELITE DIP といった製品へ親機・中継機アプリ(App_Wings)を書き込みます。
書き込みには TWELITE STAGE APP を使用します。
2023年12月現在、シリアル通信によるアプリケーションID等の設定に対応した最新版の App_Wings(v1.3.0+)は TWELITE STAGE SDK に同梱しておりません(次期リリースに追加収録の予定です)。
下記をダウンロードしてから、書き込んでください。
- TWELITE BLUE 用:App_Wings_BLUE_L1305_V1-3-2.bin
- TWELITE RED 用:App_Wings_RED_L1305_V1-3-2.bin
Arduino UNO R4 との接続
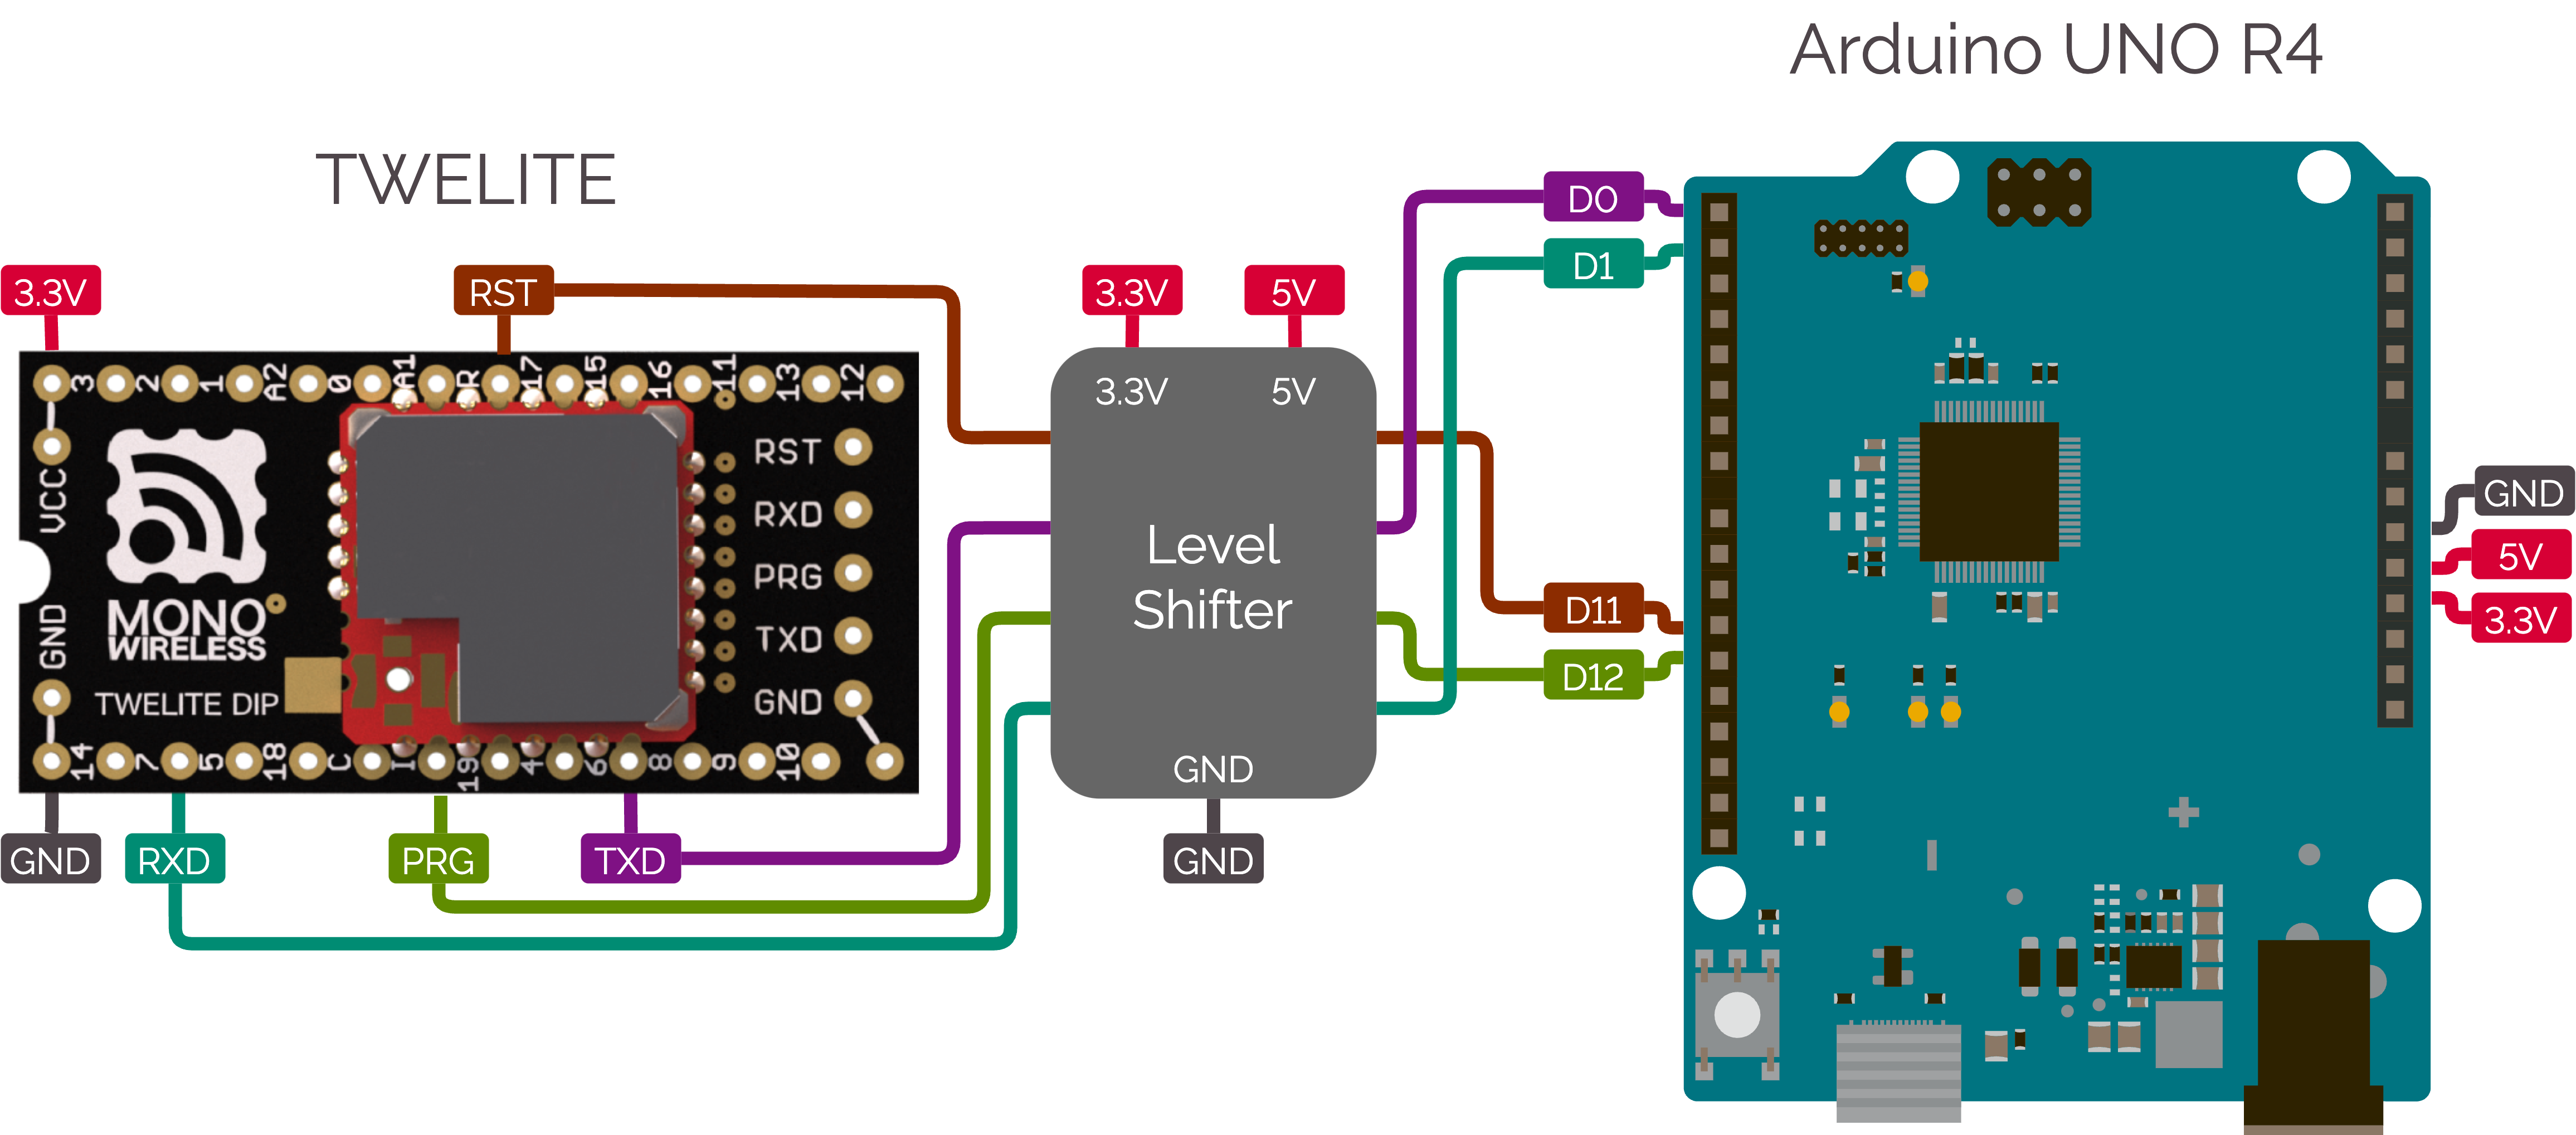
TWELITE のピンのうち、下記を使用します。
- VCC(3.3V へ接続)
- GND(GND へ接続)
- TXD(D0/RX へ接続)
- RXD(D1/TX へ接続)
- RST(D11 など任意のポートへ接続)
- PRG(D12 など任意のポートへ接続)
ライブラリ付属のサンプルスケッチに準じた接続例を以下に示します。

Arduino との接続例
ソフトウェアの準備
ライブラリの導入
Arduino ライブラリマネージャからインストールできます。
TWELITE SPOT マニュアル:MWings ライブラリの導入 を参照してください。
サンプルスケッチの動作確認
ライブラリには、各 TWELITE と通信を行うための簡単なサンプルスケッチを同梱しています。
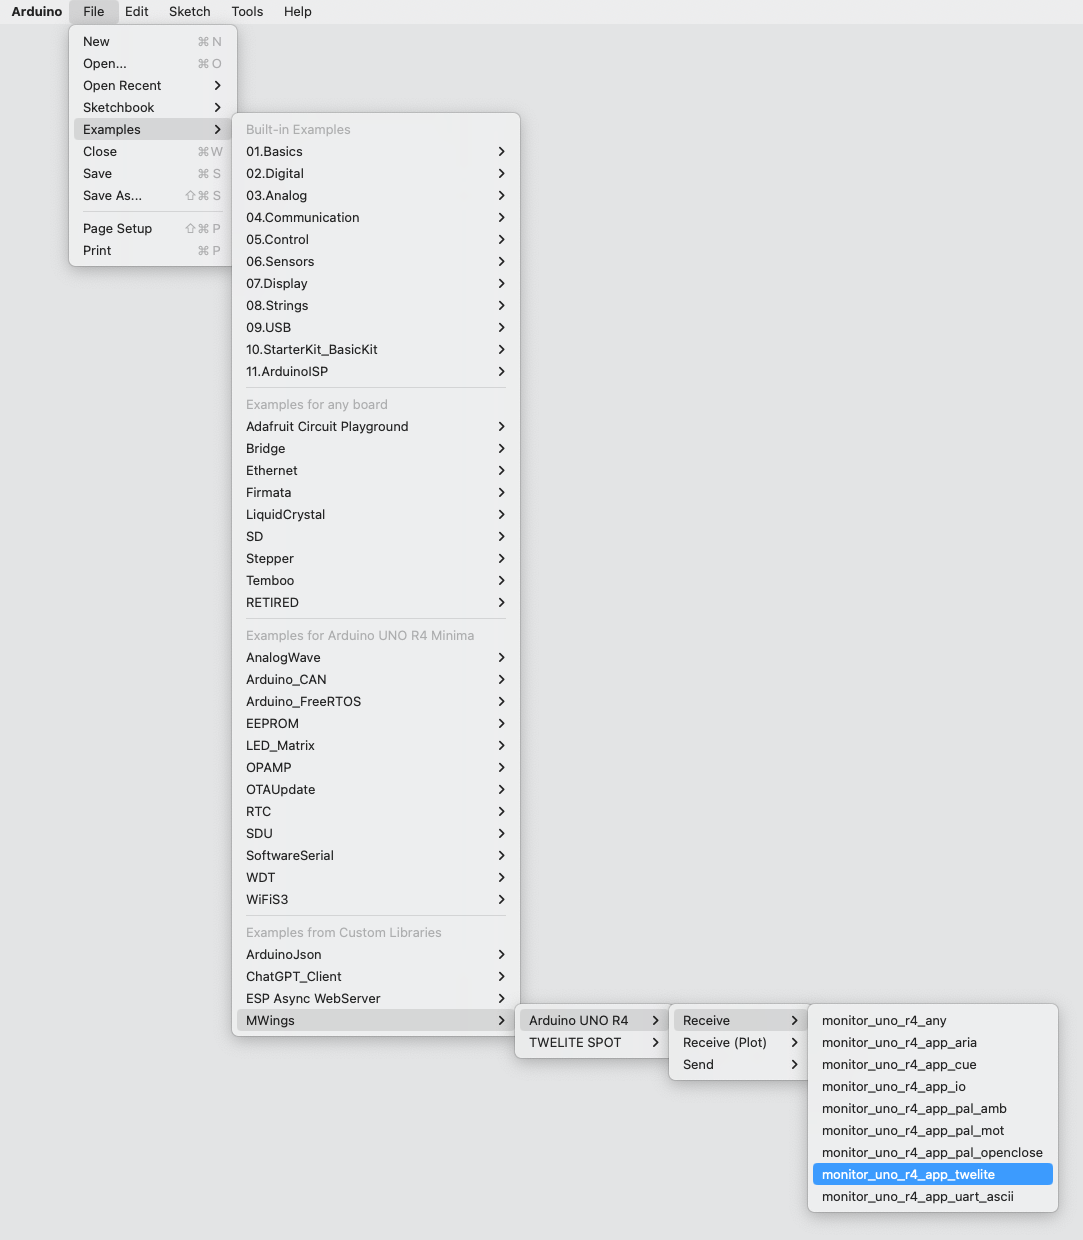
例えば、超簡単!標準アプリ(App_Twelite)のデータを受信する場合は、メニューバーから以下のサンプルスケッチを開きます。
ファイル > スケッチ例 > MWings > Arduino UNO R4 > Receive > monitor_uno_r4_app_twelite

表示例
monitor_uno_r4_app_twelite.ino
// Monitor example for TWELITE with Arduino UNO R4: Receive data from App_Twelite

#include <Arduino.h>
#include "MWings.h"

const int RST_PIN = D11;
const int PRG_PIN = D12;
const int LED_PIN = D13;        // Use on-board LED as indicator

const uint8_t TWE_CHANNEL = 18;
const uint32_t TWE_APP_ID = 0x67720102;

void setup()
{
    // Initialize serial ports
    while (!Serial && millis() < 5000); // Wait for internal USB-UART
    Serial.begin(115200);
    Serial.println("Monitor example for TWELITE with Arduino UNO R4: App_Twelite");
    Serial1.begin(115200);

    // Initialize TWELITE
    if (Twelite.begin(Serial1,
                      LED_PIN, RST_PIN, PRG_PIN,
                      TWE_CHANNEL, TWE_APP_ID)) {
        Serial.println("Successfully initialized TWELITE");
    } else {
        Serial.println("Failed to initialize TWELITE");
    }

    // Attach an event handler to process packets from App_Twelite
    Twelite.on([](const ParsedAppTwelitePacket& packet) {
        Serial.println("");
        Serial.print("Packet Timestamp:  ");
        Serial.print(packet.u16SequenceNumber / 64.0f, 1); Serial.println(" sec");
        Serial.print("Source Logical ID: 0x");
        Serial.println(packet.u8SourceLogicalId, HEX);
        Serial.print("LQI:               ");
        Serial.println(packet.u8Lqi, DEC);
        Serial.print("Supply Voltage:    ");
        Serial.print(packet.u16SupplyVoltage, DEC); Serial.println(" mV");
        Serial.print("Digital Input:    ");
        Serial.print(packet.bDiState[0] ? " DI1:Lo" : " DI1:Hi");
        Serial.print(packet.bDiState[1] ? " DI2:Lo" : " DI2:Hi");
        Serial.print(packet.bDiState[2] ? " DI3:Lo" : " DI3:Hi");
        Serial.println(packet.bDiState[3] ? " DI4:Lo" : " DI4:Hi");
        Serial.print("Analog Input:     ");
        Serial.print(" AI1:"); Serial.print(packet.u16AiVoltage[0]); Serial.print(" mV");
        Serial.print(" AI2:"); Serial.print(packet.u16AiVoltage[1]); Serial.print(" mV");
        Serial.print(" AI3:"); Serial.print(packet.u16AiVoltage[2]); Serial.print(" mV");
        Serial.print(" AI4:"); Serial.print(packet.u16AiVoltage[3]); Serial.println(" mV");
    });
}

void loop()
{
    // Update TWELITE
    Twelite.update();
}

/*
 * Copyright (C) 2023 Mono Wireless Inc. All Rights Reserved.
 * Released under MW-OSSLA-1J,1E (MONO WIRELESS OPEN SOURCE SOFTWARE LICENSE AGREEMENT).
 */
スケッチの詳細については、TWELITE SPOT 向けのスケッチ解説をご覧ください。大半の内容は共通しています。
以下は Arduino UNO R4 に固有の部分です。
ポート設定
6-8行目では、UART 関連を除く Arduino のポートを設定しています。
const int RST_PIN = D11;
const int PRG_PIN = D12;
const int LED_PIN = D13;        // Use on-board LED as indicator
| ポート | 役割 | 備考 |
|---|---|---|
| D11 | TWELITEのRST制御 | 上記の接続例参照 |
| D12 | TWELITEのPRG制御 | 上記の接続例参照 |
| D13 | 通信インジケータLED制御 | 内蔵LEDを使用 |
USBシリアルポートの初期化待ち
16行目では、USB シリアルポート(Serial)の初期化を待っています。
while (!Serial && millis() < 5000); // Wait for internal USB-UART
Arduino UNO R4 は、UNO R3 のように USB シリアル変換 IC を搭載しておらず、本体の ARM CPU が USB シリアル変換機能を担っています。 そのため、シリアルポートの初期化が終了する前は通信を行えません。
関連情報
- MWings ライブラリ API リファレンス
- TWELITE SPOT スタートガイドのスケッチ解説(スケッチ内容の大半は共通しています)
- TWELITE SPOT マニュアルの一部のスケッチ解説(スケッチ内容の大半は共通しています)
3 - パケットパーサの拡張
概要
パーサを追加するためには、次の4点のファイルを編集する必要があります。
- (新規)パーサのヘッダファイル
parser/FooBarPacketParser.h- 解釈するパケットの中身と、正規パケットの判定条件を書く
- (新規)パーサのソースファイル
parser/FooBarPacketParser.cpp- パケットの中身を解釈する部分を書く
- (追記)本体のヘッダファイル
MWings.h- パーサを追加する
- (追記)本体のソースファイル
MWings.cpp- パーサを追加する
ソースファイルは GitHub から入手してください。
通常、Arduino のホームディレクトリ内にある libraries/ へ配置します。
GitHubにて、実際のコミット差分を閲覧できます。
Added App_Tag (ADC) packet parser · monowireless/mwings_arduino@aa5ecdb
パーサのヘッダファイル
parser/ 以下にある既存のファイルを複製したうえで名称変更してください。
ここでは、parser/AppTagAdcPacketParser.h を作成します。
#ifndef APPTAGADCPACKETPARSER_H
#define APPTAGADCPACKETPARSER_H

#include "MWings_Common.h"

/**
 * @struct ParsedAppTagAdcPacket
 * @brief  Packet content for App_Tag (ADC)
 */
struct ParsedAppTagAdcPacket final : public mwings::ParsedPacketBase {
    uint32_t u32RouterSerialId;
    uint8_t u8SensorType;
    uint16_t u16AiVoltage[2];
};

/**
 * @class apptagadc::PacketParser
 * @brief  Packet parser for App_Tag (ADC)
 */
namespace apptagadc {
class PacketParser final : public mwings::PacketParserBase {
public:
    // Check if the packet is from App_Tag (ADC)
    inline bool isValid(const BarePacket& barePacket) const override {
        if ((barePacket.u8At(12) == 0x10)
            and (barePacket.u32At(18) == 0)
            and (barePacket.u16PayloadSize == 22)) {
            return true;
        }
        return false;
    }

    // Parse from bare packet
    bool parse(const BarePacket& barePacket, mwings::ParsedPacketBase* const parsedPacket) const override;
};
}

extern apptagadc::PacketParser AppTagAdcPacketParser;

#endif  // APPTAGADCPACKETPARSER_H
解釈するパケットの中身の記述
はじめに、App_Tag(アナログセンサ)の出力書式を確認してください。
出力データの例
:80000000B700628201015A0010DF08FD09A300000000E9
| # | データ | 内容 | 値 | |
|---|---|---|---|---|
: | char | ヘッダ | : | |
80000000 | 0 | uint32 | 中継機のシリアルID | 中継なし |
B7 | 4 | uint8 | LQI | 183/255 |
0062 | 5 | uint16 | 続き番号 | 98 |
8201015A | 7 | uint32 | 送信元のシリアルID | 0x201015A |
00 | 11 | uint8 | 送信元の論理デバイスID | 0x00 |
10 | 12 | uint8 | センサー種別 | アナログセンサー |
DF | 13 | uint8 | 電源電圧(mV) | 3330mV |
08FD | 14 | uint16 | ADC1の電圧 | 2301mV |
09A3 | 16 | uint16 | ADC2の電圧 | 2467mV |
00000000 | 18 | uint32 | 未使用 | |
E9 | 22 | uint8 | チェックサム | 0xE9 |
char | フッタ | \r | ||
char | フッタ | \n |
インクルードガードやnamespace、コメント文を置換したら、mwings::ParsedPacketBaseを継承し、パケットの中身を記述します。
ここでは、対象の子機に固有のデータを記述します。宛先の論理デバイスIDといった一般的なデータは、既にmwings::ParsedPacketBaseへ登録されているからです。
mwings::ParsedPacketBaseにある項目
| 型 | 名称 | 内容 |
|---|---|---|
uint32_t | u32SourceSerialId | 送信元のシリアルID |
uint8_t | u8SourceLogicalId | 送信元の論理デバイスID |
uint16_t | u16SequenceNumber | シーケンス番号 |
uint8_t | u8Lqi | LQI |
uint16_t | u16SupplyVoltage | 電源電圧 (mV) |
電源電圧など、空き項目があっても構いません。
以下の部分において、App_Tag(アナログセンサ)に固有のデータを宣言しています。
struct ParsedAppTagAdcPacket final : public mwings::ParsedPacketBase {
    uint32_t u32RouterSerialId;
    uint8_t u8SensorType;
    uint16_t u16AiVoltage[2];
};
正規パケットの判定条件の記述
mwings::PacketParserBaseを継承したapptagadc::PacketParserを作成し、純粋仮想関数isValid()をオーバーライドすることで正規パケットの判定条件を記述してください。
この条件に沿ったパケットを受信したとき、解釈を行います。
以下の部分では、センサ種別が0x12(アナログセンサ)であること、未使用領域が0であること、ペイロードの長さが22バイトであることを確認しています。
inline bool isValid(const BarePacket& barePacket) const override {
    if ((barePacket.u8At(12) == 0x10)
        and (barePacket.u32At(18) == 0)
        and (barePacket.u16PayloadSize == 22)) {
        return true;
    }
    return false;
}
パーサのソースファイル
parser/ 以下にある既存のファイルを複製したうえで名称変更してください。
ここでは、parser/AppTagAdcPacketParser.cpp を作成します。
#include "AppTagAdcPacketParser.h"

apptagadc::PacketParser AppTagAdcPacketParser;

bool apptagadc::PacketParser::parse(const BarePacket& barePacket, mwings::ParsedPacketBase* const parsedPacket) const
{
    // WARNING: Note that there is NO RTTI
    ParsedAppTagAdcPacket* const parsedAppTagAdcPacket = static_cast<ParsedAppTagAdcPacket*>(parsedPacket);

    parsedAppTagAdcPacket->u32SourceSerialId = barePacket.u32At(7);
    parsedAppTagAdcPacket->u8SourceLogicalId = barePacket.u8At(11);
    parsedAppTagAdcPacket->u16SequenceNumber = barePacket.u16At(5);
    parsedAppTagAdcPacket->u8Lqi = barePacket.u8At(4);

    const uint16_t ecc = barePacket.u8At(13);
    if (ecc <= 170) {
        parsedAppTagAdcPacket->u16SupplyVoltage = 5 * ecc + 1950;
    } else {
        parsedAppTagAdcPacket->u16SupplyVoltage = 10 * (ecc - 170) + 2800;
    }

    parsedAppTagAdcPacket->u32RouterSerialId = barePacket.u32At(0);
    parsedAppTagAdcPacket->u8SensorType = barePacket.u8At(12);

    for (int i = 0; i < 2; i++) {
        parsedAppTagAdcPacket->u16AiVoltage[i] = barePacket.u16At(2*i+14);
    }

    return true;
}
解釈する部分の記述
ヘッダファイル名やnamespaceを置換したら、parse()の中身を記述します。
以下の部分では、データ書式に従ってパケットの中身を格納しています。
無線タグアプリ(アナログセンサ)の出力書式
| # | データ | 内容 | 備考 |
|---|---|---|---|
char | ヘッダ | :のみ | |
| 0 | uint32 | 中継機のシリアルID | 中継なしは80000000 |
| 4 | uint8 | LQI | 0-255 |
| 5 | uint16 | 続き番号 | |
| 7 | uint32 | 送信元のシリアルID | |
| 11 | uint8 | 送信元の論理デバイスID | |
| 12 | uint8 | センサー種別 | |
| 13 | uint8 | 電源電圧(mV) | 電源電圧の計算を参照 |
| 14 | uint16 | ADC1の電圧 | |
| 16 | uint16 | ADC2の電圧 | |
| 18 | uint32 | 未使用 | |
| 22 | uint8 | チェックサム |
BarePacket.u8At()などのメソッドを使って、素のペイロードからデータを取り出します。
// WARNING: Note that there is NO RTTI
ParsedAppTagAdcPacket* const parsedAppTagAdcPacket = static_cast<ParsedAppTagAdcPacket*>(parsedPacket);

parsedAppTagAdcPacket->u32SourceSerialId = barePacket.u32At(7);
parsedAppTagAdcPacket->u8SourceLogicalId = barePacket.u8At(11);
parsedAppTagAdcPacket->u16SequenceNumber = barePacket.u16At(5);
parsedAppTagAdcPacket->u8Lqi = barePacket.u8At(4);

const uint16_t ecc = barePacket.u8At(13);
if (ecc <= 170) {
    parsedAppTagAdcPacket->u16SupplyVoltage = 5 * ecc + 1950;
} else {
    parsedAppTagAdcPacket->u16SupplyVoltage = 10 * (ecc - 170) + 2800;
}

parsedAppTagAdcPacket->u32RouterSerialId = barePacket.u32At(0);
parsedAppTagAdcPacket->u8SensorType = barePacket.u8At(12);

for (int i = 0; i < 2; i++) {
    parsedAppTagAdcPacket->u16AiVoltage[i] = barePacket.u16At(2*i+14);
}
static_castについて
mwings::ParsedPacketBase*からapptagadc::ParsedPacketへのダウンキャストをdynamic_castではなくstatic_castによって行っています。これは、ハードウェアの制約により実行時型情報が使えないことに起因しています。本体のヘッダファイル
既存のパーサに加えて、新たなパーサを追加します。
インクルード文の追加
パケットパーサのヘッダファイルをインクルードします。
//// AppTagAdcPacketParser for App_Tag (ADC)
#include "parser/AppTagAdcPacketParser.h"
初期化子リストの拡張
イベントハンドラをnullptrで初期化します。
               //// AppTagAdcPacketParser for App_Tag (ADC)
               _onAppTagAdcPacket(nullptr),
終了処理の追加
イベントハンドラをnullptrに戻します。
//// AppTagAdcPacketParser for App_Tag (ADC)
_onAppTagAdcPacket = nullptr;
イベントハンドラの登録メソッドの追加
イベントハンドラを登録するon()メソッドを追加します。
//// AppTagAdcPacketParser for App_Tag (ADC)
inline void on(void (*callback)(const ParsedAppTagAdcPacket& packet)) { _onAppTagAdcPacket = callback; }
イベントハンドラの追加
イベントハンドラを格納するポインタを追加します。
//// AppTagAdcPacketParser for App_Tag (ADC)
void (*_onAppTagAdcPacket)(const ParsedAppTagAdcPacket& packet);
本体のソースファイルの編集
既存のパース処理に加えて、新たなパース処理を追加します。
イベントハンドラの初期化
begin()の呼びだし時にもイベントハンドラが初期化されるようにします。
//// AppTagAdcPacketParser for App_Tag (ADC)
_onAppTagAdcPacket = nullptr;
パース処理の追加
対象のパケットを受信したときに解釈を行うようにします。
//// Start: AppTagAdcPacketParser for App_Tag (ADC)
if (AppTagAdcPacketParser.isValid(barePacket) and _onAppTagAdcPacket) {
    ParsedAppTagAdcPacket parsedAppTagAdcPacket;
    if (AppTagAdcPacketParser.parse(barePacket, &parsedAppTagAdcPacket)) {
        _onAppTagAdcPacket(parsedAppTagAdcPacket);
    }
}
//// End: AppTagAdcPacketParser for App_Tag (ADC)
変更の適用
スケッチをビルドしたときに、ライブラリも再ビルドされます。