最適な出力のために、Google Chrome(15以降)または Microsoft Edge(79以降)を推奨いたします。
2026-04-20 現在 Python による子機との通信(基本編) Python を使って子機との通信を行う方法
専用のライブラリを使うことで、Python から TWELITE STICK を通して TWELITE の子機と通信することができます。
このページの内容の多くは、MONOSTICK シリーズにも適用できます。
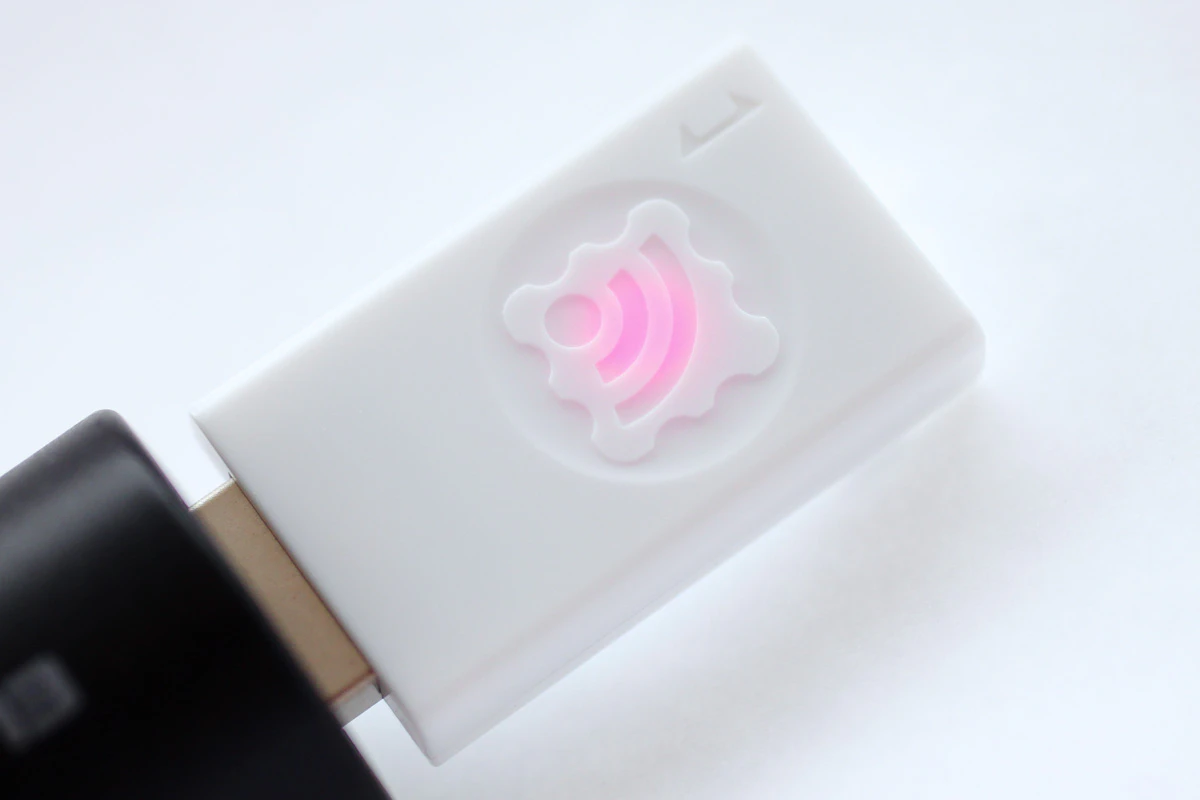
基本的な動作確認 TWELITE STICK を接続 PC の USB ポートに TWELITE STICK を接続してください。
工場出荷時の TWELITE は、親機・中継機アプリ の親機モードに設定されています。TWELITE シリーズの子機との間で送受信を行うことができ、ロゴマークはマゼンタに光るはずです。
工場出荷時の様子
MWings ライブラリの導入 Python 3.12 以降の環境を用意してください。
親機・中継機アプリの出力を解釈するための MWings モジュール を導入します。
MWings モジュールは、ホストへ接続された TWELITE の親機を通じて、TWELITE の子機と通信できます。
親機から受信したデータを解釈して、辞書や JSON のほか pandas データフレームへ変換※ 辞書から生成したコマンドを親機へ送信 ※ Lite 版は pandas に非対応
詳しい導入方法や機能の詳細については、MWings for Python マニュアル
モダンなPython開発においては、Pythonのバージョンとプロジェクト単位の依存関係の管理が必要とされます。上記のマニュアルでは、pyenv と poetry を使った環境整備の方法を紹介しています。
Raspberry Pi の場合は、Lite 版 の mwingslite モジュール
pandasへの依存を廃したバージョンであり、numpyの競合による問題を避けることができます。データフレームの出力は行えませんが、辞書形式やJSON文字列の出力機能は残しています。
軽量であるため、通常のPCであっても pandas を必要としない場合は、こちらをご利用ください。
データの受信を確認 TWELITE STICK が受信したデータを解釈できることを確認します。
GitHub で公開しているサンプルスクリプト rx_print_json.py
TWELITE STICK が受信した全種類のパケットの内容を、ターミナルに出力される JSON 形式の文字列によって確認できます。
# -*- coding:utf-8 -*-
# Written for Python 3.12
# Formatted with Black
# MWings example: Receive data, print JSON, typed
from zoneinfo import ZoneInfo
import mwings as mw
# Main function
def main () -> None :
# Create a twelite object
twelite = mw. Twelite(mw. utils. ask_user_for_port())
# Use JST for received data
twelite. set_timezone(ZoneInfo("Asia/Tokyo" ))
# Register event handlers
@twelite.on (mw. common. PacketType. APP_ARIA)
def on_app_aria (packet: mw. parsers. app_aria. ParsedPacket) -> None :
print(packet. to_json(verbose= False , spread= True ))
@twelite.on (mw. common. PacketType. APP_CUE)
def on_app_cue (packet: mw. parsers. app_cue. ParsedPacket) -> None :
print(packet. to_json(verbose= False , spread= True ))
@twelite.on (mw. common. PacketType. APP_CUE_PAL_EVENT)
def on_app_cue_pal_event (packet: mw. parsers. app_cue_pal_event. ParsedPacket) -> None :
print(packet. to_json(verbose= False , spread= True ))
@twelite.on (mw. common. PacketType. APP_IO)
def on_app_io (packet: mw. parsers. app_io. ParsedPacket) -> None :
print(packet. to_json(verbose= False , spread= True ))
@twelite.on (mw. common. PacketType. APP_TWELITE)
def on_app_twelite (packet: mw. parsers. app_twelite. ParsedPacket) -> None :
print(packet. to_json(verbose= False , spread= True ))
@twelite.on (mw. common. PacketType. APP_PAL_AMB)
def on_app_pal_amb (packet: mw. parsers. app_pal_amb. ParsedPacket) -> None :
print(packet. to_json(verbose= False , spread= True ))
@twelite.on (mw. common. PacketType. APP_PAL_MOT)
def on_app_pal_mot (packet: mw. parsers. app_pal_mot. ParsedPacket) -> None :
print(packet. to_json(verbose= False , spread= True ))
@twelite.on (mw. common. PacketType. APP_PAL_OPENCLOSE)
def on_app_pal_openclose (packet: mw. parsers. app_pal_openclose. ParsedPacket) -> None :
print(packet. to_json(verbose= False , spread= True ))
@twelite.on (mw. common. PacketType. APP_UART_ASCII)
def on_app_uart_ascii (packet: mw. parsers. app_uart_ascii. ParsedPacket) -> None :
print(packet. to_json(verbose= False , spread= True ))
@twelite.on (mw. common. PacketType. APP_UART_ASCII_EXTENDED)
def on_app_uart_ascii_extended (
packet: mw. parsers. app_uart_ascii_extended. ParsedPacket,
) -> None :
print(packet. to_json(verbose= False , spread= True ))
@twelite.on (mw. common. PacketType. ACT)
def on_act (packet: mw. parsers. act. ParsedPacket) -> None :
print(packet. to_json(verbose= False , spread= True ))
# Start receiving
try :
# Set as daemon thread
twelite. daemon = True
# Start the thread, Join to the main thread
twelite. start()
print("Started receiving" )
while True :
twelite. join(0.5 )
except KeyboardInterrupt :
# Stop the thread
print("Flushing..." )
twelite. stop()
print("Completed" )
if __name__ == "__main__" :
# Call the main function
main() 例えば、前項のTWELITE STAGE APP の場合 と同様に、工場出荷時の TWELITE DIP(超簡単!標準アプリ)の子機を用意していたなら、次のような出力を確認できるはずです。終了するには Ctrl+C を入力してください。
{
  "time_parsed": "2025-07-11T11:45:02.067804+09:00",
  "packet_type": "APP_TWELITE",
  "sequence_number": 4713,
  "source_serial_id": "8201007F",
  "source_logical_id": 120,
  "lqi": 166,
  "supply_voltage": 3254,
  "destination_logical_id": 0,
  "relay_count": 0,
  "periodic": true,
  "di_changed_1": false,
  "di_changed_2": false,
  "di_changed_3": false,
  "di_changed_4": false,
  "di_state_1": false,
  "di_state_2": false,
  "di_state_3": false,
  "di_state_4": false,
  "ai_voltage_1": 2000,
  "ai_voltage_2": 2000,
  "ai_voltage_3": 2000,
  "ai_voltage_4": 2000
}
JSON 文字列の内容 mwings.parsers.app_twelite.ParsedPacket
キー 値 time_parsed受信時刻(デフォルトはUTC, ISO8601形式) packet_typeパケット種別 sequence_numberシーケンス番号(App_Tweliteの場合は時間) source_serial_id送信元シリアルID source_logical_id送信元論理デバイスID lqi電波通信品質(8bit) supply_voltage電源電圧(mV) destination_logical_id送信先論理デバイスID relay_count中継回数 periodic定期送信パケットか否か di_changed各デジタルインタフェースの入力変化の有無 di_state各デジタルインタフェースの入力状態 ai_voltage各アナログインタフェースの入力電圧 mwings_implementationMWings の実装(将来のための情報) mwings_versionMWings のバージョン hostname受信したホストの名称 system_type受信したホストのシステムの種別
spread=Trueの場合は、リスト形式を使わずに _1, _2 といった形で値を分割します。
データを CSV ファイルに記録するサンプル rx_export_csv_durable.py
コマンドラインツールとして、長期間の受信データの記録にそのまま使うことができて便利です。
python rx_export_csv_durable.py -h
usage: rx_export_csv_durable.py [ -h] [ -v] [ -s]
Log packets from App_Wings to csv, line by line
options:
-h, --help show this help message and exit
-v, --verbose include system information
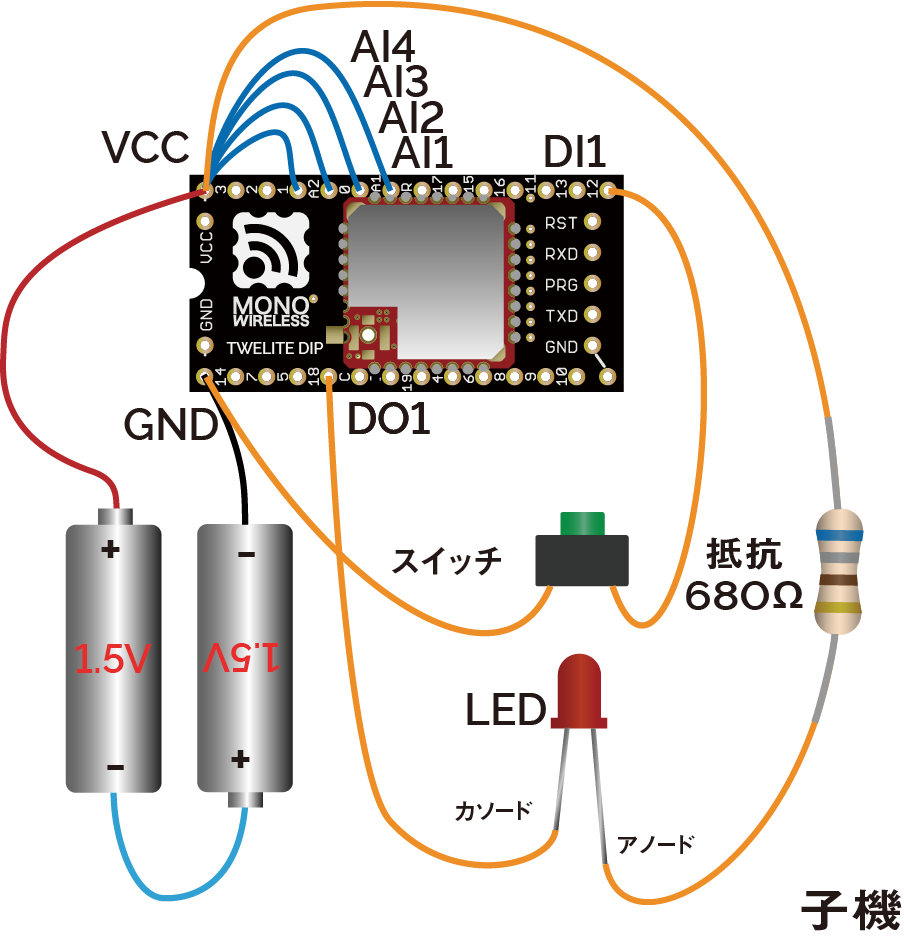
-s, --sort sort columns in the output 任意のデータを送受信 ここでは、TWELITE STAGE APP の場合 と同様に準備した TWELITE DIP の子機との通信に特化したスクリプトを作成してみましょう。
TWELITE DIP 子機の配線例
TWELITE DIP の DI1 ピンに接続したスイッチの状態表示と、DO1 ピンに接続した LED の制御を目標とします。
超簡単!標準アプリのデータのみ受信 rx_print_json.py
# -*- coding:utf-8 -*-
from zoneinfo import ZoneInfo
import mwings as mw
# Main function
def main () -> None :
# Create a twelite object
twelite = mw. Twelite(mw. utils. ask_user_for_port())
# Use JST for received data
twelite. set_timezone(ZoneInfo("Asia/Tokyo" ))
# Register event handlers
@twelite.on (mw. common. PacketType. APP_TWELITE)
def on_app_twelite (packet: mw. parsers. app_twelite. ParsedPacket) -> None :
print(packet. to_json(verbose= False , spread= True ))
# Start receiving
try :
# Set as daemon thread
twelite. daemon = True
# Start the thread, Join to the main thread
twelite. start()
print("Started receiving" )
while True :
twelite. join(0.5 )
except KeyboardInterrupt :
# Stop the thread
print("Flushing..." )
twelite. stop()
print("Completed" )
if __name__ == "__main__" :
# Call the main function
main() 特定の値を取得 これまでのスクリプトでは、to_json()
ここでは、DI1ピンの状態だけをparsers.app_twelite.ParsedPacketdi_state から取得し、仮想的なLEDをターミナルに表示します。
on_app_twelite()ハンドラを以下のように書き換えてください。
def on_app_twelite (packet: mw. parsers. app_twelite. ParsedPacket) -> None :
print(f " \r DO1 LED: { "🔴" if packet. di_state[0 ] else "⚪" } " , end= '' , flush= True ) 次のようにして、TWELITE DIP の DI ピンに接続したスイッチを押すたびに赤く光ったら成功です。
表示例
親機にコマンドを送信 TWELITE STICK が受信したデータを表示するだけではなく、TWELITE STICK からデータを送信することもできます。
スクリプトのメインループでは、threading.Thread.join()
# Start the thread, Join to the main thread
twelite. start()
print("Started receiving" )
while True :
twelite. join(0.5 ) この仕組みを利用して、メインループから TWELITE DIP の DO1 ピンを制御し、0.5秒おきに LED を点滅させてみましょう。
先のスクリプトを、次のように改変してください。これまでの変更も適用した全体を示します。
# -*- coding:utf-8 -*-
from zoneinfo import ZoneInfo
from typing import Any
import mwings as mw
# Main function
def main () -> None :
# Create a twelite object
twelite = mw. Twelite(mw. utils. ask_user_for_port())
# Use JST for received data
twelite. set_timezone(ZoneInfo("Asia/Tokyo" ))
# Register event handlers
@twelite.on (mw. common. PacketType. APP_TWELITE)
def on_app_twelite (packet: mw. parsers. app_twelite. ParsedPacket) -> None :
print(f " \r DO1 LED: { "🔴" if packet. di_state[0 ] else "⚪" } " , end= '' , flush= True )
# Initialize command
initial: dict[str, Any] = {
"destination_logical_id" : 0x78 , # All child devices
"di_to_change" : [True , False , False , False ], # Enable DI1
"di_state" : [False , False , False , False ], # Initial state of DIx
}
command = mw. serializers. app_twelite. Command(** initial)
# Toggle the DI1 state
def toggle_di1 () -> None :
command. di_state[0 ] = not command. di_state[0 ]
twelite. send(command)
# Start receiving
try :
# Set as daemon thread
twelite. daemon = True
# Start the thread, Join to the main thread
twelite. start()
print("Started receiving" )
while True :
toggle_di1() # Send
twelite. join(0.5 ) # Receive
except KeyboardInterrupt :
# Stop the thread
print("Flushing..." )
twelite. stop()
print("Completed" )
if __name__ == "__main__" :
# Call the main function
main() このスクリプトを実行すると、先ほどと同様に仮想的なLEDを表示します。
表示例
その一方で、TWELITE DIP の DO1 ピンに接続した LED は点滅し続けるはずです。スクリプトを終了すると、点滅は止まります。
パケットの受信とコマンドの送信は、非同期に扱うことができます。
1 - Python による子機との通信(ウェブサーバIoT編) Python を使って子機のデータをウェブサーバへ送信する
実用に近い応用編として、ウェブサーバを利用した IoT システムを構築します。
このページの内容は、MONOSTICK シリーズにも適用できます。
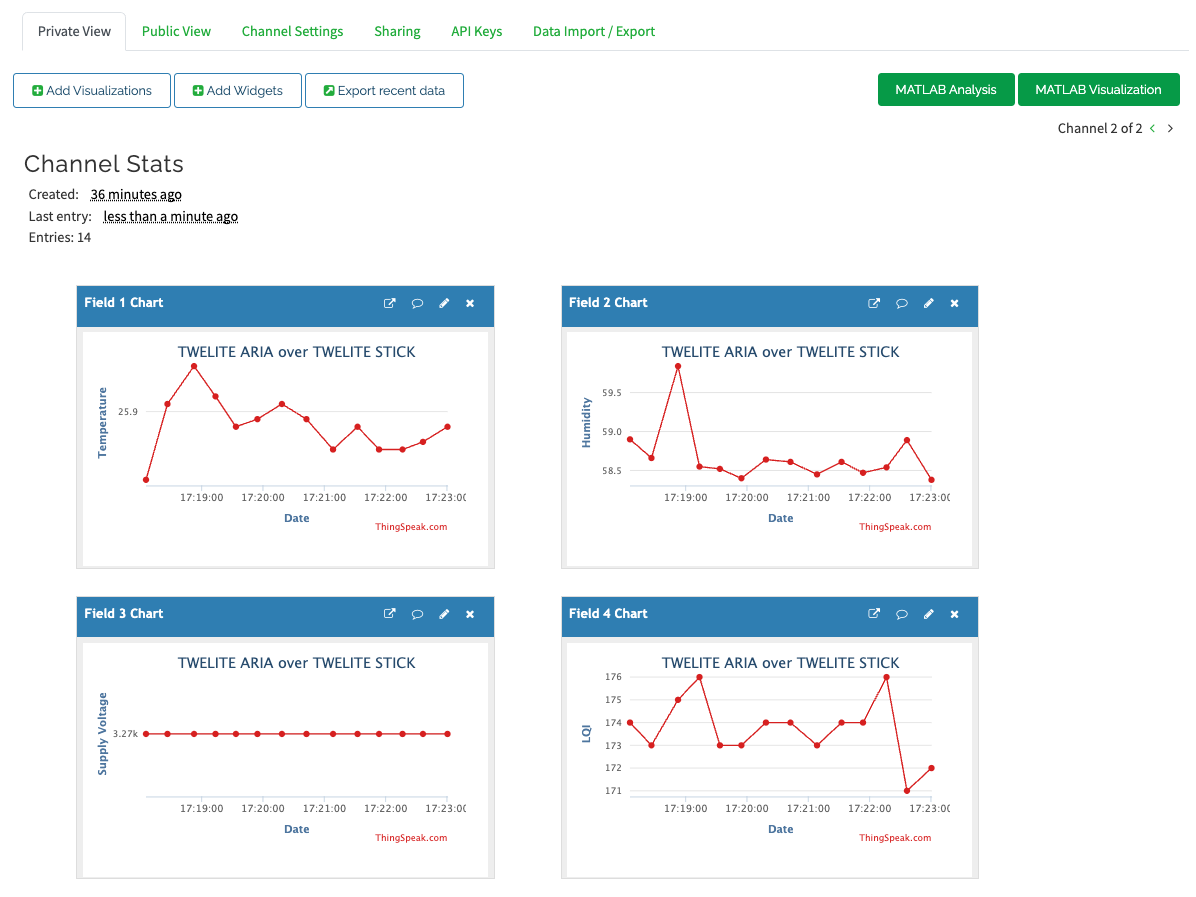
TWELITE ARIA の温湿度データを収集 温湿度センサータグ TWELITE ARIA から受信した温湿度データをウェブサーバへ送信し、ページ上のグラフに表示する簡単な IoT システムを構築してみましょう。
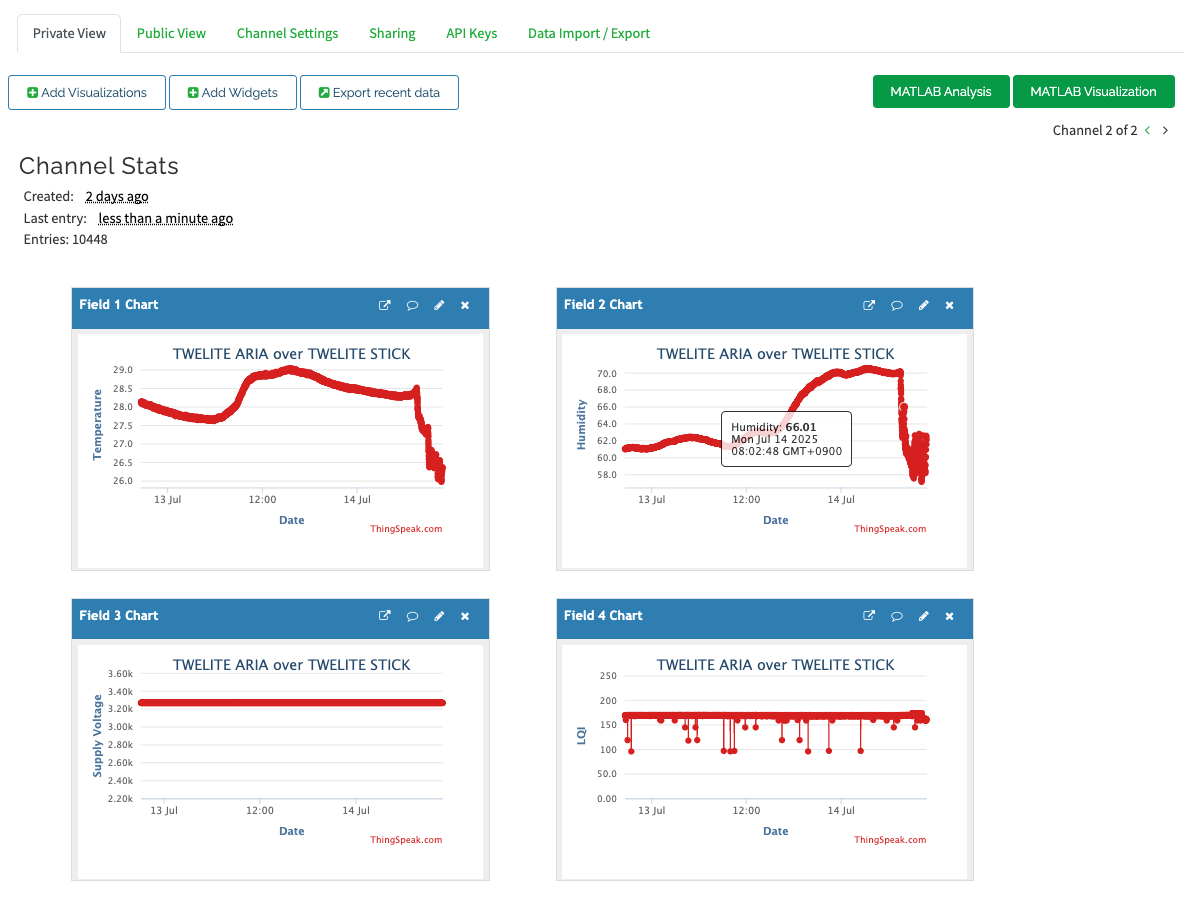
ThingSpeakの表示例
TWELITE DIP を対象とした基本編のスクリプト では DI1 と DO1 の簡単な操作に留めましたが、実際の IoT システムでは、REST API などを利用して、取得したデータをさらに上位のサーバへ送信する必要があります。
ThingSpeak について ここでは、MathWorks のサービス ThingSpeak と MWings ライブラリ を組み合わせて使います。
ThingSpeak は、MATLAB や Simulink の MathWorks が公開する IoT 分析サービスです。
2025年7月現在、一定未満のデータ量かつ商用サービスに利用しない限りは無料で使用できます。
アカウントの作成 ThingSpeak のサイト へアクセスし、MathWorks のアカウントを作成します。
Channel の作成 “Channel” を作成し、次のように設定します(“Name"や"Description"は適当で構いません)
Channelの設定例
フィールド番号を指定して送信するため、Field x の順番が重要です。
API Keys の取得 Channel ページの “API Keys” タブに移動し、16文字の “Write API key” を控えておきます。
TWELITE ARIA の設定と起動 TWELITE ARIA の設定変更 TWELITE ARIA の設定を変更 し、TWELITE ARIA モード の送信間隔 を20秒以上とします(サーバへの過負荷を避けるため)。
TWELITE ARIA の設定を変更するには、2通りの手段があります。
前者は TWELITE R2/R3 を必要としない反面、後者は作業をスムーズに行えます。
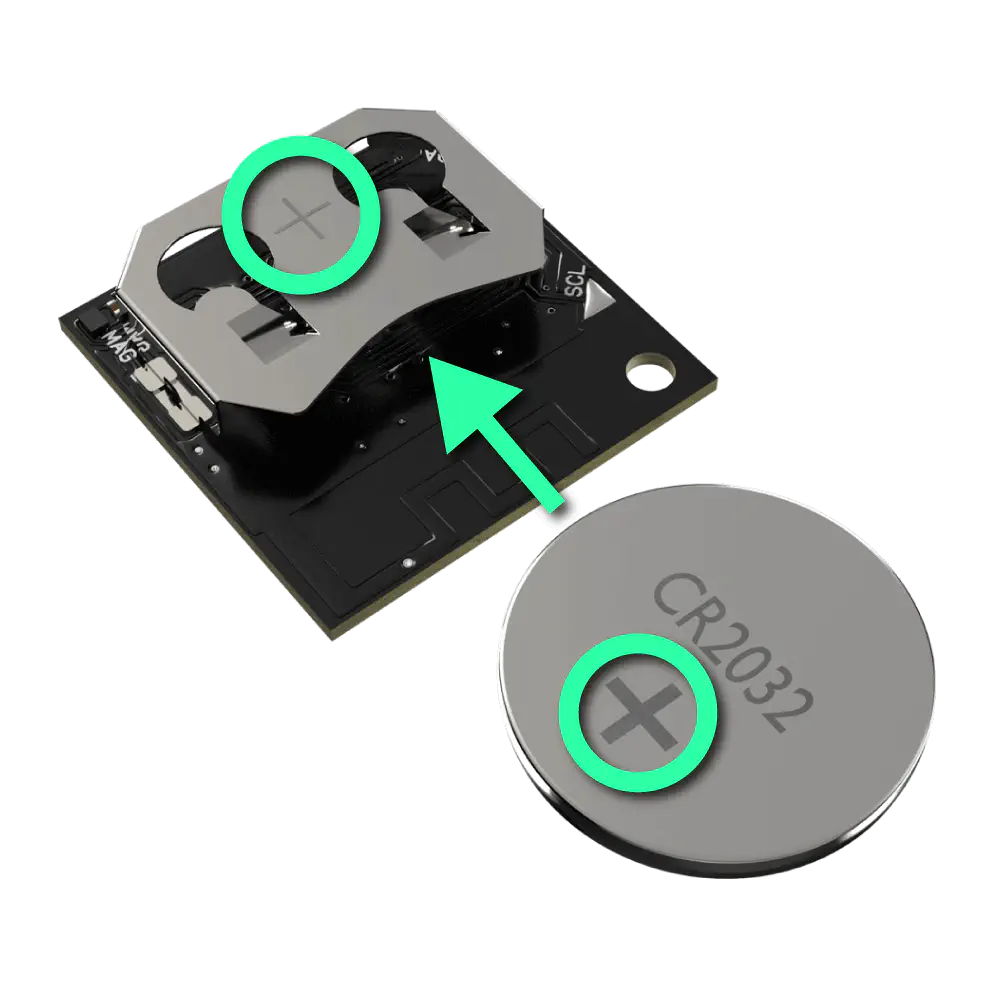
TWELITE ARIA の起動 CR2032 電池を投入し、TWELITE ARIA を起動します。
CR2032電池を挿入
スクリプトの作成と実行 モジュールの導入 Python 3.12 以降と mwings(またはmwingslite)およびrequests
pip install mwings requests スクリプトの作成 後述のスクリプト stick_aria_thingspeak.py を作成してください。mwings.parsers.app_ariarequestsモジュールを使って ThingSpeak へ HTTP GET リクエストを送信します。
冒頭の API_KEY を先ほど控えたものに置き換える必要があります。
# -*- coding:utf-8 -*-
from zoneinfo import ZoneInfo
from time import perf_counter
import mwings as mw
import requests
API_KEY = "XXXXXXXXXXXXXXXX" # Replace with your ThingSpeak API key
BASE_URL = "https://api.thingspeak.com/update"
SEND_MIN_INTERVAL = 20 # Minimum interval in seconds to send data to ThingSpeak
# Main function
def main () -> None :
# Create a twelite object
twelite = mw. Twelite(mw. utils. ask_user_for_port())
# Use JST for received data
twelite. set_timezone(ZoneInfo("Asia/Tokyo" ))
# Initialize last send time
last_send_time = perf_counter() - SEND_MIN_INTERVAL
# Initialize the target serial ID
target_serial_id = - 1
# Register event handlers
@twelite.on (mw. common. PacketType. APP_ARIA)
def on_app_aria (packet: mw. parsers. app_aria. ParsedPacket) -> None :
# Filter packets by serial ID
if target_serial_id < 0 :
# Set the serial ID from the received packet
target_serial_id = packet. source_serial_id
print(f "Serial ID set to { target_serial_id: 08X } " )
elif packet. source_serial_id != target_serial_id:
# Ignore packets from other serial ID devices
print(
f "Ignoring packet from serial ID { packet. source_serial_id: 08X } , expected { target_serial_id: 08X } "
)
return
# Throttle sending to ThingSpeak
if perf_counter() - last_send_time < SEND_MIN_INTERVAL:
print("Skipping send due to minimum interval" )
return # Skip sending if within the minimum interval
last_send_time = perf_counter() # Update last send time
# Send data to ThingSpeak
payload = {
"api_key" : API_KEY,
"field1" : f " { packet. temp_100x / 100.0 : .2f } " , # Temperature
"field2" : f " { packet. humid_100x / 100.0 : .2f } " , # Humidity
"field3" : f " { packet. supply_voltage} " , # Supply voltage (mV)
"field4" : f " { packet. lqi} " , # Link Quality Indicator
}
response = requests. get(BASE_URL, params= payload)
# Check the response status
if response. status_code == 200 :
print(f "OK: entry ID = { response. text} " )
else :
print(f "NG: status code = { response. status_code} " )
# Start receiving
try :
# Set as daemon thread
twelite. daemon = True
# Start the thread, Join to the main thread
twelite. start()
print("Started receiving" )
while True :
twelite. join(0.5 ) # Receive
except KeyboardInterrupt :
# Stop the thread
print("Flushing..." )
twelite. stop()
print("Completed" )
if __name__ == "__main__" :
# Call the main function
main() スクリプトの実行 スクリプトを実行します。
python stick_aria_thingspeak.py TWELITE ARIA からのデータを受信し、正常にデータを送信できたなら、次のようにして値の続き番号を示す Entry ID が表示されます。
Started receiving
Serial ID set to 8201C2DC
OK: entry ID = 1
OK: entry ID = 2
OK: entry ID = 3
OK: entry ID = 4
OK: entry ID = 5
...
ThingSpeak の “Private View” タブをクリックしてください。送信されたデータがグラフに表示されるはずです。
初期状態では、Y軸の範囲が動的に変化します。各グラフの✏️ボタンから最大最小値などを設定できます。
例えば、TWELITE の
動作電圧 に応じて、Field 3 Chart の
Y-Axis Min や
Y-Axis Max を設定することができます。
約2日分のデータを表示する様子
ウェブサーバと連携する、簡単な IoT システムを構築できました!
スクリプトの解説
送受信のフィルタ処理
サーバへの過負荷を避けるため、SEND_MIN_INTERVALの間隔を空けて送信します 複数の端末データの混在を防ぐため、最初の端末のシリアルIDを対象とします サーバへ送信するデータは、次の部分で構成しています。
# Send data to ThingSpeak
payload = {
"api_key" : API_KEY,
"field1" : f " { packet. temp_100x / 100.0 : .2f } " , # Temperature
"field2" : f " { packet. humid_100x / 100.0 : .2f } " , # Humidity
"field3" : f " { packet. supply_voltage} " , # Supply voltage (mV)
"field4" : f " { packet. lqi} " , # Link Quality Indicator
}
response = requests. get(BASE_URL, params= payload) mwings.parsers.app_aria0-255の数値で表現される電波通信品質(LQI)を取得し、文字列に変換したうえで GET リクエストのクエリとしています。
2 - Python による子機との通信(グラフィカルUI編) Python を使って子機と通信するためのグラフィカルUIを備えたアプリケーションを構築する
実用に近い応用編として、簡単なグラフィカルインタフェースを備えたアプリケーションを作成します。
このページの内容は、MONOSTICK シリーズにも適用できます。
TWELTIE DIP と通信する TWELITE DIP と通信するアプリケーションを、簡単なユーザインタフェースとともに構築してみましょう。
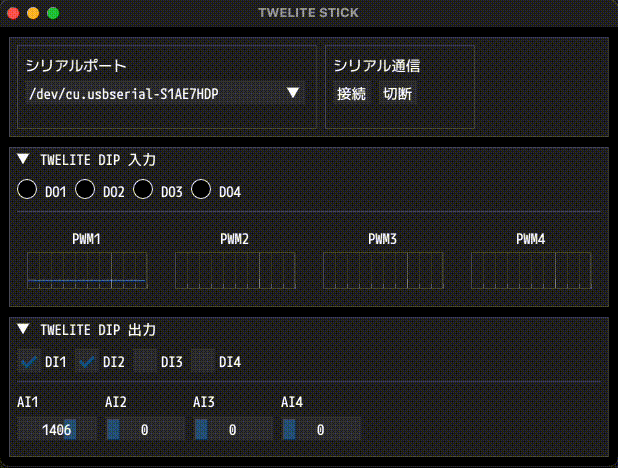
画面の表示例
TWELITE DIP を対象とした基本編のスクリプト では DI1 と DO1 の簡単な操作に留めましたが、実際にモニタリングを行うためのアプリケーションは、TWELITE STAGE APP のようなユーザインタフェースを必要とします。
Dear PyGui について ここでは、Dear PyGui と MWings ライブラリ を組み合わせて使います。
Dear PyGui (DPG) は、C++ で書かれた Dear ImGui と OpenGL をベースにしたUIツールキットです。
開発ツールのUIに利用されることが多く、高度なカスタマイズを苦手とする反面、軽量な動作とシンプルな記述を特徴としています。
TWELITE DIP の配線と起動 このアプリケーションでは、TWELITE DIP の DIx や AIx に入力された信号を受信すると同時に、DOx や PWMx へ信号を出力させます。
VCC と GND のほか、以下に示す16のピン を任意に接続してください。
種別 ピン 1 2 3 4 範囲 備考 デジタル入力 DIx#15#16#17#180.0V - VCC 内部プルアップ アナログ入力 AIx#22#23#24#250.0V - 2.0V 超過で無効扱い デジタル出力 DOx#5#8#9#120.0V - VCC LEDカソード接続 PWM出力 PWMx#4#6#7#110% - 100% 電圧はVCCレベル
スクリプトの作成と実行 モジュールの導入 mwings(またはmwingslite)およびdearpygui
pip install mwings dearpygui スクリプトの作成 後述のスクリプト stick_dip_gui.py を作成してください。mwings.parsers.app_twelitemwings.serializers.app_twelitedearpygui経由で提供します。
# -*- coding:utf-8 -*-
from time import perf_counter
from enum import IntEnum, auto
from zoneinfo import ZoneInfo
from typing import Any, Self, final
from types import TracebackType
from pathlib import Path
from collections import deque
import mwings as mw
import dearpygui.dearpygui as dpg # type: ignore
PLOT_UPDATE_INTERVAL = 1.0 / 100  # 100Hz
PLOT_X_LIMIT = 5.0  # 3 seconds
FONT = "Mplus1Code-Medium.otf"
# MARK: MainViewport
@final
class MainViewport :
@final
class State (IntEnum):
"""Application state enumeration."""
IDLE = auto()
CONNECTING = auto()
selected_port: str
twelite: mw. Twelite
command_app_twelite: mw. serializers. app_twelite. Command
pwm_data: dict[int, int]
pwm_plot_data: dict[int, deque[tuple[float, int]]]
last_plot: float
state: State
theme_disabled: int
def __init__(self) -> None :
"""Initialize the main window and prepare all components."""
self. initialize_viewport()
self. create_themes()
self. create_windows()
self. initialize()
self. update_state(self. State. IDLE)
def create_themes (self) -> None :
"""Create a visual theme for disabled UI elements."""
with dpg. theme() as self. theme_disabled:
with dpg. theme_component(dpg. mvAll):
dpg. add_theme_color(dpg. mvThemeCol_Text, (150 , 150 , 150 , 255 ))
dpg. add_theme_color(dpg. mvThemeCol_TextDisabled, (100 , 100 , 100 , 255 ))
dpg. add_theme_color(dpg. mvThemeCol_FrameBg, (5 , 5 , 5 , 255 ))
# MARK: Initialize Viewport
def initialize_viewport (self) -> None :
"""Set up Dear PyGui context, fonts, and viewport."""
dpg. create_context()
with dpg. font_registry():
font_path = str(Path(__file__). parent / FONT)
with dpg. font(file= font_path, size= 18 ) as default_font:
dpg. add_font_range_hint(dpg. mvFontRangeHint_Japanese)
dpg. bind_font(default_font)
dpg. create_viewport(
title= "TWELITE STICK" , width= 620 , height= 440 , resizable= True
)
dpg. set_viewport_vsync(False )
dpg. setup_dearpygui()
dpg. show_viewport()
def create_windows (self) -> None :
"""Create and configure all Dear PyGui windows and their contents."""
# MARK: Panel Window
with dpg. window(
no_title_bar= True ,
no_close= True ,
no_collapse= True ,
no_move= True ,
no_resize= True ,
pos= (10 , 10 ),
width= 600 ,
height= 100 ,
):
ports = mw. utils. get_ports()
with dpg. group(horizontal= True ):
with dpg. child_window(width= 300 ):
dpg. add_text("シリアルポート" )
dpg. add_combo(
items= ports,
default_value= ports[0 ],
tag= "ports_combo" ,
width= 280 ,
enabled= True ,
callback= self. on_select_port,
)
with dpg. child_window(width= 150 ):
dpg. add_text("シリアル通信" )
with dpg. group(horizontal= True ):
dpg. add_button(
label= "接続" ,
tag= "start_button" ,
enabled= True ,
callback= self. on_start,
)
dpg. add_button(
label= "切断" ,
tag= "stop_button" ,
enabled= False ,
callback= self. on_stop,
)
# MARK: Input Window
with dpg. window(
label= "TWELITE DIP 入力" ,
no_close= True ,
# no_resize=True,
pos= (10 , 120 ),
width= 600 ,
height= 160 ,
tag= "window_twelite_dip_input" ,
):
with dpg. group(horizontal= False ):
# DOx
with dpg. group(horizontal= True ):
for p in range(1 , 5 ):
with dpg. group(horizontal= True ):
with dpg. drawlist(
width= 20 , height= 20 , tag= f "indicator_do { p} "
):
dpg. draw_circle(
center= (10 , 10 ),
radius= 10 ,
fill= (0 , 0 , 0 , 255 ),
tag= f "circle_do { p} " ,
)
dpg. add_text(f "DO { p} " )
dpg. add_spacer()
dpg. add_separator()
dpg. add_spacer()
# PWMx
with dpg. group(horizontal= True ):
for p in range(1 , 5 ):
with dpg. plot(
label= f "PWM { p} " ,
height= 80 ,
width= 140 ,
tag= f "plot_pwm { p} " ,
no_frame= True ,
no_mouse_pos= True ,
):
dpg. add_plot_axis(
dpg. mvXAxis,
tag= f "plot_pwm { p} _x" ,
no_tick_labels= True ,
)
with dpg. plot_axis(
dpg. mvYAxis,
tag= f "plot_pwm { p} _y" ,
no_tick_labels= True ,
no_tick_marks= True ,
no_gridlines= True ,
):
dpg. add_line_series(
[],
[],
tag= f "series_pwm { p} " ,
parent= f "plot_pwm { p} _y" ,
)
# MARK: Output Window
with dpg. window(
label= "TWELITE DIP 出力" ,
no_close= True ,
no_resize= True ,
pos= (10 , 290 ),
width= 600 ,
height= 140 ,
tag= "window_twelite_dip_output" ,
):
with dpg. group(horizontal= False ):
# DIx
with dpg. group(horizontal= True ):
for p in range(1 , 5 ):
dpg. add_checkbox(
label= f "DI { p} " ,
tag= f "checkbox_di { p} " ,
enabled= False ,
callback= self. on_check_di,
user_data= p,
)
dpg. add_spacer()
dpg. add_separator()
dpg. add_spacer()
# AIx
with dpg. group(horizontal= False ):
with dpg. group(horizontal= True ):
for p in range(1 , 5 ):
with dpg. group(horizontal= False ):
dpg. add_text(f "AI { p} " )
dpg. add_slider_int(
label= "" ,
width= 80 ,
default_value= 0 ,
min_value= 0 ,
max_value= 2000 ,
tag= f "slider_ai { p} " ,
enabled= False ,
callback= self. on_change_ai,
user_data= p,
)
def update_state (self, new_state: State) -> None :
"""Update the UI and internal state based on the application's current status."""
# MARK: UI State
self. state = new_state
match new_state:
case self. State. IDLE:
dpg. configure_item("ports_combo" , enabled= True )
dpg. configure_item("start_button" , enabled= True )
dpg. configure_item("stop_button" , enabled= False )
for p in range(1 , 5 ):
dpg. configure_item(f "checkbox_di { p} " , enabled= False )
dpg. configure_item(f "slider_ai { p} " , enabled= False )
dpg. bind_item_theme("window_twelite_dip_input" , self. theme_disabled)
dpg. bind_item_theme("window_twelite_dip_output" , self. theme_disabled)
case self. State. CONNECTING:
dpg. configure_item("ports_combo" , enabled= False )
dpg. configure_item("start_button" , enabled= False )
dpg. configure_item("stop_button" , enabled= True )
for p in range(1 , 5 ):
dpg. configure_item(f "checkbox_di { p} " , enabled= True )
dpg. configure_item(f "slider_ai { p} " , enabled= False )
dpg. bind_item_theme("window_twelite_dip_input" , 0 )
dpg. bind_item_theme("window_twelite_dip_output" , 0 )
# MARK: UI Handlers
def on_select_port (self, sender: Any, app_data: str, user_data: Any) -> None :
"""Handle serial port selection from the combo box."""
self. selected_port = app_data
def on_start (self, sender: Any, app_data: str, user_data: Any) -> None :
"""Handle the start button click and initiate communication."""
self. start()
def on_stop (self, sender: Any, app_data: str, user_data: Any) -> None :
"""Handle the stop button click and terminate communication."""
self. update_state(self. State. IDLE)
self. twelite. close()
def on_check_di (self, sender: Any, app_data: bool, user_data: int) -> None :
"""Handle checkbox state changes for DI output control."""
if 1 <= user_data <= 4 :
self. command_app_twelite. di_state[user_data - 1 ] = app_data
self. twelite. send(self. command_app_twelite)
def on_change_ai (self, sender: Any, app_data: int, user_data: int) -> None :
"""Handle slider changes for AI values and send PWM updates."""
if 1 <= user_data <= 4 :
self. command_app_twelite. pwm_duty[user_data - 1 ] = app_data * 1024 // 2000
self. twelite. send(self. command_app_twelite)
# MARK: Packet handler
def on_app_twelite (self, packet: mw. parsers. app_twelite. ParsedPacket) -> None :
"""Update the GUI based on incoming TWELITE DIP packet data."""
now = perf_counter()
for p in range(1 , 5 ):
# DO
p_state = packet. di_state[p - 1 ]
match p:
case 1 : # RED
color = (255 , 0 , 0 , 255 ) if p_state else (0 , 0 , 0 , 255 )
case 2 : # GREEN
color = (0 , 255 , 0 , 255 ) if p_state else (0 , 0 , 0 , 255 )
case 3 : # YELLOW
color = (255 , 255 , 0 , 255 ) if p_state else (0 , 0 , 0 , 255 )
case 4 : # BLUE
color = (0 , 0 , 255 , 255 ) if p_state else (0 , 0 , 0 , 255 )
dpg. configure_item(f "circle_do { p} " , fill= color)
# PWM
self. pwm_data[p] = packet. ai_voltage[p - 1 ]
self. pwm_plot_data[p]. append((now, self. pwm_data[p]))
# MARK: Plot
def update_plot (self) -> None :
"""Update the plot with the latest PWM data."""
now = perf_counter()
# Throttle plot updates to PLOT_UPDATE_INTERVAL
if now - self. last_plot < PLOT_UPDATE_INTERVAL:
return
self. last_plot = now
for p in range(1 , 5 ):
# If no new value was added recently, duplicate the last value
if self. pwm_plot_data[p]:
last_time, last_val = self. pwm_plot_data[p][- 1 ]
if now - last_time > PLOT_UPDATE_INTERVAL:
self. pwm_plot_data[p]. append((now, last_val))
else :
self. pwm_plot_data[p]. append((now, self. pwm_data[p]))
# Remove old values older than PLOT_X_LIMIT
while (
self. pwm_plot_data[p]
and now - self. pwm_plot_data[p][0 ][0 ] > PLOT_X_LIMIT
):
self. pwm_plot_data[p]. popleft()
x_series, y_series = (
zip(* list(self. pwm_plot_data[p])) if self. pwm_plot_data[p] else ([], [])
)
if x_series and y_series:
dpg. set_value(f "series_pwm { p} " , [x_series, y_series])
dpg. set_axis_limits(f "plot_pwm { p} _x" , x_series[0 ], x_series[- 1 ])
dpg. set_axis_limits(f "plot_pwm { p} _y" , 0 , 2000 )
# MARK: Initialize Variables
def initialize (self) -> None :
"""Initialize internal command structure and default values."""
ports = mw. utils. get_ports()
self. selected_port = ports[0 ] # default
command_app_twelite_initial: dict[str, Any] = {
"destination_logical_id" : 0x78 , # All child devices
"di_to_change" : [True , True , True , True ], # Enable DI1-4
"di_state" : [False , False , False , False ], # Initial state of DIx
"pwm_to_change" : [True , True , True , True ], # Enable AI1-4
"pwm_duty" : [0 , 0 , 0 , 0 ], # Initial state of AIx
}
self. command_app_twelite = mw. serializers. app_twelite. Command(
** command_app_twelite_initial
)
self. pwm_data = {1 : 0 , 2 : 0 , 3 : 0 , 4 : 0 }
self. pwm_plot_data = {1 : deque(), 2 : deque(), 3 : deque(), 4 : deque()}
self. last_plot = 0.0
# MARK: Start
def start (self) -> None :
"""Start TWELITE communication and register listeners."""
# Create a twelite object
self. twelite = mw. Twelite(self. selected_port)
# Use JST for received data
self. twelite. set_timezone(ZoneInfo("Asia/Tokyo" ))
# Register event handler(s)
self. twelite. add_listener(mw. common. PacketType. APP_TWELITE, self. on_app_twelite)
self. update_state(self. State. CONNECTING)
# MARK: loop
def loop (self) -> None :
"""Perform periodic updates while the application is running."""
match self. state:
case self. State. IDLE:
pass
case self. State. CONNECTING:
self. twelite. update()
self. update_plot()
dpg. render_dearpygui_frame()
# MARK: Show
def show (self) -> None :
"""Main execution loop of the application."""
try :
while dpg. is_dearpygui_running():
self. loop()
except KeyboardInterrupt :
pass
finally :
print("Quit..." )
self. close()
# MARK: Lifecycle
def __enter__(self) -> Self:
"""Enter the runtime context related to this object."""
return self
def __exit__(
self,
exc_type: type[BaseException ] | None ,
exc_value: BaseException | None ,
traceback: TracebackType | None ,
) -> bool | None :
"""Exit the runtime context and close the connection."""
self. close()
return None
def __del__(self) -> None :
"""Destructor to ensure resources are cleaned up."""
self. close()
def close (self) -> None :
"""Cleanly shut down TWELITE connection and Dear PyGui context."""
if self. state == self. State. CONNECTING:
self. twelite. close()
dpg. destroy_context()
# MARK: Entry point
if __name__ == "__main__" :
with MainViewport() as viewport:
viewport. show() スクリプトの実行 スクリプトを実行します。
「シリアルポート」のコンボボックスから、使用するポート(COM3, /dev/tty.usb*など)を選択 「シリアル通信」の「接続」ボタンを押して通信を開始 TWELITE DIP の入力を変化させて、「TWELITE DIP 入力」ウィンドウの変化を確認 「TWELITE DIP 出力」ウィンドウのチェックボックスやスライダーを変化させて、TWELITE DIP の出力の変化を確認 「シリアル通信」の「切断」ボタンを押して通信を終了 ウィンドウを閉じる 表示例
正常に通信できていれば、TWELITE DIP の状態をリアルタイムに表示しつつ、TWELITE DIP の出力を任意のタイミングで変更できるはずです。
簡単なグラフィカルUIを備え、TWELITE DIP と通信するアプリケーションを構築できました!
グラフの更新タイミング
PWMxのリアルタイム描画グラフは、過去5秒間の状態を 10ms の間隔で反映します。これはスクリプト冒頭の変数が決めています。
PLOT_UPDATE_INTERVAL = 1.0 / 100 # 100Hz
PLOT_X_LIMIT = 5.0 # 3 seconds スクリプトの解説 Dear PyGui の初期化は initialize_viewport() が行っています。
フォントファイルや、OSのウィンドウ(Viewport と呼ぶ)の大きさはここで登録しています。
def initialize_viewport (self) -> None :
"""Set up Dear PyGui context, fonts, and viewport."""
dpg. create_context()
with dpg. font_registry():
font_path = str(Path(__file__). parent / FONT)
with dpg. font(file= font_path, size= 18 ) as default_font:
dpg. add_font_range_hint(dpg. mvFontRangeHint_Japanese)
dpg. bind_font(default_font)
dpg. create_viewport(
title= "TWELITE STICK" , width= 620 , height= 440 , resizable= True
)
dpg. set_viewport_vsync(False )
dpg. setup_dearpygui()
dpg. show_viewport() OSのウィンドウ内のインタフェースは、create_windows() に定義しています。
画面内の子ウィンドウは dpg.window()
コンポーネントには tag を登録することで、値や属性をプログラムから変更できます(HTMLのid=のようなイメージ)。
def create_windows (self) -> None :
"""Create and configure all Dear PyGui windows and their contents."""
# MARK: Panel Window
with dpg. window(
no_title_bar= True ,
no_close= True ,
no_collapse= True ,
no_move= True ,
no_resize= True ,
pos= (10 , 10 ),
width= 600 ,
height= 100 ,
):
ports = mw. utils. get_ports()
with dpg. group(horizontal= True ):
with dpg. child_window(width= 300 ):
dpg. add_text("シリアルポート" )
dpg. add_combo(
items= ports,
default_value= ports[0 ],
tag= "ports_combo" ,
width= 280 ,
enabled= True ,
callback= self. on_select_port,
)
... また、入力を受け付けるボタンやコンボボックス、スライダーやチェックボックスでは、callback を登録できます。
def on_select_port (self, sender: Any, app_data: str, user_data: Any) -> None :
"""Handle serial port selection from the combo box."""
self. selected_port = app_data ほかのスクリプトと同様に、TWELITE の子機から受信したデータは、イベントハンドラで受け取ることができます。
Nuitkaで実行ファイルをビルドする場合 Nuitka を使って.exeなどの実行ファイルをビルドする場合、メソッドのバインディングをC言語に変換する際にselfが重複し、引数の数を超過してしまう場合があります。このような場合には、クロージャを返すように実装してください。
from typing import Any, Callable
...
def cb_for_select_port (self) -> Callable[[Any, str, Any], None ]:
"""Make a callback for serial port selection from the combo box."""
def callback (sender: Any, app_data: str, user_data: Any) -> None :
self. selected_port = app_data
return callback
...
dpg. add_combo(
...
callback= self. cb_for_select_port(),
) on_app_twelite() では、DOxに反映するデータを tag によって即座に登録し、PWMxに反映するデータはメンバ変数を通じて update_plot() へ渡しています。
def on_app_twelite (self, packet: mw. parsers. app_twelite. ParsedPacket) -> None :
"""Update the GUI based on incoming TWELITE DIP packet data."""
now = perf_counter()
for p in range(1 , 5 ):
# DO
p_state = packet. di_state[p - 1 ]
match p:
case 1 : # RED
color = (255 , 0 , 0 , 255 ) if p_state else (0 , 0 , 0 , 255 )
case 2 : # GREEN
color = (0 , 255 , 0 , 255 ) if p_state else (0 , 0 , 0 , 255 )
case 3 : # YELLOW
color = (255 , 255 , 0 , 255 ) if p_state else (0 , 0 , 0 , 255 )
case 4 : # BLUE
color = (0 , 0 , 255 , 255 ) if p_state else (0 , 0 , 0 , 255 )
dpg. configure_item(f "circle_do { p} " , fill= color)
# PWM
self. pwm_data[p] = packet. ai_voltage[p - 1 ]
self. pwm_plot_data[p]. append((now, self. pwm_data[p])) 「開始」ボタンを押したときは、start() が呼び出されます。
ここで mwings.Twelite
def start (self) -> None :
"""Start TWELITE communication and register listeners."""
# Create a twelite object
self. twelite = mw. Twelite(self. selected_port)
# Use JST for received data
self. twelite. set_timezone(ZoneInfo("Asia/Tokyo" ))
# Register event handler(s)
self. twelite. add_listener(mw. common. PacketType. APP_TWELITE, self. on_app_twelite)
self. update_state(self. State. CONNECTING) Dear PyGui は低レベルな API を使って構築されているため、各フレームの描画をアプリケーションから指示し、描画ループを自前で定義することができます。OS のウィンドウが表示されている間、loop()は無限に呼び出されます。
シリアルポートへ接続したのち、loop() が行う処理は3つあります。
def loop (self) -> None :
"""Perform periodic updates while the application is running."""
match self. state:
case self. State. IDLE:
pass
case self. State. CONNECTING:
self. twelite. update()
self. update_plot()
dpg. render_dearpygui_frame() 画面全体の処理は、show() を呼び出すことで開始されます。
def show (self) -> None :
"""Main execution loop of the application."""
try :
while dpg. is_dearpygui_running():
self. loop()
except KeyboardInterrupt :
pass
finally :
print("Quit..." )
self. close() プログラムは、画面を閉じる dpg.is_dearpygui_running()== False か、Ctrl+Cを入力する KeyboardInterrupt ことで描画ループを抜け、mwings.Twelite や dearpygui のクローズ処理を経て終了します。